If you have a CD or DVD drive on your computer you can use discs as a type of removable storage medium. (There is another tip that discusses creating an audio disc.) These discs provide a great means for storing permanent backups, too. Discs come in many flavors, but you should have either an "-R" (recordable) or "-RW" (rewritable) disc.
To create a disc archive, insert the disc into the drive. Depending upon the type of disc and your AutoPlay settings, the AutoPlay dialog box may appear. (See Figure 1.)
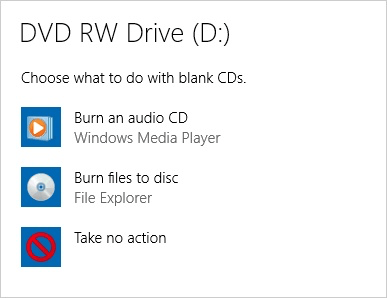
Figure 1. The AutoPlay dialog box.
Note that the letter that Windows assigned to the drive is "D:". This may be different from what you see on your system. If the AutoPlay dialog box does appear, just close it. Now if you open Explorer, you'll see device "D:" as one of your local drives. Since I inserted a blank CD, when I click on that drive I see the Burn a Disc dialog box. (See Figure 2.)
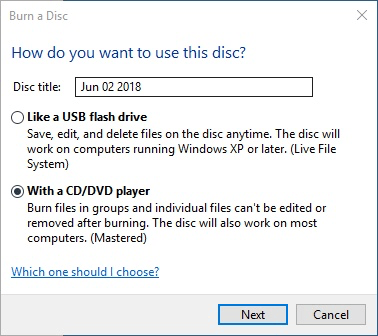
Figure 2. The Burn a Disc dialog box.
Here you give a title to your disc and also indicate how you want to use it. If you want the disc to work like a normal read/write disc that you can move, copy, and delete files on, choose the first option ("Like a USB Flash Drive"). If, instead, you want to create a permanent archive, where you are going to copy an entire collection of files to the disc and then store it somewhere, choose the second option ("With a CD/DVD player"). This tip assumes that you want to create an archive, so type in a title for your disc, ensure the bottom radio button is clicked, and click the Next button.
Now you can copy files to the disc, perform a Windows backup to the disc, etc., as you normally would to a regular disc. As you do this, the files aren't actually copied to the disc. Instead, Windows just keeps track of what you want to end up there until you are ready to create the actual archive. This creation process is referred to as "burning" the disc. When you are ready to create the archive, simply display the contents of the disc in a folder window. (See Figure 3.)
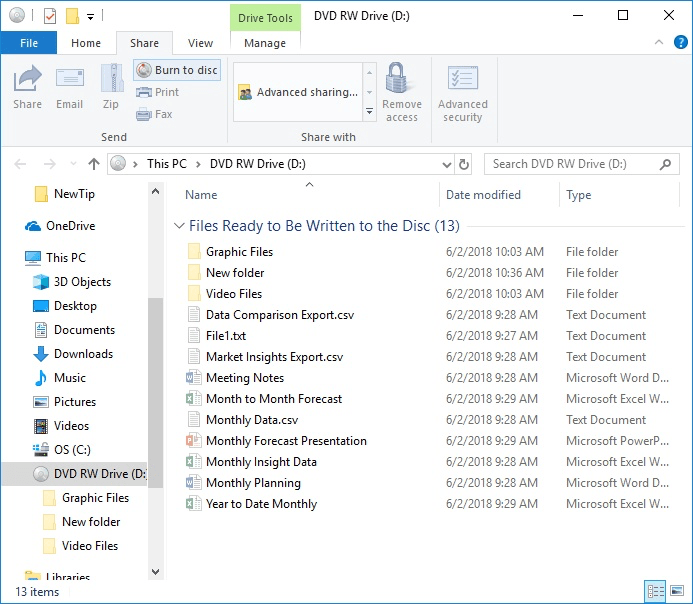
Figure 3. Preparing to burn a disc.
Note that the right side of the window shows you the files that Windows is ready to save on the CD or DVD. Remember; they aren't really stored on the disc yet. To commit them to the disc you need to click the Burn to Disc link near the top of the window. Windows displays the Burn to Disc dialog box. (See Figure 4.)

Figure 4. The Burn to Disc dialog box.
Here you can change the disc's title one last time, set the recording speed (you shouldn't really need to change it), and indicate whether the wizard will be closed once the files have been burned. (If you don't close the wizard after the burn, you'll be asked if you want to burn the files to another disc.) Once you click the Next button the files are physically copied to the disc and it is ejected. If you later want to go back and restore some files or create another collection on the disc, simply insert it and perform the operations as you normally would.
![]()
![]()
![]() This tip (12339) applies to Windows 7, 8, and 10.
This tip (12339) applies to Windows 7, 8, and 10.
If you have an important file that you want to be sure doesn't get accidentally edited, you can set it to read-only. This ...
Discover MoreNeed to know how much disk space is consumed by the small applications (apps) installed on your system? Windows makes it ...
Discover MoreBeing able to restore from a backup is just as important as making the backup in the first place. This tip tells you how ...
Discover More2021-06-14 06:55:43
Tom Van Dam
Some years ago there was quite the controversy regarding the longevity of using burnt CDs/DVDs for archival. The idea was that they wouldn't last a long time (unlike a manufactured music cd, game, etc.). I never saw any problem but was wondering if there have been improvements in the process or whether this was a factual statement. Your input would be appreciated.
Copyright © 2025 Sharon Parq Associates, Inc.

Comments