With Windows 10 Microsoft introduced Task View, which enabled you to organize your applications across virtual desktops. By activating Task View, you were shown all of the open application windows, minimized or open, on your system. You could then switch between applications or windows quickly, or you could create and organize virtual desktops.
With the April 10, 2018, update for Windows 10, Windows added to Task View's capabilites by introducing Timeline. As a part of Task View, Timeline shows you the history of activities you have performed over the last several days. Not only do you see the activities performed on the computer you're using at that moment, you also see the activity from other computers and mobile apps that your signed into with your Microsoft account.
To launch your Timeline, click on the Task View icon on the taskbar. Conversely you can press Win+Tab. Either method results in Windows showing you the Task View screen. (See Figure 1.)
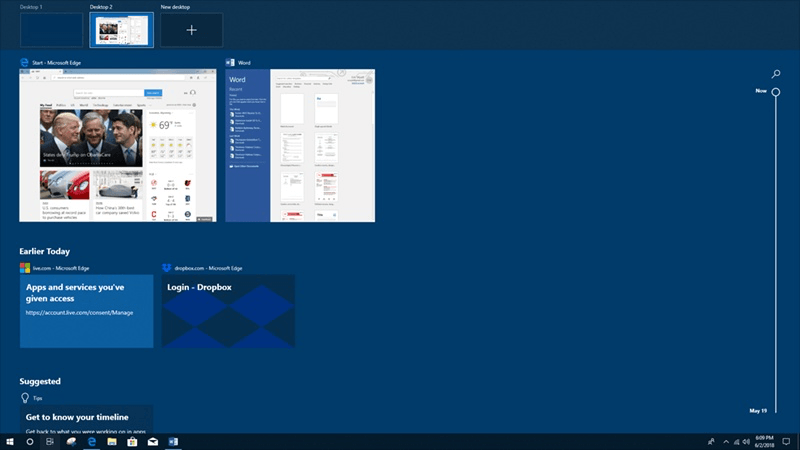
Figure 1. The Task View screen.
If you are used to working with Task View, what you see on the screen should make you feel right at home. At the top is a list of the virtual desktops you have created. Below the virtual desktops is the list of applications you have running in each virtual desktop. As you scroll down you will find items related to activity recently.
On the right side of the screen you will find search capability. By clicking on the search icon, a search bar opens where you can type a keyword related to the activity you're looking for. As you type the results related to the term, your typing appears to the left. Below the search icon you can see a vertical timeline. This allows you to quickly and visually scroll through your activity history.
In an effort to help you out, Windows 10 has activity tracking turned on by default. If you prefer to not have your activities remembered you can disable the tracking by following these simple steps:
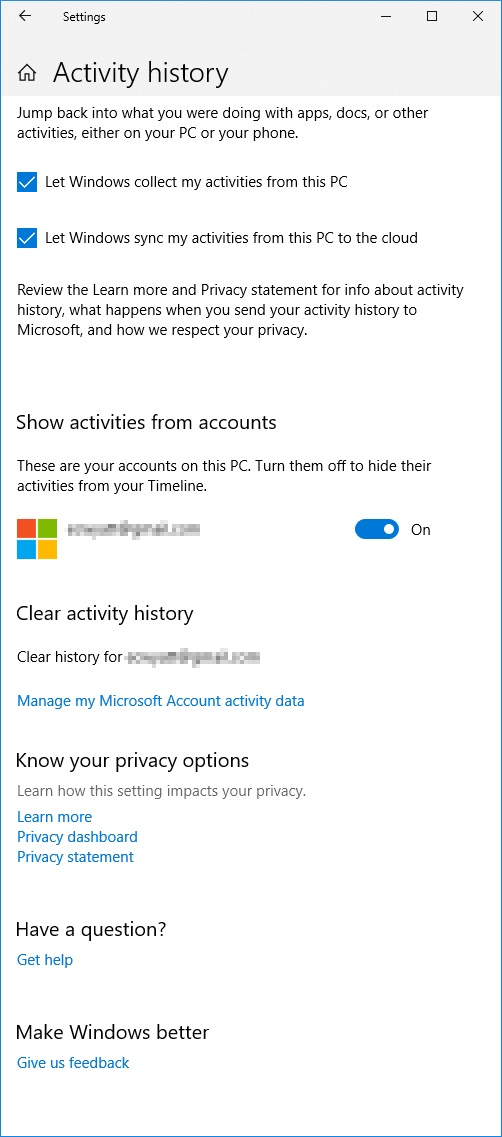
Figure 2. The Activity History screen.
From here you can choose to allow or disallow Windows collecting your activities. You can also choose if you are OK with Windows syncing that through the cloud. You can also see the accounts linked to your computer that Windows would track the activities. You can also go in and clear the activity history for the accounts associated with your PC.
The ability to remember your activities allows you to work with confidence in that you can go back and revisit an activity after a restart, or even after a week has gone by. The added ability to include your activities from other devices can instill a sense of mobile freedom.
![]() This tip (13536) applies to Windows 10.
This tip (13536) applies to Windows 10.
Windows 10 Ease of Access settings offer a wide range of settings that are aimed at helping users of all types use their ...
Discover MoreSometimes when you update a driver, you find that your computer is performing worse than it did before the update. ...
Discover MoreDo you have hearing, vision, or mobility impartments? Windows 10 offers a range of modifications in the Ease of Access ...
Discover MoreThere are currently no comments for this tip. (Be the first to leave your comment—just use the simple form above!)
Copyright © 2026 Sharon Parq Associates, Inc.
Comments