As you may know, your computer can run under a variety of different power schemes. A power scheme is a collection of hardware and system settings that manage how your computer uses power. They are typically used the most with laptops, where it's more crucial to trade off between performance and battery preservation. Even a desktop machine can use them, though. There are three schemes that come with Windows by default. They are Balanced, High Performance, and Power Saver, and you can create others if none of these suits you.
There is a command utility in Windows called Powercfg, which provides a great deal of control over your power schemes. (You can use the GUI for much of this functionality, too, but a lot of people prefer using the command line.) Powercfg takes numerous switches to tell it what you want to do regarding your power schemes. To see all of the switches available to Powercfg, invoke it with the "-HELP" (or "-?") switch.
For this tip we just want to list the power schemes that are in your current environment. The switch to do this is the "-LIST" (or just "-L") switch. Case is ignored, so even though I'll provide the examples in lowercase, you can use uppercase if you prefer. (See Figure 1.)
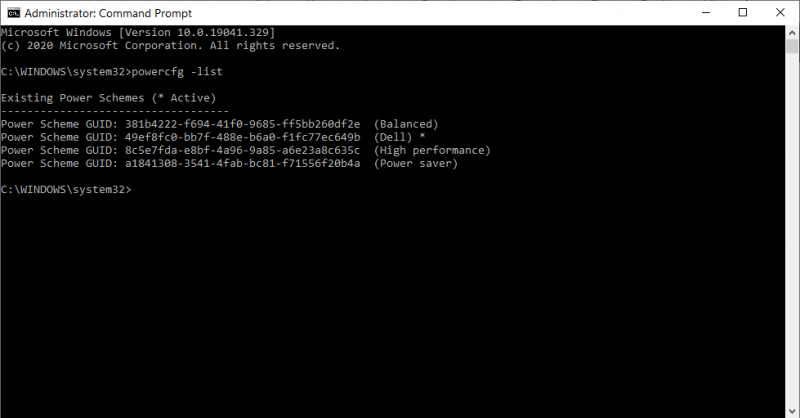
Figure 1. Powercfg -list.
This example shows that I have four power schemes (their names are on the right in parentheses). I have the Balanced (typically the default), High performance, Power saver, and Dell (which has been added to this system) schemes. The asterisk at the end of the "Dell" line denotes that this is the currently active scheme.
Note the GUIDs that are listed with each scheme. These are important to other Powercfg commands.
![]()
![]()
![]() This tip (13470) applies to Windows 7, 8, and 10.
This tip (13470) applies to Windows 7, 8, and 10.
I'm always looking for ways to free up disk space. Even with a 1 TB drive I want to be a "good disk citizen." If you're ...
Discover MoreGot a second monitor or projector you want to use with your Windows system? Here's how easy it is to take advantage of ...
Discover MoreThe Powercfg utility allows you to control how power is used on your system. This tip shows you how to use this ...
Discover MoreThere are currently no comments for this tip. (Be the first to leave your comment—just use the simple form above!)
Copyright © 2026 Sharon Parq Associates, Inc.

Comments