There are many functions in Windows that require you to press multiple keys simultaneously. For example, in many applications pressing Ctrl+F (two keys at the same time) brings up the Find dialog. But if you can only use one finger at a time it's quite difficult to press multiple keys simultaneously.
Sticky Keys lets you press a modifier key (such as Shift, Ctrl, or Alt) and have it "stick" down while you press another key. How you turn Sticky Keys on depends on the version of Windows you are using.
Regardless of the version of Windows you are using, you'll see some options for easier use of the keyboard. Depending on the version of Windows, you may or may not have to scroll down a bit until you see the Press One Key at a Time for Keyboard Shortcuts option. (See Figure 1.)

Figure 1. The Ease of Access Center.
Clicking the checkbox or sliding the control beside " Press One Key at a Time for Keyboard Shortcuts"(depending on the version of Windows, you may also need to click Apply or OK) allows you to press a modifier key, have it "stick" down, and then press a keyboard key in order to simulate the simultaneous pressing of the keys. (Tangentially, if you want to later turn Sticky Keys off, just display this dialog box again and clear the checkbox or again slide the control beside " Press One Key at a Time for Keyboard Shortcuts.")
Once you've turned on Sticky Keys, you may want to configure how it works. If you are using Windows 7 or Windows 8, click the Set Up Sticky Keys link and Windows allows you to make changes. If you are using Windows 10, the settings display automatically when you turn Sticky Keys on. (See Figure 2.)
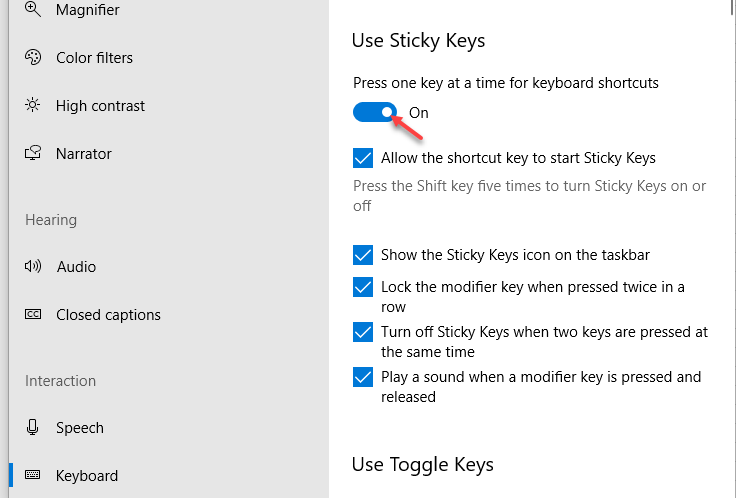
Figure 2. Turning on Sticky Keys.
The configuration options provide several ways for Sticky Keys to work. Check the options you want to use and uncheck those you don't. If you are using Windows 10, the changes take place immediately. If you are using Windows 7 or Windows 8, click Apply or OK to close the dialog box and have the settings take effect.
![]()
![]()
![]() This tip (5648) applies to Windows 7, 8, and 10.
This tip (5648) applies to Windows 7, 8, and 10.
Windows 10 Ease of Access settings offer a wide range of settings that are aimed at helping users of all types use their ...
Discover MoreWith high-resolution screens it can be a stretch, at times, to see some small detail on the Windows desktop. Fortunately, ...
Discover MoreRemembering volume conversions can be tricky. Fortunately, the Windows 10 calculator offers volume conversion capabilities.
Discover MoreThere are currently no comments for this tip. (Be the first to leave your comment—just use the simple form above!)
Copyright © 2026 Sharon Parq Associates, Inc.

Comments