Changing Your Printer Settings

Written by Allen Wyatt (last updated February 11, 2019)

2

Depending on the characteristics and capabilities of your printer, you may be able to customize a variety of settings. For instance, you may be able to control how it prints graphics or handles paper when printing. To customize your printer settings, follow these steps if you are using Windows 8 or Windows 10:

  1. Display the Control Panel.
  2. Click the View Devices and Printers under the Hardware and Sound heading. You may have to scroll down a bit to find the Printers section. (See Figure 1.)
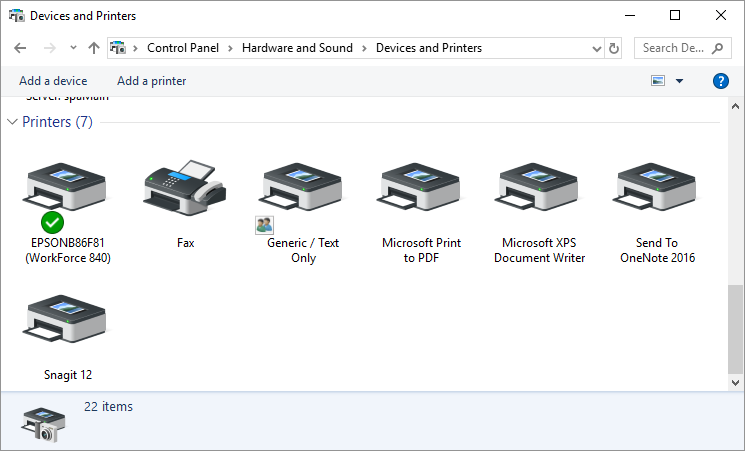
  3. Figure 1. The Devices and Printers screen.

  4. Right-click on the printer whose settings you want to change. Windows displays a context menu.
  5. Choose Printer Properties from the Context menu. (You may see two Properties choices in the Context menu; make sure you choose Printer Properties.) Windows displays the Properties dialog box for the printer. (See Figure 2.)
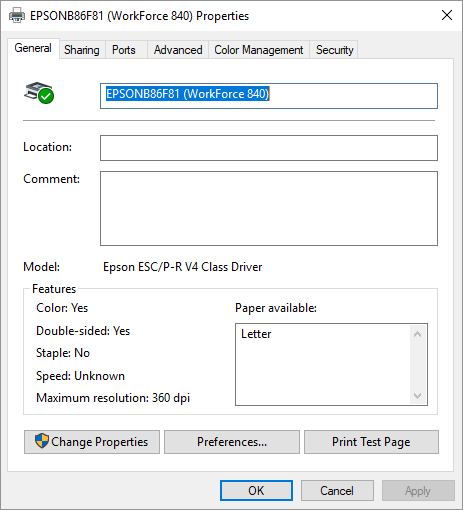
  6. Figure 2. The Properties dialog box for a printer.

  7. Use the tabs and controls within the dialog box to specify the settings you want your printer to use. (The tabs and controls available in the dialog box will vary depending on your printer make and model.)
  8. Close the dialog boxes opened by following these steps.

If you are using Windows 7, the steps are a bit different, primarily in how you get to the printer drivers on the system:

  1. Click Start and then click Devices and Printers. Windows 7 displays the Devices and Printers screen. Note that the current default printer has a green circle next to it that contains a check mark.
  2. Right-click on the printer whose settings you want to change. Windows 7 displays a Context menu.
  3. Choose Printer Properties from the Context menu. (You may see two Properties choices in the Context menu; make sure you choose Printer Properties.) Windows 7 displays the Properties dialog box for the printer.
  4. Use the tabs and controls within the dialog box to specify the settings you want your printer to use. (The tabs and controls available in the dialog box will vary depending on your printer make and model.)
  5. Click OK.

 This tip (10722) applies to Windows 7, 8, and 10.

Author Bio

Allen Wyatt

With more than 50 non-fiction books and numerous magazine articles to his credit, Allen Wyatt is an internationally recognized author. He is president of Sharon Parq Associates, a computer and publishing services company. ...

MORE FROM ALLEN

Setting Bracket Clearance Spacing in the Equation Editor

The Equation Editor provided with Word can be very powerful in how it displays mathematic equations. Here's how you can ...

Discover More

Opening a Backup File

If you have Word configured to save backup copies of your document, you may want to actually load one of those copies at ...

Discover More

Creating Multiple Highlighter Tools

Some people, while developing documents, like to use the Highlighter tool quite a bit. It can quickly get monotonous, ...

Discover More
More WindowsTips

Understanding XPS Documents

XPS Documents have been around for several years and are now making their way into the native Windows environment. They ...

Discover More

Printing a Test Page

Windows includes the ability to print a test page to a printer. This is a good idea when you want to check whether the ...

Discover More

Stopping or Deleting a Print Job

Knowing how to stop or delete a print job can save lots of paper and also lots of embarrassment if you happen to ...

Discover More
Comments

If you would like to add an image to your comment (not an avatar, but an image to help in making the point of your comment), include the characters [{fig}] (all 7 characters, in the sequence shown) in your comment text. You’ll be prompted to upload your image when you submit the comment. Maximum image size is 6Mpixels. Images larger than 600px wide or 1000px tall will be reduced. Up to three images may be included in a comment. All images are subject to review. Commenting privileges may be curtailed if inappropriate images are posted.

What is two minus 1?

2019-02-11 10:48:17

Henry Noble

@CADDcliff
You can create multiple printer definitions for the same physical hardware. Go through the add-a-printer dialog, select to add with manual settings, keep the existing printer driver, then be sure to give the new printer a new name. For example, you might have "Plot-color", "Plot-B&W", and "Plot-color-duplex".
When it comes time to print, you'll need to specify the appropriate printer for the page, or range of pages, to be printed. If the need is frequent and the pattern consistent, you could create a printing macro that goes through the steps for you, then assign the macro to a button on the toolbar.


2019-02-11 09:50:21

CADDcliff

Thanks for this tip. I was wondering if you could explain how to set up multiple copies of the same printer, each with a different set of unique settings. I would like to have a "printer" that would default to color printing of only page 1, and another copy of the same printer that would default to 2-sided printing, and another copy of the same printer that would be my "default" printer with my preferred settings like you described above. Thank you.


Newest Tips