Changing Your Printer Settings

Written by Allen Wyatt (last updated February 11, 2019)

2

Depending on the characteristics and capabilities of your printer, you may be able to customize a variety of settings. For instance, you may be able to control how it prints graphics or handles paper when printing. To customize your printer settings, follow these steps if you are using Windows 8 or Windows 10:
  1. Display the Control Panel.
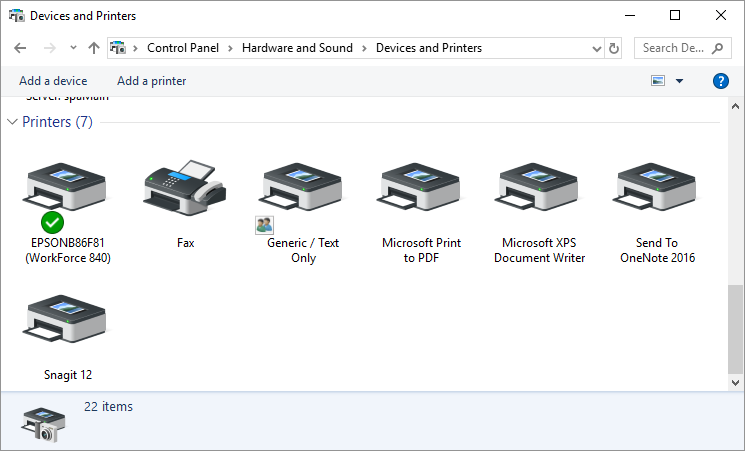
  2. Click the View Devices and Printers under the Hardware and Sound heading. You may have to scroll down a bit to find the Printers section. (See Figure 1.)
  3. Figure 1. The Devices and Printers screen.
  4. Right-click on the printer whose settings you want to change. Windows displays a context menu.
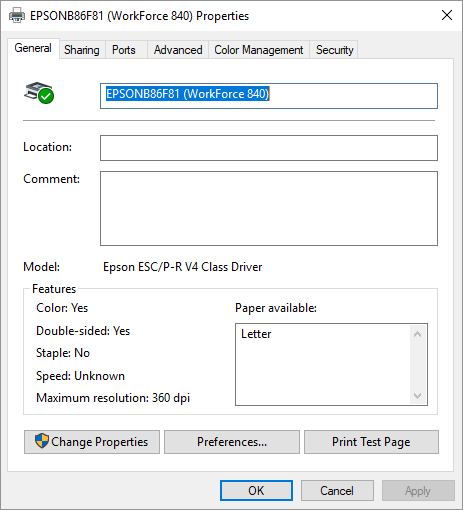
  5. Choose Printer Properties from the Context menu. (You may see two Properties choices in the Context menu; make sure you choose Printer Properties.) Windows displays the Properties dialog box for the printer. (See Figure 2.)
  6. Figure 2. The Properties dialog box for a printer.

  7. Use the tabs and controls within the dialog box to specify the settings you want your printer to use. (The tabs and controls available in the dialog box will vary depending on your printer make and model.)
  8. Close the dialog boxes opened by following these steps.

If you are using Windows 7, the steps are a bit different, primarily in how you get to the printer drivers on the system:

  1. Click Start and then click Devices and Printers. Windows 7 displays the Devices and Printers screen. Note that the current default printer has a green circle next to it that contains a check mark.
  2. Right-click on the printer whose settings you want to change. Windows 7 displays a Context menu.
  3. Choose Printer Properties from the Context menu. (You may see two Properties choices in the Context menu; make sure you choose Printer Properties.) Windows 7 displays the Properties dialog box for the printer.
  4. Use the tabs and controls within the dialog box to specify the settings you want your printer to use. (The tabs and controls available in the dialog box will vary depending on your printer make and model.)
  5. Click OK.

 This tip (10722) applies to Windows 7, 8, and 10.

Author Bio

Allen Wyatt

With more than 50 non-fiction books and numerous magazine articles to his credit, Allen Wyatt is an internationally recognized author. He is president of Sharon Parq Associates, a computer and publishing services company. ...

MORE FROM ALLEN

Changing Headers and Footers

Editing what is in your page header or footer is fairly easy, and you can use the same editing techniques you already ...

Discover More

Generating Random Strings of Characters

If you need to generate a random sequence of characters, of a fixed length, then you'll appreciate the discussion in this ...

Discover More

Missing Page Break Indicator

Enter a page break in Word, and that page break may not appear on the screen as you expect it to appear. This has to do ...

Discover More
More WindowsTips

PDF on Demand

Many times, it helps to have a PDF of a file that can be distributed electronically when physical printouts are not ...

Discover More

Creating a Printer Pool

If you work in an office with many users, your system may have access to a group of printers. Here's how you can set up ...

Discover More

Quick Photo Printing

Windows 10 allows for quick and easy printing of your photos at standard photo sizes. You can start printing your photos ...

Discover More
Comments

If you would like to add an image to your comment (not an avatar, but an image to help in making the point of your comment), include the characters [{fig}] (all 7 characters, in the sequence shown) in your comment text. You’ll be prompted to upload your image when you submit the comment. Maximum image size is 6Mpixels. Images larger than 600px wide or 1000px tall will be reduced. Up to three images may be included in a comment. All images are subject to review. Commenting privileges may be curtailed if inappropriate images are posted.

What is four more than 5?

2019-02-11 10:48:17

Henry Noble

@CADDcliff
You can create multiple printer definitions for the same physical hardware. Go through the add-a-printer dialog, select to add with manual settings, keep the existing printer driver, then be sure to give the new printer a new name. For example, you might have "Plot-color", "Plot-B&W", and "Plot-color-duplex".
When it comes time to print, you'll need to specify the appropriate printer for the page, or range of pages, to be printed. If the need is frequent and the pattern consistent, you could create a printing macro that goes through the steps for you, then assign the macro to a button on the toolbar.


2019-02-11 09:50:21

CADDcliff

Thanks for this tip. I was wondering if you could explain how to set up multiple copies of the same printer, each with a different set of unique settings. I would like to have a "printer" that would default to color printing of only page 1, and another copy of the same printer that would default to 2-sided printing, and another copy of the same printer that would be my "default" printer with my preferred settings like you described above. Thank you.


Newest Tips