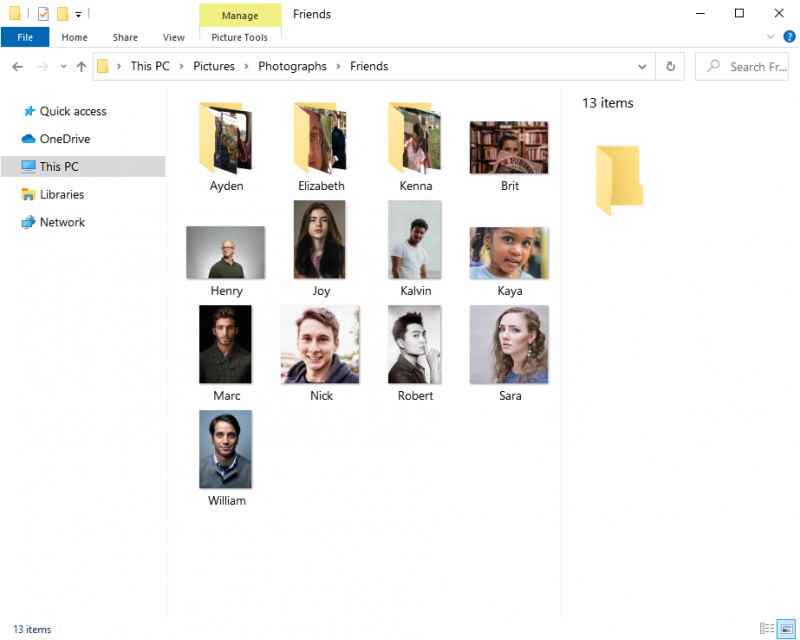
Recently I came into a situation where I needed to print some family photos. Printing the files is simple enough, but these were going to go into a frame. And you know it can be frustrating if you've ever bought photo frames before you know what the specific sizes are. Typical photo prints include, but are not limited to, 2.5"x3.5" (wallet size), 4"x6", 5"x7", and 8"x10". Usually, to print photos at any of these sizes you need to purchase or find a piece of free software. This can become costly or potentially open your system up to possible harmful code. With Windows 10 you don't need to do either, you can print your photos directly from an Explorer window. Let's look at how quickly and easily you can do this:

Figure 1. Explorer Window with pictures needing to be printed.

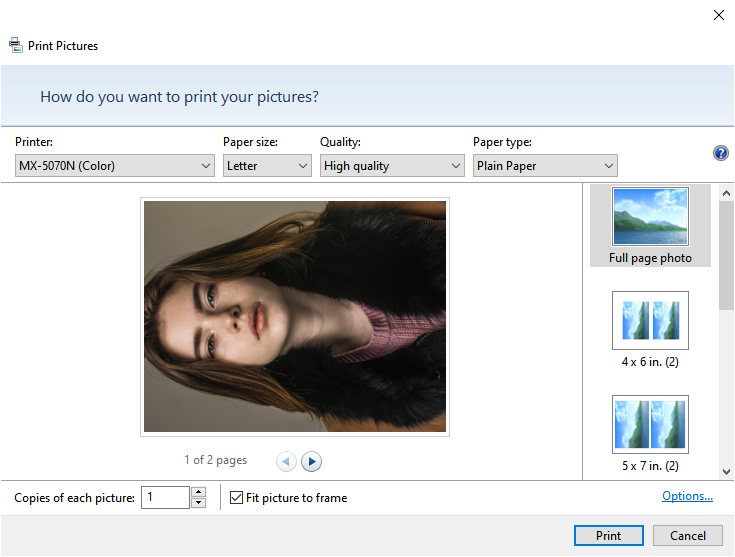
Figure 2. Print Pictures utility with images loaded to be printed.
Once you have the images loaded, you need to specify how you want the pictures printed. The Print Pictures dialog box has several options available. At the top of the dialog box you can specify the Printer, Paper Size, Quality, and Paper Type options. If you have multiple printers connected to your computer, you will need to select the printer that you want to print to. Under the paper size option choose the size of paper that you will be printing on. (This impacts the number of images you can print per sheet.) Quality and Paper Type options will be determined based on your printer. You may be able to change the options to match your desired results.
At the left of the dialog box you can see how the images will be laid out using a "Print Preview" window. You can cycle through the pages that will be printed if it takes more than one sheet. Next to the Print Preview window, you will see the available layout/size options. There are 7 print layouts to choose from: Full Page Photo, 4 x 6 in., 5 x 7 in., 8 x 10 in., 3.5 x 5 in., Wallet, and Contact Sheet. The number of images per page will change depending on the paper size selected. For example, on an 8.5"x11" (letter) piece of paper you can fit two 5"x7", but on an 11"x17" (tabloid) paper you can fit four 5"x7" prints.
Under the Print Preview window, you can specify the number of copies you would like for each photo. You can also choose whether the photo fits the photo frame, though this setting can be a bit misleading. If you check the tick box Windows scales the images to fit the dimensions of the print size selected. This can result in some of the image being cropped off.
If you uncheck the box the image will still be resized, but it will not fill the image frame. Only the height or width will equal the print size selected, meaning that the print may not completely fill a standard frame size.
If there are additional printer settings you need to adjust, you can click on the Options link in the bottom-right corner of the dialog box. If you click on the Options link Windows opens the Print Settings window. From there you can further modify color management or printer properties.
With the printing capabilities provided by the Print Pictures dialog box, you can quickly and effortlessly print the photos you need. The best part is you don't need to install any additional software to print those memories that are important to you.
![]() This tip (13713) applies to Windows 10.
This tip (13713) applies to Windows 10.
Creating an XPS document is as easy as printing a document. This tip explains how.
Discover MoreKnowing how to stop or delete a print job can save lots of paper and also lots of embarrassment if you happen to ...
Discover MoreWindows allows you to define many printers that can be used with your system. Chances are good that one of those printers ...
Discover MoreThere are currently no comments for this tip. (Be the first to leave your comment—just use the simple form above!)
Copyright © 2026 Sharon Parq Associates, Inc.
Comments