Clean Boot Windows 10

Written by Eric Wyatt (last updated December 23, 2019)

1

With our computers making our lives, as some would say, "easier," it's easy to forget that a lot is going on in these small, powerful machines. With each program requiring possible drivers, custom settings, and a whole list of other items, it's a possible recipe for conflict. This conflict can result in our computers running improperly. While your computer's running fine and smooth one day, the next it may seem sluggish or unresponsive. If you're not aware of what caused the change in performance, it may be necessary to look for the culprit(s). For many users, who are familiar with issues affecting their computers, they'll recommend starting in Safe Mode. Sometimes this can help, but if you need more control you will want to start Windows using a "clean boot."

Clean boot allows you more control than you are allotted with starting in Safe Mode. When your computer is restarted with a clean boot, you can control what programs and services are launched or run at startup. This allows you to focus on and isolate the problem and hopefully fix it.

Before we get started with how to perform a clean boot, it is important to know a couple of things. First, you must be logged in as an administrator. This is not usually a problem when you're using your computer. If you're in an environment where you have an admin or IT department, you may need to contact them to have them run a clean boot. The next item to keep in mind is that when you're running a clean boot, your computer may act differently than you are used to; this is normal. Just remember that when you're done you will restart your computer to normal operating mode. This is also not a quick process; remember that you are attempting to isolate any possible conflicts and that can take a bit of time.

How to Perform a Clean Boot

  1. Press the Windows button and type (without quotes) "msconfig", then press Enter. Windows opens the System Configuration app.
  2. Click on the Services tab at the top of the System Configuration app. This displays a list of services currently running on your system. (See Figure 1.)
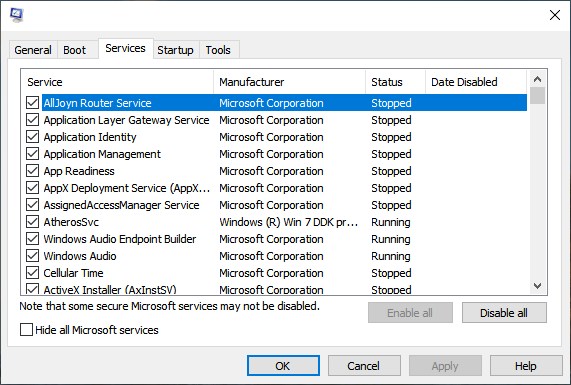
  3. Figure 1. The Services tab of the System Configuration app.

  4. Select the checkbox that says "Hide all Microsoft Services." This modifies the list shown by hiding all the services that are registered as being from Microsoft.
  5. With all the services selected (a checkmark is next to each service), press the button labeled "disable all." All of the services listed will then be unchecked.
  6. Click on the Startup tab at the top of the System Configuration app. (See Figure 2.)
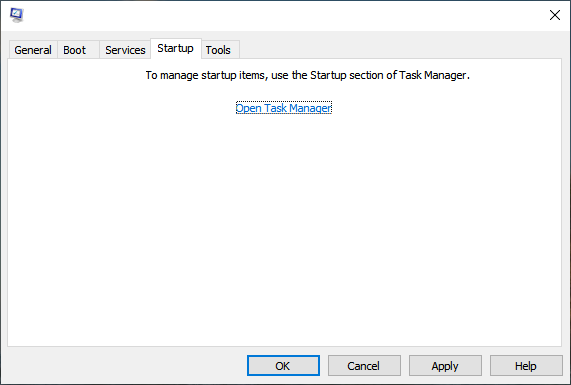
  7. Figure 2. The Startup tab of the System Configuration app.

  8. Click on "Open Task Manager." This opens the Windows Task Manager window.
  9. Select the Startup tab at the top of the Task Manager window. You are shown a list of all the items that start when you start your computer. (See Figure 3.)
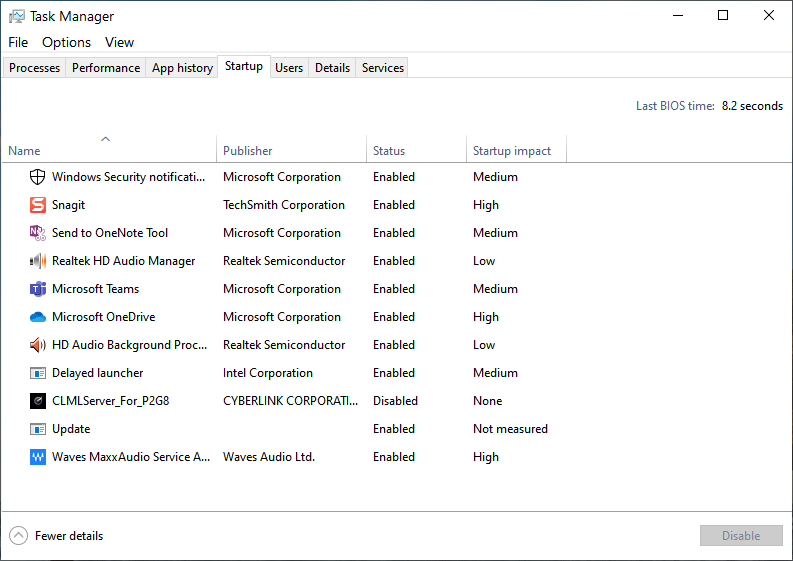
  10. Figure 3. The Startup tab of the Windows 10 Task Manager.

  11. Click on any items you feel might be interfering with your computer and click on Disable. Repeat this step, as needed, for all startup programs that you feel are impacting your computer.
  12. Close the Task Manager window. You should see the System Configuration window, still open to the Startup tab.
  13. Click the OK button. This closes the System Configuration window.
  14. Restart your computer.
  15. When your computer restarts, try to perform the or process that was having issues. If your problem has gone away, you will need to determine which service was causing the issue by systematically turning them on or off and restarting the computer after each change. Doing this can be a long and tedious process; to speed it up you can turn a set of the services on at the same time. To start identifying the issue:

  16. Repeat steps 1 through 3. The services tab will list all of the services on your computer though none will have a checkmark next to them.
  17. Select (click on the checkbox) each service in the top half of the services list. There should be a visible checkbox next to each service.
  18. Click the OK button, again this will close the System Configuration window.
  19. Restart your computer.

When the computer has restarted attempt the problem issue again. If the problem has returned, then one of the services you've turned back on is the problem. You will need to repeat steps 12-16, but this time turn off half of the services you turned on previously. Continue to do this until you have identified the issue. Once you have identified the problem service, you can contact the manufacturer of the program and see about a solution. In the meantime, you can run Windows with the selected service left disabled.

Returning Computer to Normal after a Clean Boot

Once you have completed the search for the problem program during the Clean Boot process, you can reset your computer to normal operation by following these steps:

  1. Press the Windows button and type (without quotes) "msconfig", then press Enter. Windows again opens the System Configuration app.
  2. In the General Tab of the System Configuration app, click on "Normal Setup"
  3. Click on the Services tab at the top of the System Configuration app. This shows a list of services currently running on your system.
  4. Unselect the checkbox that says "Hide all Microsoft Services." This will modify the list shown by unhiding all the services that are registered as being from Microsoft.
  5. Click on Enable All. This turns all the services back on.
  6. Click on the Startup tab at the top of the System Configuration app.
  7. Click on "Open Task Manager." This opens the Windows Task Manager window.
  8. Select the Startup tab at the top of the Task Manager window. You are shown a list of all the possible items that can be started when you start your computer.
  9. Enable all of the startup programs and then press OK.
  10. Select Restart when prompted.

Having gone through the Clean Boot process your computer should be free from any issues that you were facing before. While this process can be time consuming, it helps narrow down a culprit that brings your machine down.

 This tip (13716) applies to Windows 10.

Author Bio

Eric Wyatt

Eric Wyatt is a swell guy (or so his friends tell him). He is a formally trained designer and branding expert, bringing a wide range of skills to his Tips.Net articles. ...

MORE FROM ERIC

Tracking Prevention

Websites have been tracking users' web traffic for a long time, keeping data on website visits and your surfing ...

Discover More

Read Aloud with Magnifier

Sometimes for comprehension it works better to have something read out loud. Have what you are reading read out loud to ...

Discover More

Listing Folder and Directory Content Using Command Prompt

Using Command Prompt to generate file listing the contents of a directory is quick and easy. Here's how to do it.

Discover More
More WindowsTips

Renaming Your Computer

When you buy a new computer, it typically has some obscure name that doesn't accurately reflect your personality. Or ...

Discover More

Downloads and Storage Sense

Storage Sense can free up limited storage space on your computer automatically. Make sure you don't have it delete files ...

Discover More

Adjusting Vison Settings in the Ease of Access Center

If you have vision impairments that affect your ability to use your computer, Windows 10's Ease of Access Center can help ...

Discover More
Comments

If you would like to add an image to your comment (not an avatar, but an image to help in making the point of your comment), include the characters [{fig}] (all 7 characters, in the sequence shown) in your comment text. You’ll be prompted to upload your image when you submit the comment. Maximum image size is 6Mpixels. Images larger than 600px wide or 1000px tall will be reduced. Up to three images may be included in a comment. All images are subject to review. Commenting privileges may be curtailed if inappropriate images are posted.

What is one less than 9?

2021-12-06 15:20:33

Dan A. Peters

Ref. Clean Boot Windows 10 article,
You say, "...You will need to repeat steps 12-16..." yet there is no step 16. I assume you meant to say, "...steps 12-15..."
Sincerely,
Dan A. Peters

PS, Thank you for all you do in supporting everyone that uses Windows!


Newest Tips