Enable or Disable Mouse Hover Window Activation

Written by Eric Wyatt (last updated September 6, 2021)

WindowsTips reader John wrote in asking how to turn off a feature in Windows 10. When this feature is enabled, it does precisely what it is called—Activate a Window By Hovering Over It with the Mouse (a feature you can tell a lot of research went into naming).

All kidding aside, this feature is intended to aid in navigating the operating system by reducing the number of mouse clicks you need to make. It can be helpful if you have carpal tunnel or other ailments, where this feature can be a welcome thing. For others, this feature can be annoying as it might cause a window you don't want to be used to become the active window, thereby interrupting workflow.

Whether you want the feature enabled or disabled, the process you follow to control the feature involves the same steps.

  1. Press the Windows key and type (without quotes) "Control Panel," then press Enter. Windows opens and displays the Control Panel.
  2. Click on "Ease of Access." This opens the Ease of Access window of the Control Panel. You might need to change the "View By" option to either small or large icons to see this link.
  3. Scroll down and click on Change How Your Mouse Works. This opens the Make the Mouse Easier to Use window of the Control Panel.
  4. Check or uncheck the box next to the "Activate a Window By Hovering Over It with the Mouse" option. (See Figure 1.)
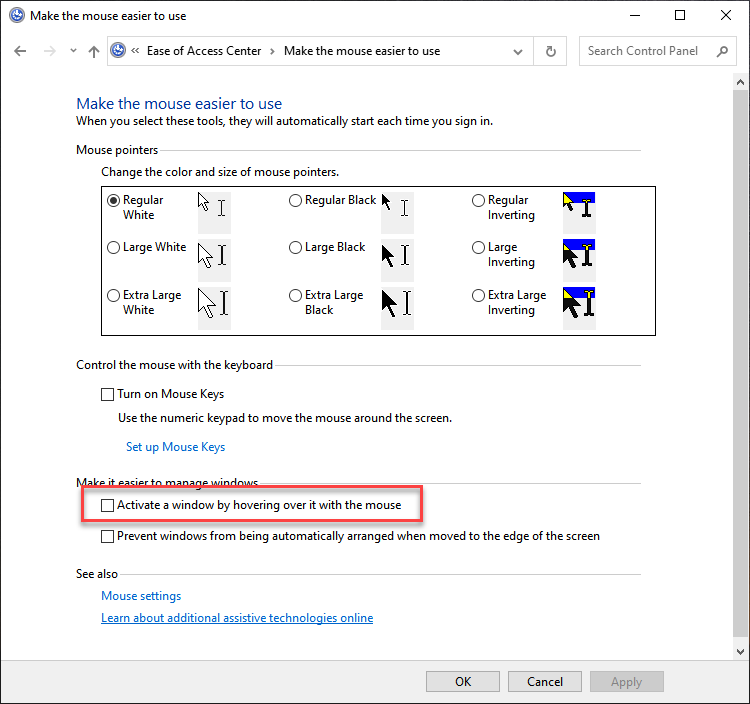
  5. Figure 1. The Activate a Window By Hovering it with the Mouse option in the Control Panel.

  6. Click Apply, then close the Ease of Access window. The option you chose will take effect immediately.

If you enabled this setting, when you move your mouse over a window, that window will become active. If you disabled this setting in step 4, your current window remains active even if you hover over another window.

 This tip (11297) applies to Windows 10.

Author Bio

Eric Wyatt

Eric Wyatt is a swell guy (or so his friends tell him). He is a formally trained designer and branding expert, bringing a wide range of skills to his Tips.Net articles. ...

MORE FROM ERIC

Disabling USB Selective Suspending

USB Selective Suspending allows Windows to automatically (and without warning) suspend USB ports. Discover how to ...

Discover More

Controlling the Taskbar on Multiple Monitors

On Windows computers the Taskbar, by default, runs along the bottom of the screen. Learn how to control how the Taskbar ...

Discover More

Removing Temporary Files

Windows provides a workspace for programs to create temporary files, the Temporary folder. You can remove files from the ...

Discover More
More WindowsTips

Getting Started with the Xbox Game Bar

Xbox Game Bar is more than just for use in the Xbox ecosystem. What settings correlate to using Xbox Game Bar? Read on to ...

Discover More

Look to the Background

Windows 10 has several apps that run in the background that help improve performance and function for your system. Some ...

Discover More

Understanding Optional Features

Windows 10 includes many features that are not enabled by default. Discover how to turn on or off the optional features ...

Discover More
Comments

If you would like to add an image to your comment (not an avatar, but an image to help in making the point of your comment), include the characters [{fig}] (all 7 characters, in the sequence shown) in your comment text. You’ll be prompted to upload your image when you submit the comment. Maximum image size is 6Mpixels. Images larger than 600px wide or 1000px tall will be reduced. Up to three images may be included in a comment. All images are subject to review. Commenting privileges may be curtailed if inappropriate images are posted.

What is seven less than 7?

There are currently no comments for this tip. (Be the first to leave your comment—just use the simple form above!)


Newest Tips