Tommy works in an office where they just added a couple of new employees, so he is in the process of installing a network for the employees to use. He is wondering what types of things can be shared using the network and how they do the sharing.
One of the powerful features of Windows is the ability to utilize resources on networked systems as if they were local to your system. There are two main types of resources that can be shared: printers and file systems. The idea is that you could configure your systems so that everyone doesn't have to have a printer physically attached to their machine, and not all systems need to have an abundance of disk space. Instead, printers can be scattered throughout the organization and shared, and only some systems need to have a large amount of disk capacity so long as it's shared.
Printers
Network printers can be configured as shared devices so that others on the network can use them. If you are using Windows 7 go to Start | Devices and Printers. If you are using Windows 8 or Windows 10, display the Control Panel and click View Devices and Printers (under the Hardware and Sound heading). Windows displays the Devices and Printers dialog box. (See Figure 1.)
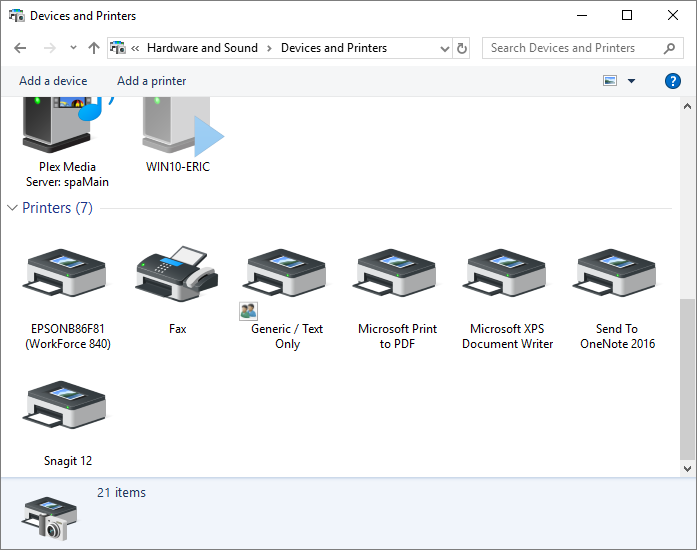
Figure 1. The Devices and Printers dialog box.
Right-click the printer you want to share and select Printer Properties from the Context menu. Windows displays the Properties dialog box for the selected printer. The contents of the dialog box vary depending on the capabilities of your printer. Make sure the Sharing tab is displayed. (See Figure 2.)
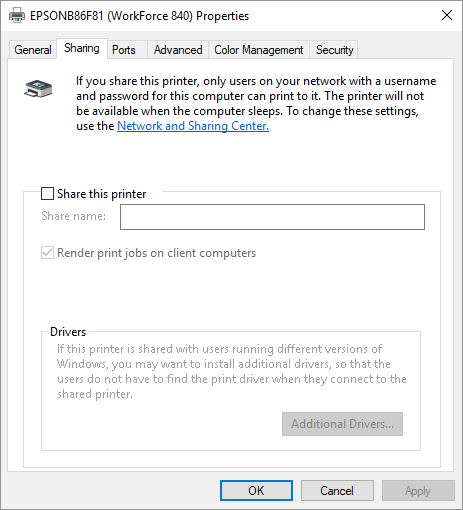
Figure 2. The Sharing tab of the printer's Properties dialog box.
Click the Share this Printer check box and optionally change the Share Name of the printer.
Depending on the configurations of your particular systems you may either check or uncheck the Render Print Jobs on Client Computers check box. If checked, then all the processing required prior to queuing the print job occurs on the client computer. If unchecked, the computer hosting (serving) the printer does the processing for all print jobs sent through it.
When you are done sharing the printer, click OK to close the printer's Properties dialog box. The printer is immediately made available to others on your network. In order to access the shared printer from a different system, go to that system and, if the system is using Windows 7, choose Start | Devices and Printers and click on Add a Printer. If the system is using Windows 8 or Windows 10, display the Control Panel and click View Devices and Printers (under the Hardware and Sound heading) and then click the Add a Printer option, at the top of the dialog box. Windows starts the Add Printer wizard. The Windows 10 system will perform a search for a device or printer to this PC. Click on The Printer I want isn't Listed if our printer isn't found. Windows displays the Find a Printer by Other Options section of the Add Printer wizard. (See Figure 3.)
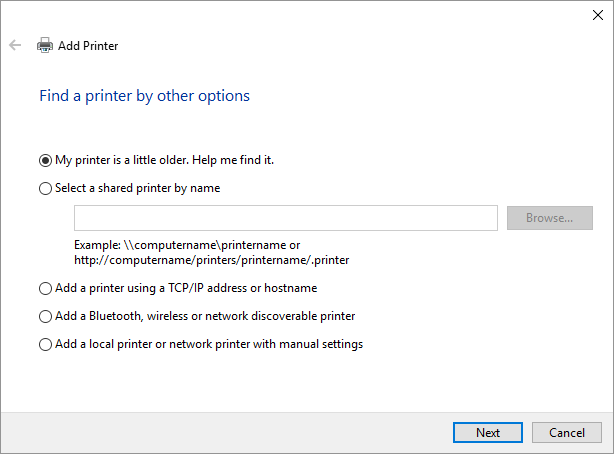
Figure 3. The Add Printer wizard.
Click the second option (Add a Network, Wireless or Bluetooth Printer if you are using Windows 7 or Windows 8) or click the fourth option (Add a Bluetooth, Wireless or Network Discoverable Printer) if you are using Windows 10, and the system immediately starts scanning the network for available printers. After all of the printers have been found, select the printer name that you want to use and click Next. The network printer is added to the computer's list of available printers. Click Finish to finish the process.
File Folders and Disk Drives
File folders and entire disks can also be shared among network-connected systems, and the procedure is similar to that of sharing a printer. Using Windows Explorer, right-click the folder you want to share with others on the network and select Share With | Specific People (Windows 7) or Share | Specific People (Windows 8). Windows then displays the File Sharing dialog box. If you are using Windows 10, display File Explorer and make sure the Share tab of the ribbon is displayed. Then right-click the folder you want to share with others on the network and select Give Access to | Specific People. Windows then displays the Network Access dialog box. (The File Sharing and Network Access dialog boxes are essentially the same.) (See Figure 4.)
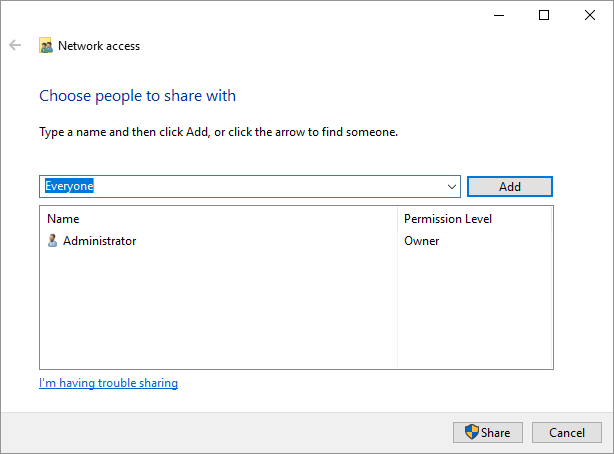
Figure 4. The Network Access dialog box.
The dialog box looks like it does because I clicked the drop-down arrow to the left of the Add button and selected Everyone from the list. When I then clicked the Add button, the group "Everyone" was added to the list of those allowed to access my folder.
When you add a person or a group to those permitted to access your folder, the permission level for your addition is set to "Read." If the group being added is "Everyone," then this allows everyone on the network to read from the shared folder. Clicking the down-arrow beside the Read setting (in the File Sharing dialog box) allows you to change the permission level to something else, such as to allow them to write to the folder. Once you've set the desired permission level, click the Share button to commit your changes.
Sharing an entire disk drive is similar to sharing a folder, but the mechanics are a bit different. Under Windows Explorer, right-click the disk drive you want to share and choose Share With | Advanced Sharing or Share | Advanced Sharing (Windows 8). If you are using Windows 10, display File Explorer, right-click the disk drive you want to share and choose Give Access to | Advanced Sharing. Windows displays the Sharing tab of the disk drive's Properties dialog box, and you should click the Advanced Sharing button within the dialog box. Windows then displays the Advanced Sharing dialog box. (See Figure 5.)
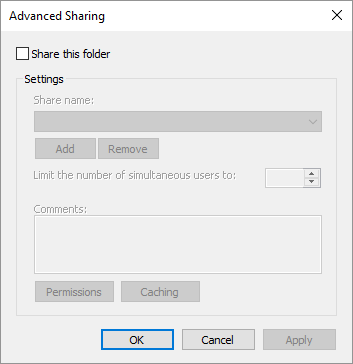
Figure 5. The Advanced Sharing window.
Click the Share this Folder check box (yes, I know it's not really a folder; it's a disk drive). You can then optionally change the Share Name. When ready to share, click OK to finish the process.
![]()
![]()
![]() This tip (12210) applies to Windows 7, 8, and 10.
This tip (12210) applies to Windows 7, 8, and 10.
There are a lot of malicious users on the Internet who are trying to break into other people's systems. One way to ...
Discover MoreDo you work with a lot of open windows at the same time? If so, you'll love this way to easily focus on only one of those ...
Discover MoreBy default in Windows 10, when a folder or file is copied or duplicated within the same folder as the original, the ...
Discover More2018-10-02 07:01:23
Barry
I'm not sure I know what you're asking, Nahoj. If the computer wasn't up and running, then it couldn't initiate the sharing.
2018-10-02 06:59:25
Nahoj
Does the computer initiating the sharing need to be up and running for printer sharing to work?
Copyright © 2026 Sharon Parq Associates, Inc.

Comments