File Explorer's Quick Access view is great for navigating the file system. If there are particular files or folders that you frequent, you can pin them to Quick Access and have them be just a click away.
Pinning an item to Quick Access is very easy. Within File Explorer, navigate to the file or folder that you want to pin, right-click it, and select "Pin to Quick Access" from the Context menu. The item that you pinned doesn't move, but you'll now see it also in the Quick Access section of File Explorer. (See Figure 1.)

Figure 1. Pinning a folder to Quick Access.
And you don't have to settle for the order in which File Explorer keeps your pinned items. You can drag/drop items within the Quick Access section to place them in the order you like by clicking on an item and, while holding down the mouse button, dragging the item to another location in the Quick Access section. When you release the mouse button, the item is repositioned. (See Figure 2.)
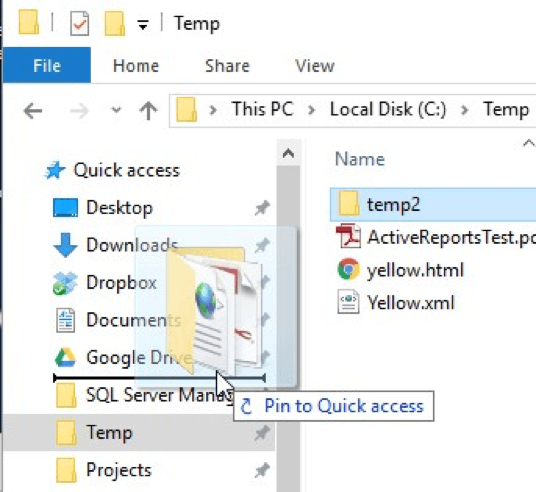
Figure 2. Drag/drop a folder in Quick Access to reorder it.
Finally, if you later wish to remove an item from the Quick Access section, you right-click the item and select "Unpin from Quick Access" from the Context menu. The item still retains its availability in its original location on disk, but its Quick Access entry is removed. (See Figure 3.)

Figure 3. Unpinning an item from Quick Access.
![]() This tip (13452) applies to Windows 10.
This tip (13452) applies to Windows 10.
Many times, the automatically created Thumbs.db file is more trouble than it's worth. If you want to stop Windows from ...
Discover MoreThe Windows page file is crucial to optimal system performance. This tip shows you how to control its size.
Discover MoreIt's simple to use Robocopy when dealing with entire directories. Dealing with directories is what it does best! This top ...
Discover MoreThere are currently no comments for this tip. (Be the first to leave your comment—just use the simple form above!)
Copyright © 2026 Sharon Parq Associates, Inc.

Comments