Changing Time Settings

Written by Allen Wyatt (last updated June 12, 2017)

1

Windows provides a couple of different places in which you can adjust your time settings. The traditional place to make those changes is in the Control Panel. You can access the time settings in the Control Panel in this manner:

  1. Display the Control Panel
  2. Click the Clock, Language, and Region link.
  3. Click the Date and Time link. Windows displays the Date and Time dialog box. (See Figure 1.)
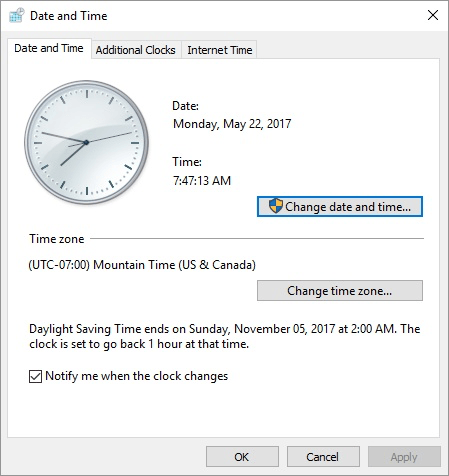
  4. Figure 1. The Date and Time dialog box.

  5. Adjust your time settings, as desired.
  6. Click OK to close the Date and Time dialog box.
  7. Close the Control Panel.

If your time-setting needs aren't as extensive as what are provided by the Control Panel, you can use the PC Settings area. How you use this area (and what is offered in it) depends on the version of Windows you are using.

Using Windows 8

When using Windows 8, there are several ways you can display the PC Settings area:

  • Keyboard. Press Win+I (to display the Settings pane) and then choose the Change PC Settings link. If you prefer, you can press Win+C to display the Charms bar at the right of the screen, choose the Settings option (to display the Settings pane), and then choose the Change PC Settings link.
  • Mouse. Move the mouse to the very upper-right or lower-right corners of the screen. Windows displays the Charms bar, in which you should click the Settings option. Windows then displays the Settings pane where you can finally click the Change PC Settings option.
  • Touch. Swipe in from the right edge of the screen to display the Charms bar. At the bottom of the bar choose Settings to display the Settings pane. Finally, touch the Change PC Settings link.

With the PC Settings area displayed, click General at the left side of the screen. At the top of the resulting screen are a couple of controls that affect your time settings. (See Figure 2.)

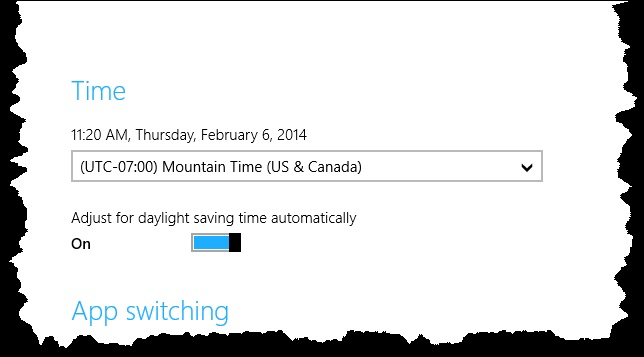
Figure 2. PC Settings allows you to change exactly two time settings.

Windows allows you, within PC Settings, to simply choose a time zone and whether the system should be adjusted automatically for daylight saving time. Any changes you make here are implemented immediately.

Using Windows 10

The easiest way to get to the PC Settings area in Windows 10 is to click the Start menu button, then click the small "gear" icon. Windows displays a Settings dialog box in which you should click Time & Language and, finally, Date & Time. (See Figure 3.)

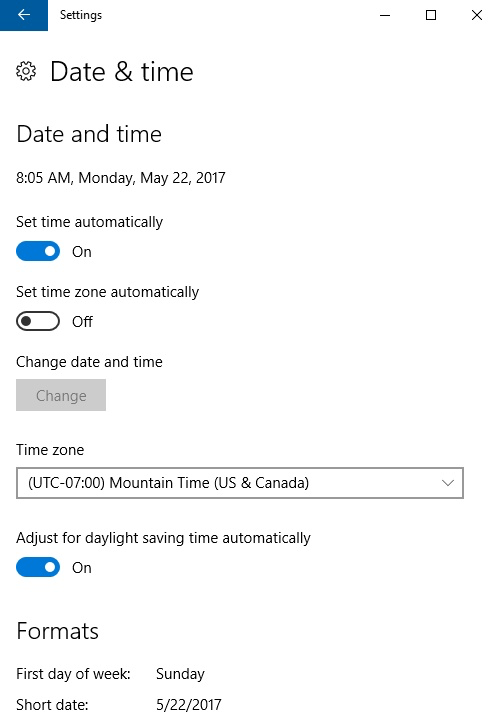
Figure 3. Changing time settings using the PC Settings area.

The PC Settings route allows you to change more time options than what was possible in Windows 8. You can scroll through the Settings dialog box to make any changes desired. When you are done, dismiss the dialog box and your changes are automatically made.

 This tip (12949) applies to Windows 8 and 10.

Author Bio

Allen Wyatt

With more than 50 non-fiction books and numerous magazine articles to his credit, Allen Wyatt is an internationally recognized author. He is president of Sharon Parq Associates, a computer and publishing services company. ...

MORE FROM ALLEN

Specifying Superscript Text

Applying different formatting to the text within a cell can seem a bit confusing. This is certainly the case when it ...

Discover More

Entering Data as Thousands

There are many different ways you may need to enter data in a worksheet. For instance, you might want to enter data in ...

Discover More

Automatic Row Height for Wrapped Text

When you format a cell so that the information within it can wrap to multiple lines, you may be surprised if Excel ...

Discover More
More WindowsTips

Using Command Prompt (CMD) to Change Your Computer Name

Computers have names that are used to identify them. Using Command Prompt (CMD) you can change your computer's name.

Discover More

Disabling Windows Shake

Windows Aero Shake minimizes open windows with a simple gesture. You can disable this feature using the Registry Editor.

Discover More

Syncing Settings between Computers

When you use a Microsoft account or an Azure Active Directory (Azure AD) account, you can sync settings between the ...

Discover More
Comments

If you would like to add an image to your comment (not an avatar, but an image to help in making the point of your comment), include the characters [{fig}] (all 7 characters, in the sequence shown) in your comment text. You’ll be prompted to upload your image when you submit the comment. Maximum image size is 6Mpixels. Images larger than 600px wide or 1000px tall will be reduced. Up to three images may be included in a comment. All images are subject to review. Commenting privileges may be curtailed if inappropriate images are posted.

What is eight more than 8?

2017-06-12 17:34:04

Henry Noble

For one less click in Windows 10:
Double-click the time in the taskbar, then click the link at bottom left for Date and time settings.


Newest Tips