Setting an Account to Automatically Logon

Written by Eric Wyatt (last updated March 8, 2021)

Passwords on our computers have been around for years. They help keep the contents of our computers private and secure from others. This is extremely helpful and a source of security for many. Passwords can be set for account login, file protection, network access, and more. I always encourage the use of a strong password and this is also encouraged by computer security experts around the globe.

Having said that, this week a colleague asked if it was possible to remove the need to enter a password from an account on a shared computer used for testing. This is a rather easy process:

  1. Press Win+R to open the Run dialog box.
  2. Type (without quotes) "netplwiz" and then press Enter. This opens the User Accounts dialog box.
  3. Uncheck the box marked "Users Must Enter a User Name And Password To Use This Computer."
  4. Click Apply in the lower-right corner of the dialog box. This opens the Automatically Sign In dialog box.
  5. Enter the password for the username entered into the User Name field and click OK. This closes the Automatically Sign In dialog box. (See Figure 1.)
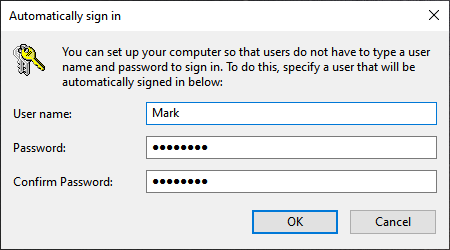
  6. Figure 1. Enter the password and username for the account to be logged in automatically.

  7. Close the User Accounts dialog box.
  8. Your change should take effect immediately, however, I recommend restarting to verify the changes took effect.

It is important to state that removing the need for passwords does bring some inherent security concerns. It is only recommended to do this if you are not concerned about someone gaining access to your system.

 This tip (13832) applies to Windows 10.

Author Bio

Eric Wyatt

Eric Wyatt is a swell guy (or so his friends tell him). He is a formally trained designer and branding expert, bringing a wide range of skills to his Tips.Net articles. ...

MORE FROM ERIC

Favorite Weather Locations and News

Keeping track of the weather for various locations and staying on top of weather news can help you plan for activities ...

Discover More

Keeping Track Of Your Timeline

Sometimes you need to go back and revisit an activity you were doing from a couple of days ago. With the new Timeline ...

Discover More

Setting Time Limits for Windows 10 Users

If your computer is set up in crowded environment, it may be helpful to establish times that an account can be used. You ...

Discover More
More WindowsTips

Five Windows 10 Services that are Safe to Disable

Windows 10 is built using services that perform tasks. In this tip you'll discover five services that you can disable safely.

Discover More

Adjusting Vison Settings in the Ease of Access Center

If you have vision impairments that affect your ability to use your computer, Windows 10's Ease of Access Center can help ...

Discover More

Change the Default Appended Name for New Folders

By default in Windows 10, when a folder or file is copied or duplicated within the same folder as the original, the ...

Discover More
Comments

If you would like to add an image to your comment (not an avatar, but an image to help in making the point of your comment), include the characters [{fig}] (all 7 characters, in the sequence shown) in your comment text. You’ll be prompted to upload your image when you submit the comment. Maximum image size is 6Mpixels. Images larger than 600px wide or 1000px tall will be reduced. Up to three images may be included in a comment. All images are subject to review. Commenting privileges may be curtailed if inappropriate images are posted.

What is two less than 5?

There are currently no comments for this tip. (Be the first to leave your comment—just use the simple form above!)


Newest Tips