Controlling the Size of the Windows Page File
The Windows page file is a system file stored on your disk drive at C:\pagefile.sys. The page file is used to allow virtual memory to work correctly. (Understanding virtual memory is covered under another tip.) This file is typically sized to the amount of physical memory in your computer. So, if you have 16 GB of memory in your system, the size of the page file will also be 16 GB. Windows controls this file, so it is recommended that you leave it alone.
If, for some reason, you want to control the size of the page file yourself, how you start depends on the version of Windows you are using. If you are using Windows 7, click the Start button, right-click Computer, and select Properties. A Control Panel screen appears that displays some information about your system.
If you are using Windows 8 or Windows 10, you display the same screen by displaying the Control Panel, clicking on the System and Security link, and then clicking the System link.
Regardless of the version of Windows you are using, you should now follow these steps:
- At the left side of the screen click Advanced System Settings. Windows displays the System Properties dialog box; the Advanced tab should be displayed. (See Figure 1.)

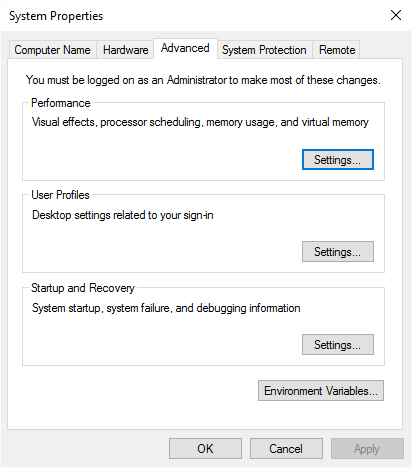
Figure 1. The Advanced tab of the System Properties dialog box.
- In the Performance area of the dialog box, click the Settings button. (This is the first of three Settings buttons in the dialog box.) Windows displays the Performance Options dialog box.
- Make sure the Advanced tab is displayed. (See Figure 2.)

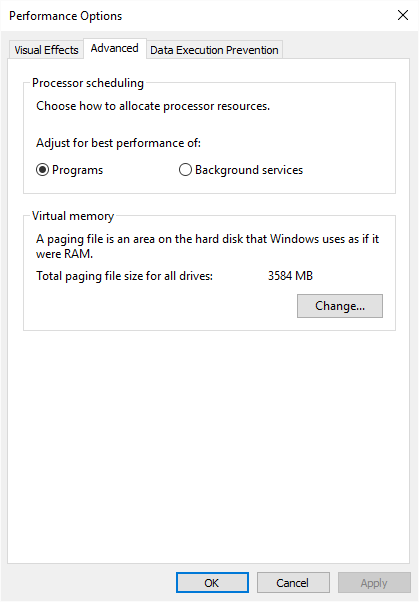
Figure 2. The Advanced tab of the Performance Options dialog box.
- Click the Change button. Windows displays the Virtual Memory dialog box. (See Figure 3.)

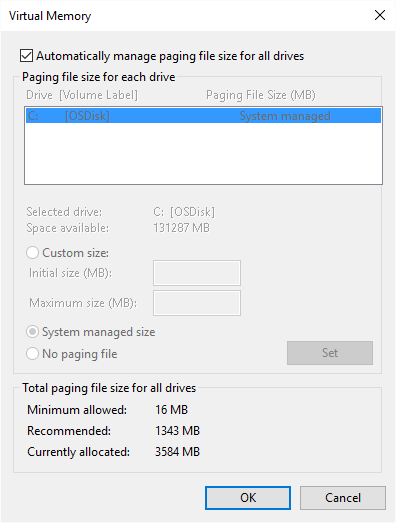
Figure 3. The Virtual memory dialog box.
- Clear the first check box on the dialog box. (The one that specifies Windows automatically managers the paging file size.)
- In the list of drives on your system, select the drive where you want a paging file located.
- Click the Custom Size radio button.
- Specify an Initial Size and Maximum Size setting, in megabytes, for the paging file.
- Click Set.
- Repeat steps 6 through 9 for each drive on which you want a paging file.
- Click OK and close all other open dialog boxes.
- Restart your system.
Author Bio
Barry Dysert
Barry has been a computer professional for over 35 years, working in different positions such as technical team leader, project manager, and software developer. He is currently a software engineer with an emphasis on developing custom applications under Microsoft Windows. When not working with Windows or writing Tips, Barry is an amateur writer. His first non-fiction book is titled "A Chronological Commentary of Revelation." Learn more about Barry...
Working with Compressed Files and Folders via Zip
Windows 10 provides multiple ways to work with compressed files and folders. One great way is to use the Zip utility, ...
Discover More
Removing a Place from the Recent Places or Quick Access Lists
Some Windows features can be both time savers and privacy concerns at the same time. The Recent Places list and the Quick ...
Discover More
Restoring Your System from a Restore Point
Restore Points let you go "back in time" to a point before you made system changes that could prove harmful to your ...
Discover More
Understanding ZIP Folders
Need to move a lot of information to someone else? The answer may be to store that information in a ZIP folder. Here's ...
Discover More
Combining Drives in Storage Spaces
Need to add some addition drive space to your system? Why not consider adding what Windows calls a 'storage space?' This ...
Discover More
Using the DiskPart Utility
The DiskPart utility is a low-level command-line program that lets you manage disks, virtual disks, partitions, and ...
Discover More
Comments