Many times the question comes up, "How do I compress a file or folder in Windows?" While the reason to do so is obvious (to free up disk space), the motivation behind the question is something that you may want to consider. For one thing, disk space is relatively cheap these days. Many new laptops come with a 500GB hard drive, and you can get 1TB drives without spending that much more. And let's not forget about external drives and cloud storage. Add all this to the fact that file compression really may not save you all that much space and that it does increase processing time when accessing a compressed file, and you may begin to wonder if it's really worth compressing files at all.
If you have huge text files sitting around, they will usually compress nicely, but most often the files that are taking up the most amount of space are binary files, and compressing them usually won't save you much space at all. Nevertheless, if you want to compress a file, you can certainly do so—and quite easily.
Assuming you have no third-party compression tools on your system, simply right-click on the file, and choose Send to | Compressed (zipped) folder. This will create a new, compressed file in the same directory and named with a .zip extension. You should then open this .zip file (with Explorer) to verify that it got compressed properly. You can then delete your old, uncompressed file and there you have it—you have saved some space.
When you want to uncompress your .zip file, open it with Explorer and you'll see an "Extract" item in the top menu bar: (See Figure 1.)

Figure 1. Viewing a compressed file.
At the top of the figure you see that the compressed file is named "IMG_0452.zip". Then, by looking in the Explorer pane, you can see your original file, "IMG_0452.JPG". To uncompress your file, click the Extract menu item. When you do, the ribbon will change, and you'll see an Extract All button appear to the right: (See Figure 2.)
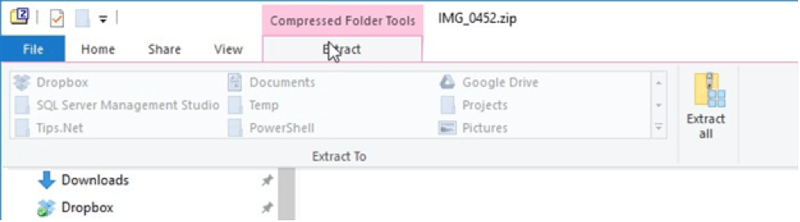
Figure 2. Use Extract All to restore your original file.
When you click Extract All you'll be presented with a dialog box prompting you for the folder where you'd like your file restored. When you enter that information and press OK your original, uncompressed file will be back and you can delete the .zip file.
![]()
![]()
![]() This tip (2672) applies to Windows 7, 8, and 10.
This tip (2672) applies to Windows 7, 8, and 10.
Need to move a lot of information to someone else? The answer may be to store that information in a ZIP folder. Here's ...
Discover MoreWindows provides a workspace for programs to create temporary files, the Temporary folder. You can remove files from the ...
Discover MoreYou may wish to clear your Recently Used Documents list or even have them not remembered in the first place. How you ...
Discover More2017-03-05 06:36:41
Tonya Rose
Very nice explanation! I usually like to use WInZip for file compression because it leaves all the information intact, and that is the first way I learned by following this guide: http://www.winzip.com/learn/file-compression.html but there are also a lot of great file compressors that are free as well :)
2017-01-30 13:33:46
MW
As Scott points out, compressing a file makes it smaller and faster for the recipients to download when it is attached to an email.
But I find the zip feature most useful when I want to export and email an entire folder structure and organization -- including all sub folders and files the way I have set them up -- to the recipients.
'Zipping' the top most folder as Barry describes above accomplishes that task quickly and cleanly.
2017-01-30 13:27:22
Paddytheirishman
I agree with Scott. Compression to a zip file means a simpler way to move multiple files as an attachment. This is my main use. In the old days (1992) I had a notebook computer with a 40 MEGABYTE drive.
I had it compress all my files to give it almost 80 MEGABYTES. We are spoiled with 500 GIGABYTE drives and the like.
2017-01-30 12:49:59
Allan Poe
This won't work on W 97 as shown, as there is no ribbon.
For 97: Rt clk file>Clk Extract all
2017-01-30 12:01:32
Edward Decker
Is it possible to compress an entire folder, including sub-folders and their files, at once?
2017-01-30 11:23:36
Scott Renz
Usually the reason for compressing is to save time uploading or downloading to/from the Internet or because limitations on size of email attachments.
Copyright © 2026 Sharon Parq Associates, Inc.

Comments