Setting Data Usage Limits

Written by Eric Wyatt (last updated July 8, 2019)

Previously, we talked about how to monitor your computer's data usage, and we discussed how you can look at the data usage for your various apps. If you have a metered Internet connection and need to limit the amount of data used, this can be a helpful resource. Along with monitoring your data usage, Windows 10 also allows you to set data limits.

To set data limits for your Windows 10 computer, follow these simple steps:

  1. Press the Windows key and type (without quotes) "Data Usage Overview," then press Enter. This opens the Data Usage tab of the Settings window. (See Figure 1.)
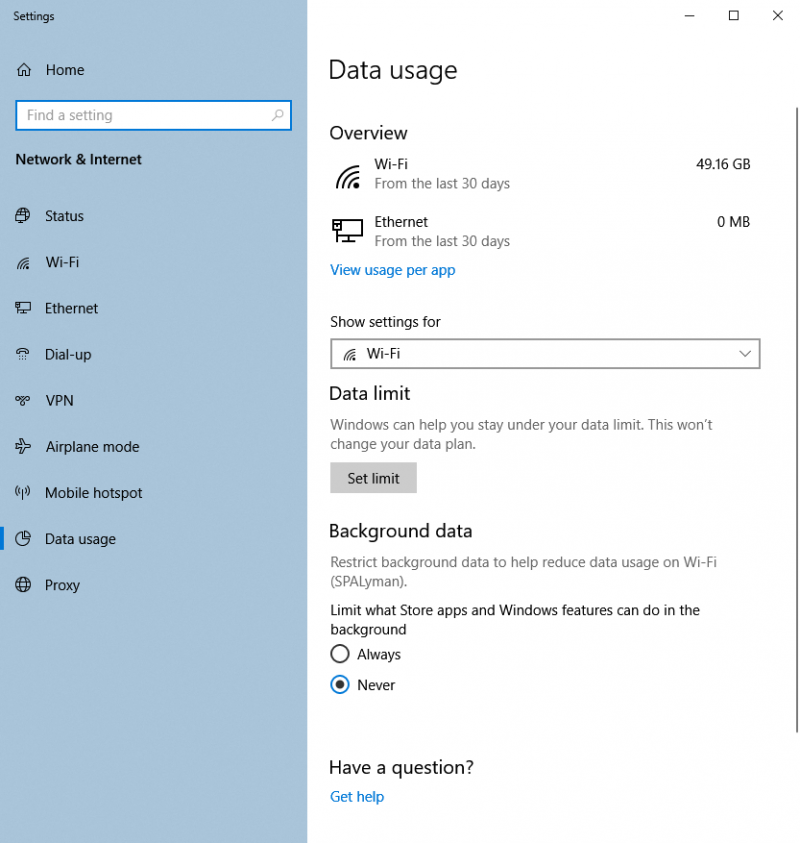
  2. Figure 1. The Data Usage tab of the Settings window.

  3. Click the Set Limits button in the Data Limit section. This will bring up the Set Data Limit pop-up window.
  4. Using the controls provided, set the desired limits you would like to implement for your system.
  5. Click Save. The Set Data Limit pop-up window is closed, and your changes take effect immediately.

If you approach your data limit, Windows lets you know with a notification. (See Figure 2.)

Figure 2. A Data Usage notification.

It is important to note that if you reach your data limit, Windows will warn you, but it will not disable the Internet. (This means you may incur fees from your Internet provider for going over the limit.) Also, it is important to realize that the data usage amounts may vary from your ISP's readings, as they might record data readings differently.

With Data Usage limits and monitoring, you are better able to understand how your computer is using your data. As well, you'll be notified when you've reached the data usage limits which can help keep your data usage in line.

 This tip (1399) applies to Windows 10.

Author Bio

Eric Wyatt

Eric Wyatt is a swell guy (or so his friends tell him). He is a formally trained designer and branding expert, bringing a wide range of skills to his Tips.Net articles. ...

MORE FROM ERIC

Five Windows 10 Services that are Safe to Disable

Windows 10 is built using services that perform tasks. In this tip you'll discover five services that you can disable safely.

Discover More

Read Aloud with Magnifier

Sometimes for comprehension it works better to have something read out loud. Have what you are reading read out loud to ...

Discover More

Introducing Microsoft Garage

Microsoft Garage is a way to test out new innovative programs or features that help developers looking to expand or test ...

Discover More
More WindowsTips

Process Explorer

Process Explorer is a very well built utility that does a lot, from helping you with performance analysis to finding the ...

Discover More

Scanning and Fixing System Files

Is your system running a bit flakey at times? If you think the culprit might be a problem with some of your system files, ...

Discover More

M8 Free Clipboard

If you've ever found it tedious to do copy/paste with one piece of information at a time, you'll really like M8 Free ...

Discover More
Comments

If you would like to add an image to your comment (not an avatar, but an image to help in making the point of your comment), include the characters [{fig}] (all 7 characters, in the sequence shown) in your comment text. You’ll be prompted to upload your image when you submit the comment. Maximum image size is 6Mpixels. Images larger than 600px wide or 1000px tall will be reduced. Up to three images may be included in a comment. All images are subject to review. Commenting privileges may be curtailed if inappropriate images are posted.

What is eight minus 8?

There are currently no comments for this tip. (Be the first to leave your comment—just use the simple form above!)


Newest Tips