Over the years the need to monitor your home Internet data usage has gone away for many people. For others, their Internet data plan requires them to stay under a specific data cap to avoid potentially costly overage fees. A good example of this are cell phones—the data plans people buy for their cell phones typically have a data-cap amount, even if they are labeled as "unlimited."
As you use your computer to connect to the Internet you might need to track your data usage. Fortunately, Windows 10 offers a way to view the data usage for your computer, built in. To start looking at your data usage you simply need to press the Windows key and type (without quotes) "Data Usage Overview," then press Enter. This opens the Data Usage tab of the Settings window. (See Figure 1.)
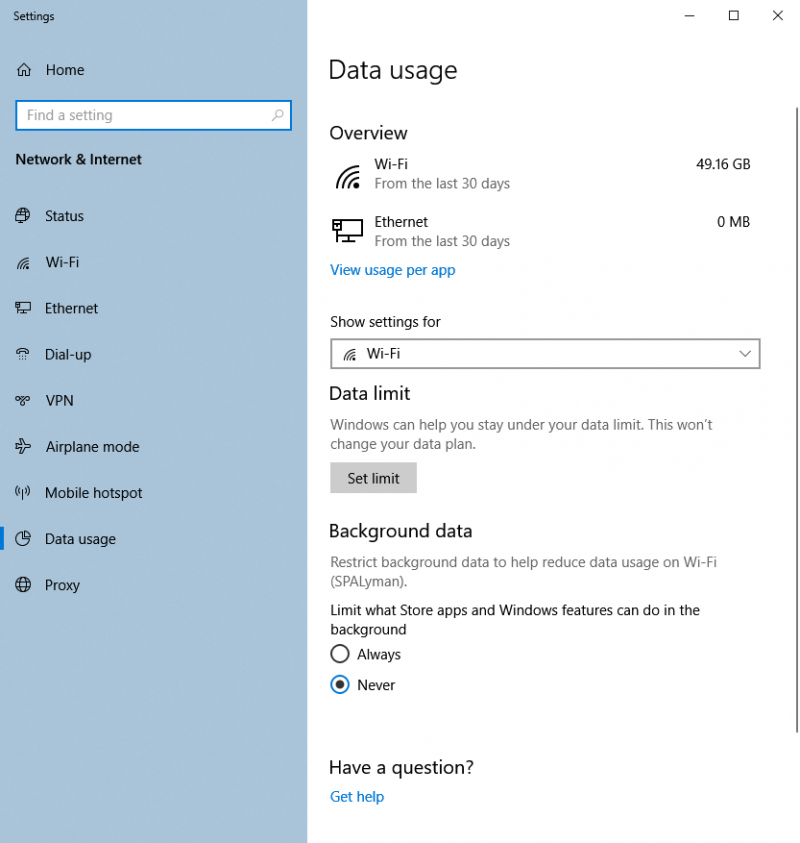
Figure 1. The Data Usage tab of the Settings window.
On the Data Usage tab of the Settings window you can quickly see the wireless network and ethernet connections for your computer. To the right of each connection it displays the amount of data that has been used. In my case, my computer connects through a wireless connection and I can see that over the last 30 days I have used a total of 49.16 GB (Gigabytes). Since I do not connect over ethernet, I show no data has been transmitted.
If, looking at your overview, you are concerned that the amount is high, you can take a slightly closer look by either clicking on the View Usage Per App link or clicking directly on one of the connections listed. This will display the Usage Details window. (See Figure 2.)
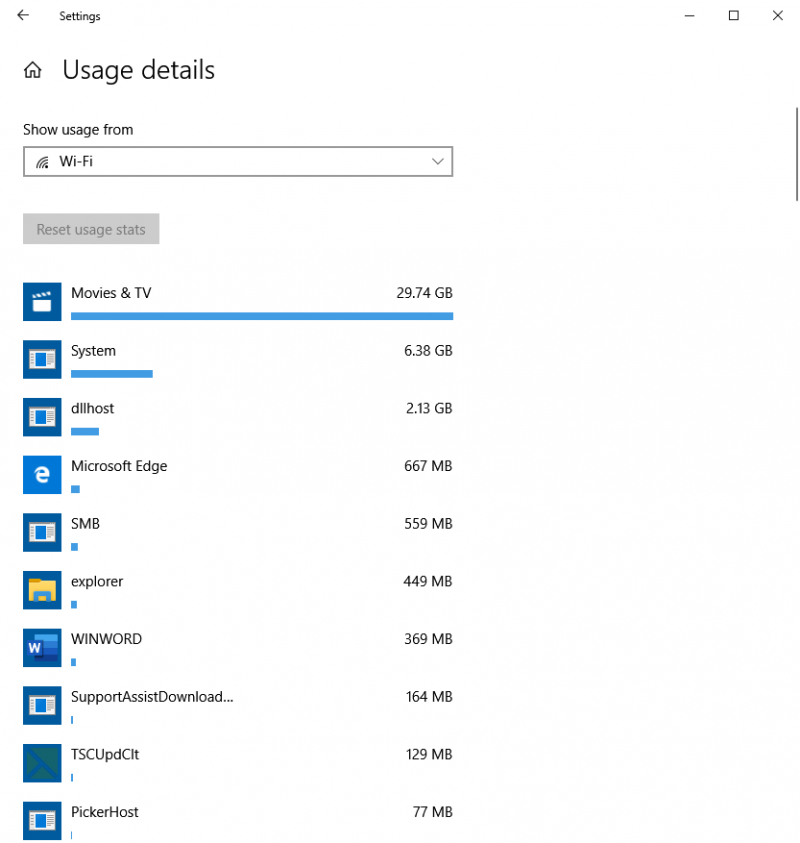
Figure 2. The Usage Details window.
Using my computer as reference again, I can see that, as I had expected, the majority of my data usage has come from Movies & TV, where 29.74 GB of my total 49.16 GB has been used. As you scroll through the Usage Details window you can look and see how your data usage is split between the apps and activities on your computer.
With the ability to easily monitor your computers data usage you can now be sure to know how your data is being used and adjust accordingly if needed.
![]() This tip (13650) applies to Windows 10.
This tip (13650) applies to Windows 10.
Upgrading the memory on your Windows 10 computer can be helpful in improving sluggishness. Determining the number of ...
Discover MoreBy using the alarm capabilities of Windows, you can make sure you never miss another important time again. This tip shows ...
Discover MoreCutePDF Writer is an extremely versatile utility that allows you to create PDF files from virtually any application that ...
Discover More2019-07-01 12:56:09
Miguel
Hi there.
My Windows 10 Home Edition 64 bits showed beautiful desktop images weekly when starting Windows session and before Windows 10 desktop background image was displayed once session was ready to operate. This was very nice until Windows 10 was upgraded to 1903 18362.175 version on last june, because the beautiful images showed while session starts (currently, this is a small town near the pick of a mountain) are now displayed blurred, fuzzy. However, once session is started, Windows 10 desktop background image (I chose shore landscape with some rocks offshore) is shown correctly.
Nowadays, the only way to see clearly which one desktop background image is displayed while starting Windows 10 session, I go to Settings-Personalization-Lock Screen. I have to say 'Show lock screen image when starting session' (or similar wording) option is ON.
So, ¿can you tell me, please, how I can fix blurred, fuzzy images showed when starting Windows 10, so that be displayed colorful as it was previously before Windows 10 last upgrade? I don´t want to uninstall current Windows 10 1903 18362.175 version to come back to previous version.
Thank you very much for attention and help!
Copyright © 2026 Sharon Parq Associates, Inc.
Comments