As you use your computer more and more, you will begin to have hard drive space taken up with temporary files or items in the Recycle Bin. To aid you in freeing up space, Windows 10 introduced a new feature called Storage Sense. Storage Sense is a tool that will help you when your computer is running out of space. The Storage Sense feature is disabled by default but turning it on is simple and can be done quickly. To turn it on follow these steps:
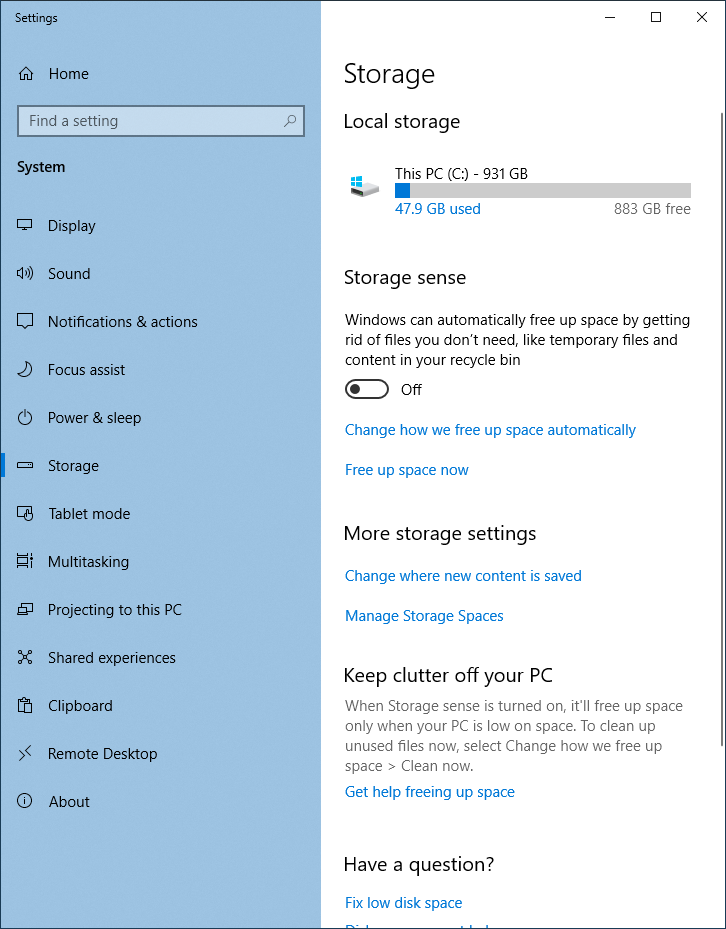
Figure 1. The Storage tab of the Settings window.

Figure 2. Storage Sense toggled to the "On" position.
To modify the settings for Storage Sense, click the Change How We Free Up Space Automatically link under the On/Off toggle. This opens the Change How We Free Up Space Automatically window where you can modify multiple settings that allow you to determine how Storage Sense functions. The Change How We Free Up Space Automatically window is broken up into three main sections—Storage Sense, Temporary Files, and Free Up Space Now. (See Figure 3.)
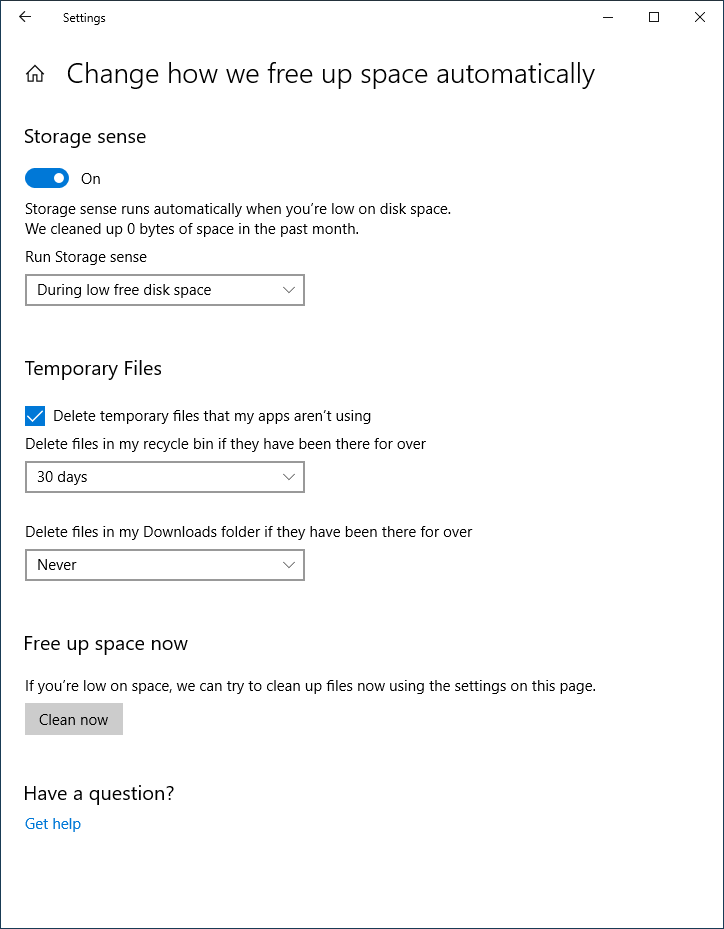
Figure 3. The Change How We Free Up Space Automatically window.
Storage Sense
Under the Storage Sense section, you will see the On/Off toggle. This functions the same as the On/Off toggle discussed above. Next there is a drop-down list that allows you to choose when Storage Sense will automatically run. This drop-down list allows for four options—Every Day, Every Week, Every Month, and the default During Low Free Disk Space.
Temporary Files
The temporary files section allows for three things you can use to configure when Storage Sense deletes certain types of files. The first choice is whether to Delete Temporary Files That My Apps Aren't Using. By checking this option Storage Sense will delete the temporary files that can accumulate over time, and as the option states, are not used by your app. Next is the Delete Files in My Recycle Bin If They Have Been There for Over drop-down list. This allows you to set how to determine which files Storage Sense empties from your Recycle Bin. You have five options in this drop-down list to choose from—Never, 1 Day, 14 Days, 30 Days, or 60 Days. As an example, if you choose 14 Days, a file in your Recycle Bin will be deleted once it has been in the bin for 14 days or longer.
The Delete Files in My Downloads Folder If They Have Been There for Over option is similar to the previous option, only this time it removes files you have downloaded and are stored in your downloads folder. You have five options with this drop-down list, as well—Never, 1 Day, 14 Days, 30 Days, or 60 Days. As an example, if you choose 1 Day, a file in your Downloads folder will be deleted once it has been in there for 1 day or longer.
Free Up Space Now
The Free Up Space Now section provides a way for you to manually run Storage Sense any time you want. When you press the Clean Now button, Windows applies all of the settings you selected in the window when it runs Storage Sense.
With the proper settings, Storage Sense runs in the background and your computer will regain some of the precious space it needs.
![]() This tip (421) applies to Windows 10.
This tip (421) applies to Windows 10.
The Recycle Bin is a great feature that allows you to recover files that you didn't intend to delete. But you may find ...
Discover MoreWhen you delete a file, Windows typically asks you if you are sure you want to make the deletion. You can control this ...
Discover MoreThe place where Windows stores files and other items you intend to delete is called the Recycle Bin. Understanding how to ...
Discover More2019-02-25 07:40:50
Peter
I think there is an error in these instructions.
I use Windows 10 in a corporate environment.
This does not work typing "Storage Settings" as described ends up searching the internet. However, typing "Storage Sense" does work as described.
Copyright © 2026 Sharon Parq Associates, Inc.
Comments