Rolling Back a Driver

Written by Eric Wyatt (last updated August 13, 2018)

There are times where you may discover that after a driver has updated that something isn't working properly. You might run into this type of issue a lot if you are downloading and using pre-release drivers or perhaps the updated driver causes a device to fail. When this happens, you can use Device Manager to roll back the driver to a previously installed version. To do this, follow these simple steps:

  1. Click on the Start button in the bottom-left corner of the screen. Windows displays the Start screen.
  2. Type Device Manager and press Enter. Windows displays the Device Manager.
  3. 3. Double-click the desired device category for the item that you want to roll back. Windows expands that category to show all of the corresponding devices.
  4. Find the device you want to roll back and double-click its name. Windows displays the Properties dialog box for that device.
  5. Click on the Driver tab. (See Figure 1.)
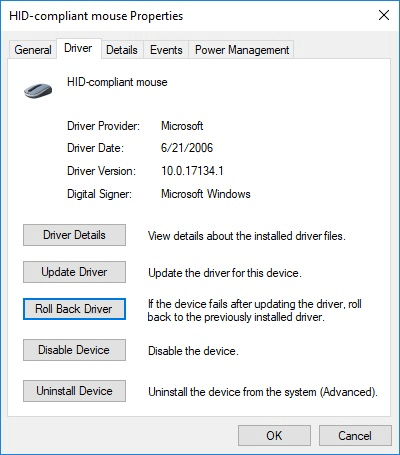
  6. Figure 1. The Driver tab of the Mouse Properties dialog box.

  7. Click on the Roll Back Driver button.

Your computer will either roll back the driver automatically or it will display a confirmation screen asking if you're sure you want to roll back the driver. If you do, click Yes and Windows rolls the driver back to the previous version.

Now you're able to return your device to a previous driver state that you were comfortable with.

 This tip (114) applies to Windows 10.

Author Bio

Eric Wyatt

Eric Wyatt is a swell guy (or so his friends tell him). He is a formally trained designer and branding expert, bringing a wide range of skills to his Tips.Net articles. ...

MORE FROM ERIC

Recording Video with the Xbox Game Bar

You can use Xbox Game Bar to record videos of applications running on your system. Let's see how to capture a video of ...

Discover More

More Power to You

Needing more power options than "god mode" provides? Here are some additional "god modes" that give you more access control.

Discover More

Turn Off/On Window Snap

Windows allows for a system window to "snap" to certain areas of your screen. You can easily turn this feature on or off.

Discover More
More WindowsTips

Adjusting Interaction Settings in the Ease of Access Center

Windows 10's Ease of Access Center allows you to configure your computer to be easier to use if you have certain ...

Discover More

Adjusting Hearing Settings in the Ease of Access Center

If you have hearing difficulties that affect your ability to use your computer, Windows 10's Ease of Access Center can ...

Discover More

Getting Narration through the Ease of Access Center

If you are blind or have a severe vision impairment, the Narrator feature provided in the Ease of Access Center found in ...

Discover More
Comments

If you would like to add an image to your comment (not an avatar, but an image to help in making the point of your comment), include the characters [{fig}] (all 7 characters, in the sequence shown) in your comment text. You’ll be prompted to upload your image when you submit the comment. Maximum image size is 6Mpixels. Images larger than 600px wide or 1000px tall will be reduced. Up to three images may be included in a comment. All images are subject to review. Commenting privileges may be curtailed if inappropriate images are posted.

What is five minus 1?

There are currently no comments for this tip. (Be the first to leave your comment—just use the simple form above!)


Newest Tips