Web cameras, for many people, have become an important tool for their personal or business lives. Whether you are video conferencing with your great aunt or taking part in an international virtual meeting, webcams allow us to "be there" without actually "being there." While webcams allow us to open ourselves up too many wonderful opportunities, they can also lead to some unknown pains or dangers. Windows 10 allows for some basic camera privacy settings that you can use to help protect yourself and we'll cover some additional tips that might help you make sure your camera privacy settings are where you need them to be.
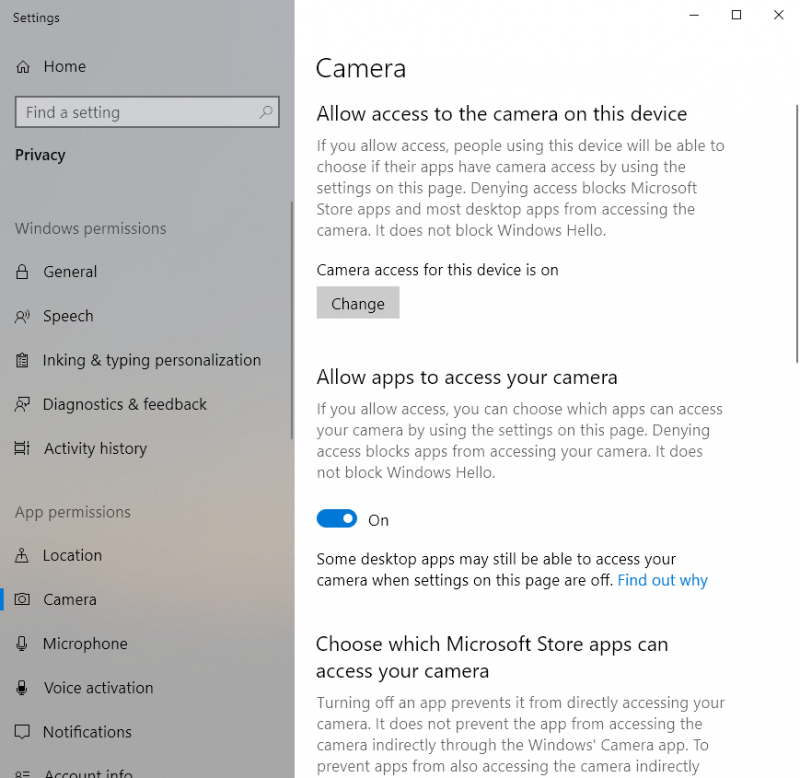
To open Camera Privacy Settings on your computer, press the Windows key and type (without quotes) "Camera Privacy Settings", then press Enter. Windows displays the Camera Privacy Settings section of the Settings dialog box. From here, there are a few sections to look at and adjust to meet the privacy settings you desire for your computer. (See Figure 1.)

Figure 1. The Camera Privacy section of the Settings dialog box.
Allow Access to the Camera on This Device
This allows applications and users on your computer to have access to a camera on your computer. If you turn this off, by clicking the Change button, neither applications nor users will be able to use the camera(s) associated with your computer. If you use face authentication or Windows Hello to log into your computer, you will still be able to do so.
Note: If you do not see this option it is because you are not logged into your computer as an administrator.
Allow Apps to Access Your Computer
This controls whether applications have access to the camera of your computer for you or your account only. This does not affect other users on your computer.
Note: If this option is grayed out, then your administrator has specified that you do not have access.
Choose Which Microsoft Store Apps Can Access Your Camera
This section displays apps that you have installed through the Microsoft Store or which were installed with the OS that might access your camera. Simply click on the toggle next to the app you want to allow access (on) or block (off).
Note: It is important to understand that this will not list all the apps on your computer. Only apps from the App store.
Once you have gone through and specified all the settings you desire you can close the settings dialog box, your changes will take effect immediately.
Added Protection
A very serious concern when it comes to web cameras is someone accessing the camera remotely and turning it on when you are unaware. While most good-quality webcams come with a light or indicator that turns on when the camera is being used, a person with less than wholesome motives can circumvent this. To prevent your camera from showing anything you can add a non-transparent piece of tape over the lens. Personally, I do not like this option as it can leave a residue on the material covering the lens. You can also purchase third party camera covers or use a custom-made cover from household items. If your web camera is external, meaning not built-in, there is also the option to simply unplug the camera.
When you connect a web camera to your computer, just like any other piece of hardware, it is important to know exactly how this piece of technology interacts with not only your computer but also your life.
![]() This tip (13758) applies to Windows 10.
This tip (13758) applies to Windows 10.
You probably don't want to allow someone to continually attempt to login to your system until they finally guess your ...
Discover MoreAll objects on your computer (e.g., disk drives) have permissions that allow or deny various types of access. This tip ...
Discover MoreForgetting your administrator password may be cause for panic because there is no supported way to discover it. Before ...
Discover MoreThere are currently no comments for this tip. (Be the first to leave your comment—just use the simple form above!)
Copyright © 2024 Sharon Parq Associates, Inc.
Comments