Quick Event Creation

Written by Eric Wyatt (last updated November 25, 2019)

Adding calendar events in Windows 10 has been, for the most part, fairly easy. It was done by launching the Calendar app itself either through the standard method of launching an app or by clicking on the plus icon in the notification's popup from the calendar in the Taskbar. With the release of the Windows 10 November 2019 version 1909, however, Windows provides a new, faster way to add calendar events, without needing to launch the Calendar app itself.

Windows has made this quick and easy to use. Follow these steps to start adding calendar events:

  1. On the Taskbar click on the calendar to display the Calendar notification window. (See Figure 1.)
  2. Figure 1. The Calendar notification window.

  3. Under "Today" click in the "Add An Event Or Reminder" box and type the name for your event. As you begin to type, Windows adds additional customizable options under the title of your event or reminder. (See Figure 2.)
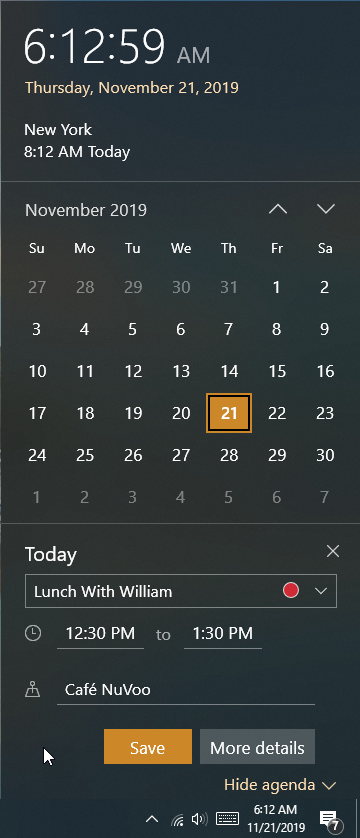
  4. Figure 2. The Add an Event or Reminder options.

  5. Set the start and end times for your event or reminder.
  6. If applicable, set the location for your event or reminder.
  7. Click on the Save button to add the event or reminder to your calendar.

If your event has more information that needs to be added, you can use the More Details button. Windows launches the Calendar app and opens your event with all the information you previously entered. You can then add additional information needed for your event or reminder.

Note: If you open the calendar notification and do not see the "Add An Event Or Reminder" box there may be one of two reasons:

  1. Your computer is not updated to Windows 10 November 2019 version 1909.
  2. The Agenda is hidden in the notification. Click on "Show Agenda" in the bottom right corner of the notification window to display the Agenda and you should see the "Add An Event Or Reminder" box.

Now, as you're working and need to quickly add a calendar event, you can do so without launching an additional app. This saves you time and allows you to get back to other tasks quickly.

 This tip (13705) applies to Windows 10.

Author Bio

Eric Wyatt

Eric Wyatt is a swell guy (or so his friends tell him). He is a formally trained designer and branding expert, bringing a wide range of skills to his Tips.Net articles. ...

MORE FROM ERIC

Disabling USB Selective Suspending

USB Selective Suspending allows Windows to automatically (and without warning) suspend USB ports. Discover how to ...

Discover More

Change the Default Appended Name for New Folders

By default in Windows 10, when a folder or file is copied or duplicated within the same folder as the original, the ...

Discover More

Listing Folder and Directory Content Using Command Prompt

Using Command Prompt to generate file listing the contents of a directory is quick and easy. Here's how to do it.

Discover More
More WindowsTips

Forecast the Weather

Getting a handle on the weather is something that man has been dreaming of since the dawn of time. While you might not be ...

Discover More

Timing With the Stopwatch

Time today is a trackable in many ways. Windows 10 includes the Alarm & Clock app that allows you to manage time in ...

Discover More

Using the Snipping Tool

Being able to capture portions of the screen can come in handy for a wide variety of reasons. The Windows snipping tool ...

Discover More
Comments

If you would like to add an image to your comment (not an avatar, but an image to help in making the point of your comment), include the characters [{fig}] (all 7 characters, in the sequence shown) in your comment text. You’ll be prompted to upload your image when you submit the comment. Maximum image size is 6Mpixels. Images larger than 600px wide or 1000px tall will be reduced. Up to three images may be included in a comment. All images are subject to review. Commenting privileges may be curtailed if inappropriate images are posted.

What is 6 + 5?

There are currently no comments for this tip. (Be the first to leave your comment—just use the simple form above!)


Newest Tips