More Clocks to Track Time

Written by Eric Wyatt (last updated November 4, 2019)

With some types of work, it is important or helpful to keep track of the time in other time zones. Some businesses even put multiple clocks on the wall for various time zones. With the clock in the bottom-right corner of the Taskbar on your computer, you see the date and time. If you hover over the time and date, a small pop-up displays the day, date, and year. (See Figure 1.)

Figure 1. Windows displaying the date over the Taskbar clock.

Wouldn't it be nice when you hover over the time if you could see what the time is in another time zone area without doing the math in your head? Windows 10 allows you to achieve this easily.

Follow these steps to quickly add up to two additional clocks to your Taskbar for quick reference:

  1. Open Control Panel by pressing the Windows key, typing "Control Panel" (without quotes), and pressing Enter.
  2. Click on the View By option in the top-right corner and choose the "Category" option. The Control Panel automatically changes its layout.
  3. Click on "Clock and Region." Windows displays the Clock and Region settings of the Control Panel.
  4. Under Date and Time, click on the "Add Clocks for Different Time Zones" option. Windows opens the Additional Clocks tab of the Date and Time dialog box.
  5. 5. Click on the check box for the first "Show this Clock" group. Select the time zone you wish to display and determine the name you want to be displayed and enter it in the "Enter Display Name" field. If you want to add an additional clock, repeat this step for the extra box below the first one. (See Figure 2.)
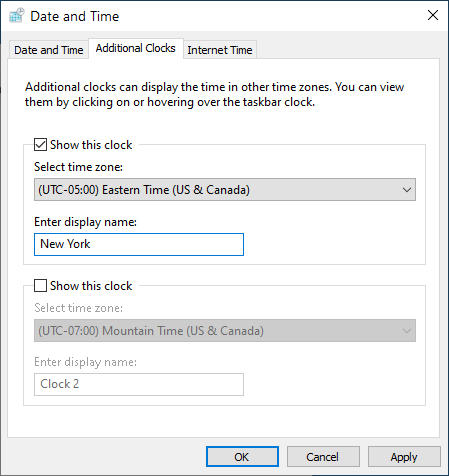
  6. Figure 2. Additional Clocks tab of the Date and Time dialog box.

  7. Close the dialog box. Windows applies your settings automatically.

When you hover over the clock in the Taskbar, Windows displays more information. Instead of just the date it showed before it will now display two (or three, depending on your choice in step 5) additional lines. The first is the Date, followed by the Local Time, and then the clock you added. (See Figure 3.)

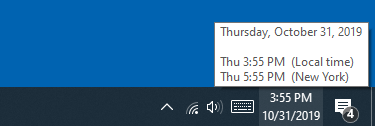
Figure 3. Windows displaying the date and specified time zone clocks over the taskbar clock.

As an additional feature, when you click on the clock in the Taskbar, Windows displays the expanded Date and Calendar pop-up. At the top of the pop-up Windows shows the additional clocks. (See Figure 4.)

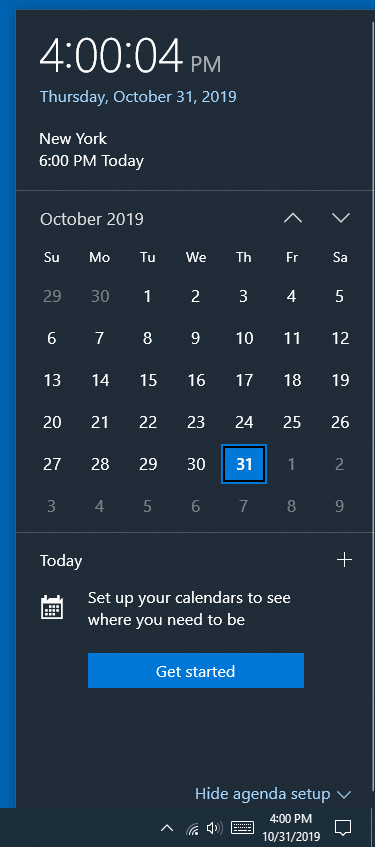
Figure 4. Date and Calendar pop-up displaying the additional time zone clocks.

By enabling additional time zone clocks, you'll be able to keep track of the time zones important to your work or personal life.

 This tip (13696) applies to Windows 10.

Author Bio

Eric Wyatt

Eric Wyatt is a swell guy (or so his friends tell him). He is a formally trained designer and branding expert, bringing a wide range of skills to his Tips.Net articles. ...

MORE FROM ERIC

Commands for Better Dictation

The Dictation feature in Windows 10 Fall Creators Update provides a quick way to enter text without typing. Knowing ...

Discover More

Google Drive

If you have files that you need to access from more than one device, or give access to someone else, Google Drive is a ...

Discover More

Change the Default Appended Name for New Folders

By default in Windows 10, when a folder or file is copied or duplicated within the same folder as the original, the ...

Discover More
More WindowsTips

Specifying a Time Server for Windows to Use

Windows can utilize resources on the Internet to make sure that your computer's internal clock is working at the right ...

Discover More

Displaying a Calendar

Want to know what today is? How about the date for next Thursday or the second Friday in October? Windows can display a ...

Discover More

Deleting Additional Clocks

Windows can display up to three separate clocks so you can keep track of what time it is in various time zones. If you ...

Discover More
Comments

If you would like to add an image to your comment (not an avatar, but an image to help in making the point of your comment), include the characters [{fig}] (all 7 characters, in the sequence shown) in your comment text. You’ll be prompted to upload your image when you submit the comment. Maximum image size is 6Mpixels. Images larger than 600px wide or 1000px tall will be reduced. Up to three images may be included in a comment. All images are subject to review. Commenting privileges may be curtailed if inappropriate images are posted.

What is 1 + 1?

There are currently no comments for this tip. (Be the first to leave your comment—just use the simple form above!)


Newest Tips