Modifying How Windows Notifies You of Impending Changes
Part of the security features built-in to Windows includes displaying notifications whenever something is about to change on your system. By default, Windows displays a notification if a program installed on your system is about to make a change, but doesn't notify you if you are making a change manually. On most systems these notifications pop up if you download and run a program from the Internet or if you have a program that manages automatic updates to software on your system.
Windows provides a minimal amount of control for when you receive notifications. You can't control notifications on a program-by-program basis, but you specify which general types of notifications you want to receive. Here's how you do it:
- Display the Control Panel.
- Click on the User Accounts and Family Safety link (Windows 7 and Windows 8) or the User Accounts link (Windows 10). Windows displays the User Accounts page.
- Click the User Accounts link. (Same wording as step 2, but a different link entirely.)
- Click the Change User Account Control Settings link. Windows displays the User Account Control Settings dialog box. (See Figure 1.)
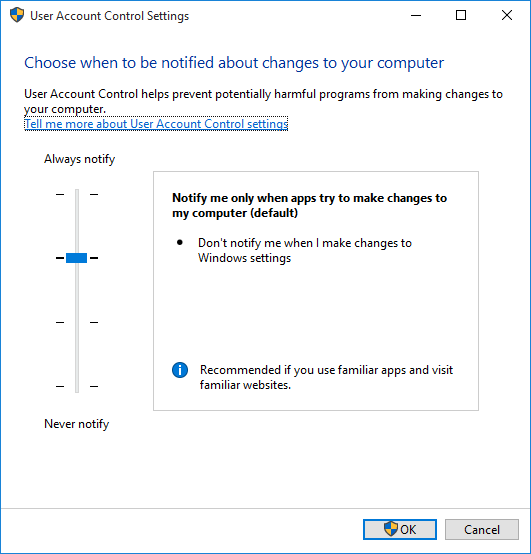
Figure 1. The User Account Control Settings dialog box.
To modify the times when Windows notifies you that changes are about to be made to your system, use the slider control. The four possible settings are as follows, from top to bottom:
- Always Notify Me. This setting is the most bothersome, as it "locks down" our system and notifies you whenever any change at all is about to happen. (It is bothersome because you'll get a notification every time you try to modify any Windows settings yourself.)
- Notify Me Only When Programs Try to Make Changes to My Computer. This is the default setting, and it is appropriate for most people.
- Notify Me Only When Programs Try to Make Changes to My Computer (Do Not Dim My Desktop). This setting is functionally equivalent to the previous setting. The only difference is that it stops Windows from subduing your desktop when a notification dialog box appears.
- Never Notify Me. This setting essentially turns off User Account Control notifications and allows unfettered access to your system by any programs you might install on your system.
After you've adjusted the slider to reflect your desired notification level, click the OK button to make the change permanent.
Author Bio
Allen Wyatt
With more than 50 non-fiction books and numerous magazine articles to his credit, Allen Wyatt is an internationally recognized author. He is president of Sharon Parq Associates, a computer and publishing services company. Learn more about Allen...
Using AutoComplete with Disjointed Lists
AutoComplete can help you to more quickly enter information in a worksheet. How it works, behind the scenes, can affect ...
Discover More
Using Seek In a Macro
When reading information from a text file, your macro may need to start reading at a place other than the beginning of ...
Discover More
Setting User Information
Need to change the information that Word stores about you? Here's how to find the info.
Discover More
Easily Running a Program as the Administrator
In order to run some programs properly in the Windows environment, you'll need to do so using administrator privileges. ...
Discover More
Understanding Action Center
Action Center provides you with a quick overview of security and maintenance issues and allows you to drill down to the ...
Discover More
Ransomware Defense
Ransomware attacks can cause your system and data to become inaccessible. These dangerous and potentially costly attacks ...
Discover More
Comments