USB drives are a boon to those using computers because they are portable, reliable, fairly fast, and have a good deal of capacity. USB drives are well suited for transferring large amounts of data between computers that aren't connected by a fast network.
When selecting a USB drive for use with your system, you'll always get the best performance if you match the "generation" of the USB drive to what is supported by your system. In other words, if your system has USB 2 or USB 3 connectors on it, then you will get the best performance by using a USB 2 or USB 3 drive. You can use older generations of drives with newer generations of connectors, but the transfer speeds will only go to whatever speed is the slowest between your system and drive. (For example, a USB 2 drive won't perform at USB 3 speeds even if your system is capable of USB 3 support.)
One thing to be aware of when using USB drives is that if AutoPlay is turned on, the disk will be searched every time it's plugged in. When you plug in a drive, you'll see the AutoPlay dialog box appear. (See Figure 1.)
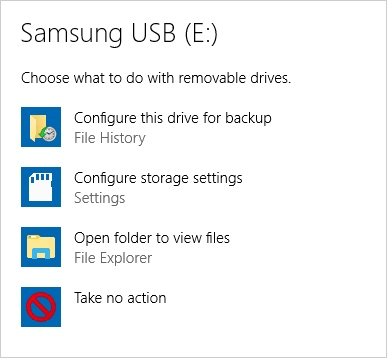
Figure 1. The AutoPlay dialog box.
Don't be fooled into thinking that you must wait until the search is finished before you can use the device. Instead, simply click the Open Folder to View Files option near the bottom, and you'll immediately see an Explorer window appear for your USB drive. You can then navigate the drive just as you would any other disk drive.
Another unnecessary cause that may concern you is that occasionally nothing happens when you plug in a USB drive. When this happens, it's usually because the USB connectors need to be reseated. Simply remove the USB drive from the USB port and plug it back in. You should then see your drive appear.
Finally, it's recommended that you always safely remove the USB drive instead of simply pulling it out of the USB port. You safely remove a device by clicking the Safely Remove icon in your system tray. It looks like a USB cable with a check mark next to it. (See Figure 2.)
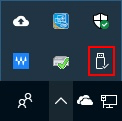
Figure 2. The Safely Remove icon.
Once you click the Safely Remove icon, Windows shows you the USB devices it detects on your system. Click the name of the device you want to remove and Windows will shortly let you know if it is OK to remove it. Once you're notified, you are free to unplug it.![]()
![]()
![]() This tip (12371) applies to Windows 7, 8, and 10.
This tip (12371) applies to Windows 7, 8, and 10.
If you want granular control over all the devices on your system, getting familiar with the device manager is time well ...
Discover MoreIt is not unusual for you to work with several (and sometimes many) programs at the same time. Each program is displayed ...
Discover MoreComputers can address far more locations than may exist in physical memory. The key to this feature is the use of virtual ...
Discover More2021-04-26 14:47:37
MW
According to MS' website, the Windows 10 v1809 update included an automatic setting called "Quick Removal" that allows you to pull out your USB devices without first 'ejecting' them, but you also can change that setting back to the old version:
https://docs.microsoft.com/en-US/windows/client-management/change-default-removal-policy-external-storage-media
Nonetheless I still always eject my USB devices before unplugging them (if you are using File Manager to navigate in the USB, right click on the USB root and select "eject.")
But if like me you have a bunch of different USB devices usually plugged in, it can be confusing finding which one you want to eject when you are viewing a folder tree in File Manager.
So using File Manager I always rename each new USB stick with letters, e.g., AA, BB, CC, etc., and also hand write the corresponding letters on the outside of the stick.
That makes it much easier to find and correctly identify which USB stick you want to remove/eject before you pull it out.
2021-04-26 12:16:52
Bill
The Safely Remove function still exists on my Windows 10 recent upgrade, but when I click it, not much happens. Specifically the "OK to Remove" message never appears. I have gotten to the point where I simply wait 5 seconds or so, and then yank the drive. That's kind of uncomfortable. A Google search shows that many people experience this issue, but so far there seems to be no answer. If you could contribute toward a fix, it would be much appreciated.
Bill
Copyright © 2026 Sharon Parq Associates, Inc.

Comments