The Task Manager is a handy utility that gives you a bird's-eye view of what's going on with your system. It runs at a higher priority than normal applications, and it has sufficient privilege to view and control the system's running processes. You can invoke the Task Manager by using one of these methods:
Regardless of how you start the program, the Windows Task Manager dialog box appears. The Task Manager dialog box looks slightly different depending on your version of Windows. (See Figure 1.)
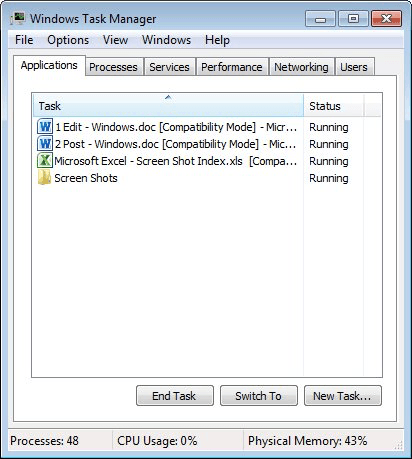
Figure 1. The Windows 7 Task Manager dialog box.
At the outset, you can see by looking at the bottom of the dialog box that there are currently 48 processes running, that they're using 0% of the CPU, and that they're consuming 43% of physical memory. When Task Manager is invoked, it starts on the tab it was on when it was previously closed. In this case, we see the Applications tab, which shows the titles of the currently opened windows. There is much more going on, though, than these open windows. To get a better look, in Windows 7 click the Processes tab, in Windows 10 click the More Details link at the bottom of the Task Manager dialog box: (See Figure 2.) (See Figure 3.)
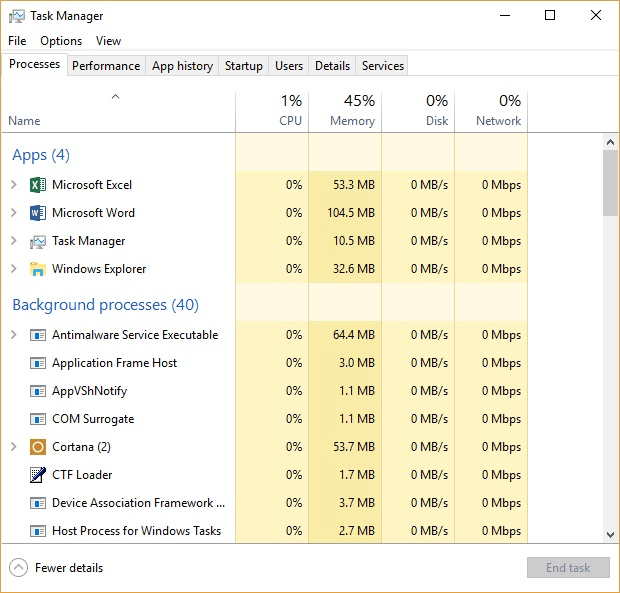
Figure 3. Windows 10 Task Manager's Processes tab.
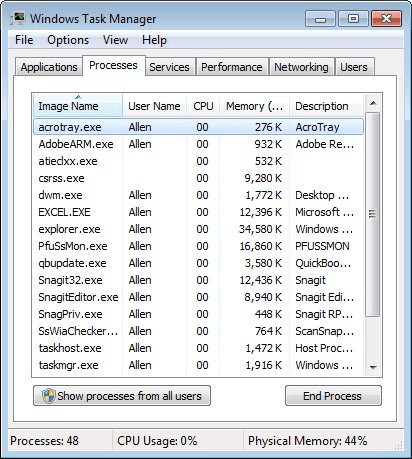
Figure 2. Windows 7 Task Manager's Processes tab.
You have to scroll horizontally to see them, but there are dozens of available columns of information. The above figures show each process's Name, Status, CPU, Memory, and more. (The exact wording for the columns will vary depending on your version of Windows.) You can choose which columns to display by pulling down the View menu and selecting them. The Show Processes from All Users button controls which processes you see in the dialog box—only those of a single user or those from all users.
The display can be sorted on any column. Note the small up-arrow that is shown in the middle of the Image Name column header. This means that the display is sorted in ascending order by image name. If you clicked on the column header, the display would be resorted in descending order. So, by clicking on the CPU column header or the Memory column header you can quickly see which processes are consuming the most resources.
If there's a process that's "hung" or consuming ever-increasing amounts of memory or perhaps has a lock on a file that you need, you can terminate that process by clicking it and then clicking the End Process button.
There are more choices available to you, too. If you right-click on a process you'll see a Context menu that offers a number of choices. This menu allows you to, among other things, set the process's priority and affinity (i.e., which of the CPU cores it's allowed to run on). These are particularly useful if you have a process that is consuming a lot of the CPU and making the system slow for everything else. By relegating it to a subset of cores and/or reducing its priority you can improve your overall system performance without taking the drastic step of terminating the process.
When you're finished working with the Task Manager, you close it either by clicking the dialog box's Close button or by pressing Esc.
![]()
![]() This tip (12164) applies to Windows 7 and 10.
This tip (12164) applies to Windows 7 and 10.
Windows Aero, first introduced with Windows Vista, provides a nice visual experience when working on your computer. And ...
Discover MoreStorage space on your computer is vitally important. New storage settings introduced in Windows 10 Version 1903 provides ...
Discover MoreWhen you get a lot of windows open on your screen, it can sometimes be difficult to locate the one with which you need to ...
Discover More2024-07-15 18:59:10
Ben
Great study: im doing: "every Process in Task Manager Explained"...
boy: pray for me!
Shalom!
Joseph,
Hebrew Yisraelite,
Charleston, S.C
6:58 PM July
Copyright © 2026 Sharon Parq Associates, Inc.

Comments