Whenever you are working in Windows, you are ultimately working with one or more files of various types. All files have names, and each name is broken into pieces. For example, given a file name of "C:\Temp\MyFile.txt", the first piece ("C:") is the disk name. The next piece ("\Temp") is the folder or directory name, and the "MyFile.txt" piece is the actual file name. The file name itself is further broken into two pieces, with the "MyFile" being the base file name and the ".txt" being the file type or extension.
A file's type is very important. It tells Windows what kind of file it is and therefore what program should be used to open the file. For example, a file type of ".txt" tells Windows that this is a text file and should be opened (by default) with Notepad. A file type of ".xlsx" tells Windows that this is an Excel workbook and should be opened (by default) with Excel.
There are thousands of different file types and corresponding programs used to open them. You can even add more file types of your own and associate them with whatever programs should be used to open them. Moreover, you can always change which program is used to open which file type.
Before working with file types, you should configure your system so that file types are displayed. There is an option in Windows to hide known file types, but turning that option off allows you to see the types. You turn on the displaying of file types by following these steps if you are using Windows 8 or Windows 10:
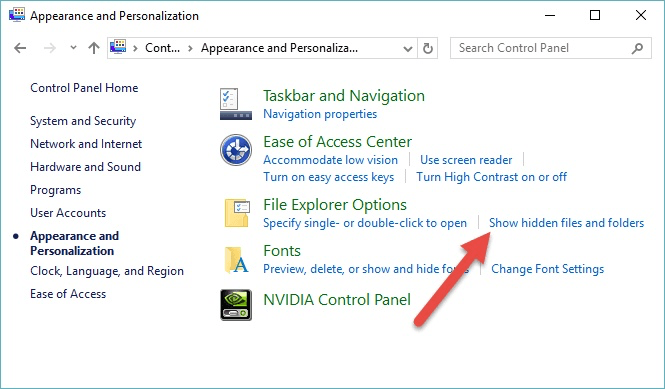
Figure 1. The Appearance and Personalization area of the Control Panel.
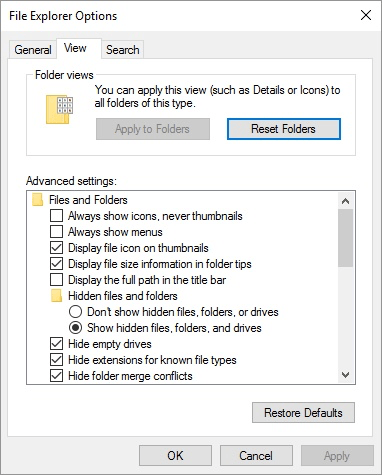
Figure 2. The View tab of the Folder Options dialog box.
If you are using Windows 7, follow these steps instead:
Regardless of the version of Windows you are using, by deselecting the Hide Extensions for Known File Types check box, you will be able to see the types of all your files in Windows Explorer or File Explorer. Once you've set up your system to display the file types, it's much easier to work with them.
![]()
![]()
![]() This tip (12065) applies to Windows 7, 8, and 10.
This tip (12065) applies to Windows 7, 8, and 10.
Every file on your disk drive has a unique file path that defines its location. Understanding how file paths work can be ...
Discover MoreWindows maintains a set of attributes that describe and control characteristics of your files. Here's how to change the ...
Discover MoreWindows allows you to customize many aspects of its user interface. One thing you can modify is how a folder's icon ...
Discover MoreThere are currently no comments for this tip. (Be the first to leave your comment—just use the simple form above!)
Copyright © 2026 Sharon Parq Associates, Inc.

Comments