The Recycle Bin is a special system folder that holds the files that you delete. This is done so that if you accidentally delete a file you didn't intend to, you can easily restore it by opening the Recycle Bin, selecting the file you want to “undelete,” and clicking Restore.
This feature comes at a price, however. The Recycle Bin does take up disk space, and as you delete many files over time, this special folder can consume a good portion of your disk. If you find yourself getting low on disk space, you can resize the Recycle Bin so that it takes up less space (but therefore holds fewer deleted files).
By default, the Recycle Bin is set to about 5% of the size of your disk. This isn't bad until you consider that a 1TB drive will have a Recycle Bin that uses 50 GB of disk space. If you think this is too much “wasted” space, you can resize the Recycle Bin to make it smaller. Or, if you find yourself doing a lot of “undeletes,” you may want to increase the size of the Recycle Bin so that it will hold more deleted files. In either case, you resize the Recycle Bin by right-clicking the Recycle Bin icon on your desktop and selecting Properties from the resulting Context menu. Windows displays the Recycle Bin Properties dialog box. (See Figure 1.)
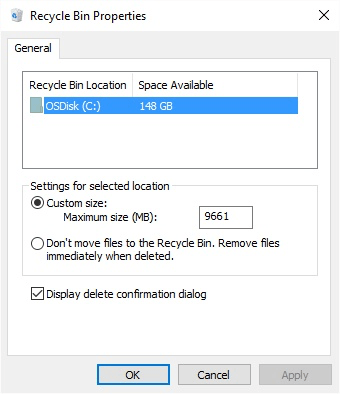
Figure 1. The Recycle Bin Properties dialog box.
The dialog box displays all of the disks that have an associated Recycle Bin (each hard drive can have its own Recycle Bin). The text box associated with the first radio button (“Custom size”) tells you the size of the selected drive's Recycle Bin, in MB. If you want to change it, simply adjust the number in the text box.
The second radio button tells the system that you don't want to use the Recycle Bin at all. If you check this radio button, then whenever you delete a file it is immediately and permanently deleted and you won't be able recover it. This has the same effect as holding down the Shift key when deleting a file.
The Display Delete Confirmation Dialog check box tells the system that whenever you go to delete a file, it should prompt you by asking if you really want to do the deletion. If this box is not checked, when you delete a file you are not presented with this confirmation.
When you finish making whatever changes you want in the Properties window, click the OK button to have your changes take effect.
![]()
![]()
![]() This tip (11936) applies to Windows 7, 8, and 10.
This tip (11936) applies to Windows 7, 8, and 10.
When you delete a file, Windows typically asks you if you are sure you want to make the deletion. You can control this ...
Discover MoreWindows allows you to easily configure the properties associated with the Recycle Bin. This tip provides an overview of ...
Discover MorePlacing something in the Recycle Bin does not mean it is gone forever. After placing something there, you may change your ...
Discover MoreThere are currently no comments for this tip. (Be the first to leave your comment—just use the simple form above!)
Copyright © 2026 Sharon Parq Associates, Inc.

Comments