Most people have at least a few icons on their Desktop. Indeed, many people have so many Desktop icons that it may be hard to find room for anymore. Regardless of whether you have a few or a lot, there may come a time when you want to change the size of your icons. Windows is very customizable and includes the ability to change the size of your icons. As it is with many things in Windows, there is more than one way to affect such customization.
To change the size of your icons if you are using Windows 7, click the Start button and then click Control Panel. In the Control Panel window, click the Display item. You can now change the size of your icons (and other items on your screen) by clicking one of the radio buttons. Clicking the Medium radio button will make things a little larger; clicking the Larger radio button will increase the size of your items by 50%. After you select which size you want, click Log Off Now and then login again to see the new size. If you want to revert back to the original size, go through the same process and click the Smaller radio button.
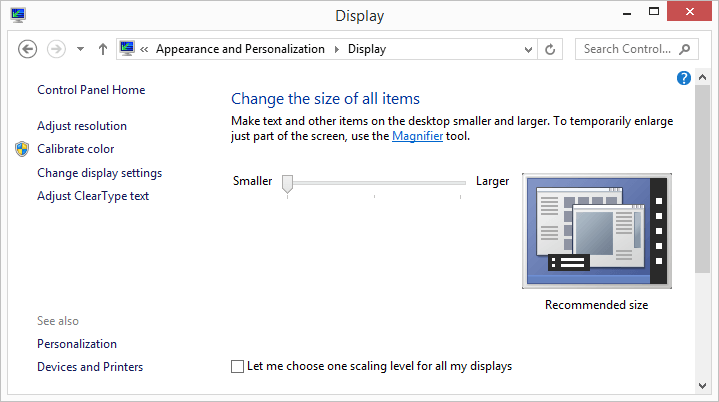
If you are using Windows 8 the steps adjustment interface is a bit different. Start by displaying the Control Panel, then click the Appearance and Personalization link and, finally, the Display link. Windows displays the Display settings window. (See Figure 1.)

Figure 1. The Display settings in the Control Panel.
You can now change the size of your icons (and other items on your screen) by using the slider control. When you have the setting the way you want, click the Apply button (you may need to scroll down a bit to see it) and then close the window.
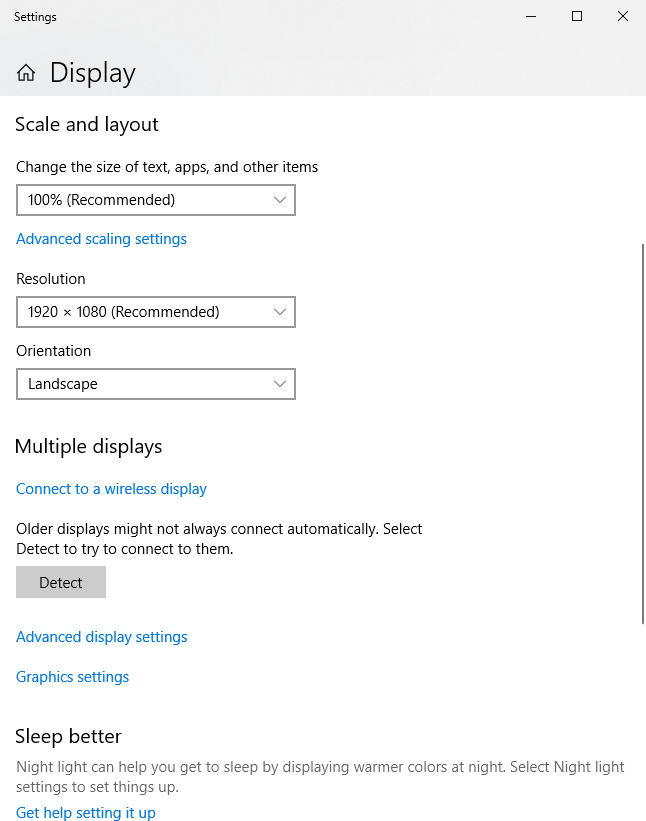
If you are using Windows 10 the steps adjustment interface is, again, a bit different. Type "Display Settings" (without the quotes) in the Search box to the left of the task bar and press Enter. Windows displays the Display section of the Settings dialog box. (See Figure 2.)

Figure 2. The Display section of the Settings dialog box.
Open the Change the Size of Text, Apps, and Other Items link (if it isn't already open under the Scale and Layout heading). Choose a desired setting from the drop-down list. Windows immediately applies the chosen scaling setting to the items on your Desktop. You can further customize the scaling settings by clicking on the Advanced Scaling Settings link. Enter a custom scaling size in the box under the Custom Scaling heading, click the Apply button, and then close the window.
The methods described above change the size of all items on your Desktop including text, apps, and icons. You can easily change the size of only your Desktop icons without altering the size of other items displayed on your Desktop.
If you need finer control beyond what is offered in the Control Panel (Windows 7 or 8) or the Settings dialog box (Windows 10), first minimize all of your open windows. This is easily done by clicking the Show Desktop button on the Taskbar. Once all your windows are minimized, you can reduce the size of your Desktop icons by first clicking on an open area of the Desktop and then holding down the Ctrl key while you scroll down using your mouse wheel. To increase the size of your icons, hold down the Ctrl key while you scroll up the mouse wheel.
If you are using Windows 10, there is no need to minimize all of your open windows on your Desktop before clicking on an open area of the Desktop and using the Ctrl key and the mouse wheel to adjust the size of the Desktop icons.
![]()
![]()
![]() This tip (11253) applies to Windows 7, 8, and 10.
This tip (11253) applies to Windows 7, 8, and 10.
There may be times when you need to minimize all of your open windows in one quick step. Windows provides a few methods ...
Discover MoreThe Windows Task Manager is a great utility for a variety of reasons. Understanding it will prove beneficial towards an ...
Discover MoreOften when we are using our computers, we need to remember certain steps that we take, either for ourselves or to show ...
Discover More2019-05-20 12:51:22
Allan
An easier way in W7 is to rt clk anywhere on the desktop>View>Select icon size
Copyright © 2026 Sharon Parq Associates, Inc.
Comments