The power behind an Indexed Search is the index itself, but only certain file types are indexed by Windows. To see what these types are (or to modify the file-type list), you need to access the search index. Do this by pressing the Windows key, typing "index" (without the quotes), and pressing Enter. Windows displays the Indexing Options dialog box. (See Figure 1.)

Figure 1. The Indexing Options dialog box.
To get to the list of file types indexed by Windows, click the Advanced button. Windows displays the Advanced Options dialog box; you should make sure the File Types tab is displayed. (See Figure 2.)
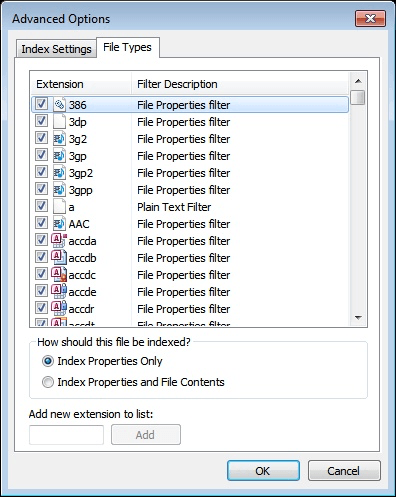
Figure 2. The File Types tab of the Advanced Options dialog box.
Every file type with a checkmark will be indexed, but only if the file possessing that file type is within a folder that is being indexed. Conversely, those without a checkmark are not indexed, even if they are in a folder that is included in the index.
If you want to add a new file type to the search index, type the extension (without the leading period) in the Add New Extension to List box and click the Add button. As soon as you click Add, your new file type is added to the list and will be included in the index.
![]()
![]() This tip (12920) applies to Windows 7 and 10.
This tip (12920) applies to Windows 7 and 10.
File types (or extensions) are key to using Windows effectively. When you double-click a file in Windows Explorer or File ...
Discover MoreMicrosoft is constantly updating Windows for various reasons. For most people, those updates are downloaded and installed ...
Discover MoreA system image is a snapshot of your system disk as of a certain point in time. Should the need arise, you can restore ...
Discover MoreThere are currently no comments for this tip. (Be the first to leave your comment—just use the simple form above!)
Copyright © 2025 Sharon Parq Associates, Inc.

Comments