The concept of a jump list can trace its roots back to versions of Windows that display "recent documents." The idea behind jump lists is that applications (such as Microsoft Word, Microsoft Excel, Notepad, etc.) can keep track of the documents that that application has most recently accessed.
Jump lists were first introduced in Windows 7. They appear on the Start menu as well as on the Taskbar. (Actually, they only appear on the Start menu in Windows 7 and Windows 10—there is no traditional Start menu in Windows 8.) Jump lists are maintained for each application in a "circular" data structure, meaning that when a jump list gets full, opening a new document drops the oldest one off the list to make room for the new document.
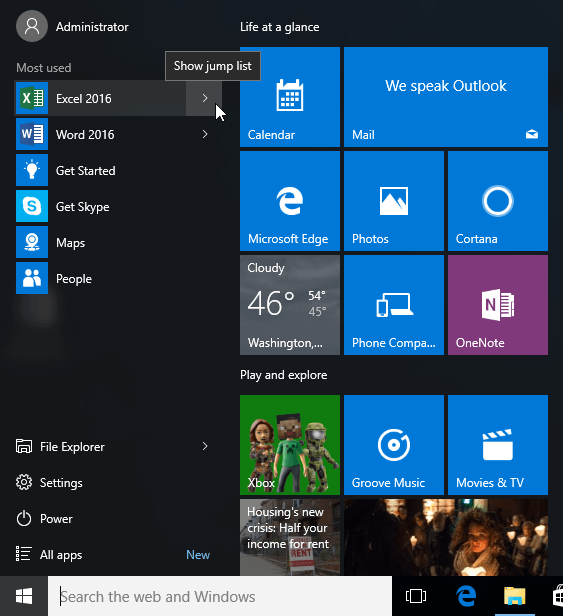
For applications on the Start menu, you can tell if it has a jump list because there will be an arrow to the right of the application name. The following figure is what's currently on my Start menu. (See Figure 1.)

Figure 1. Start Menu items.
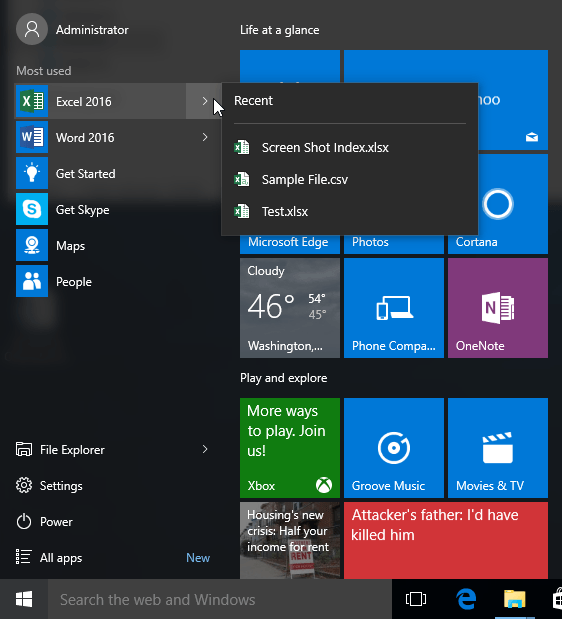
Of the items listed, the three of them have associated jump lists: Excel 2016, Word 2016, and File Explorer. This means that I can click the right arrow beside one of the applications and see the recently opened documents associated with that application. (See Figure 2.)

Figure 2. A jump list for Excel 2016.
This shows the three most recently accessed workbooks for Excel 2016. Clicking on one of these will open that workbook.
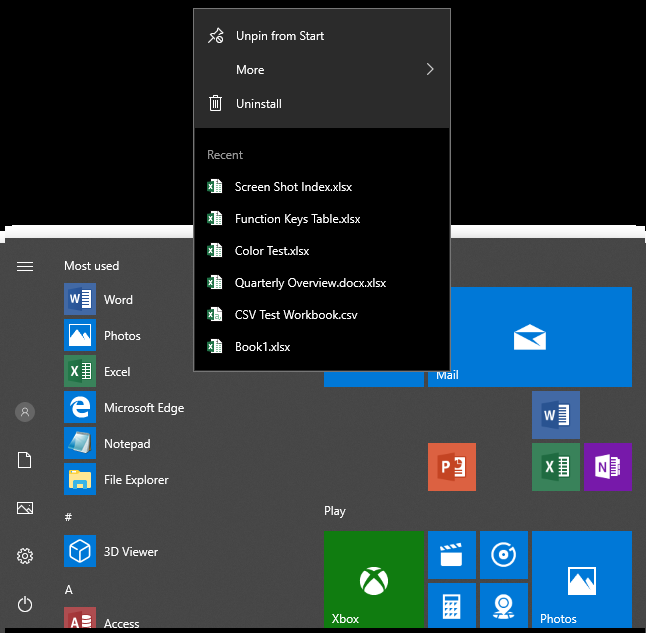
The Start menu may look a little different with newer versions of Windows 10. There may not be an arrow to the right of the application name on the Start menu. To access the jump list associated with Excel, for instance, I can right-click on the application's name and see the recently opened documents associated with that application. (See Figure 3.)

Figure 3. A jump list for Excel in Office 365.
Jump lists also exist for applications that are on the Taskbar. To access the jump list all you need to do is right-click the application's icon on the Taskbar. Jump lists on the Taskbar are a bit different from those on the Start menu. Here, not only do you see the files most frequently accessed with the program, but you may also see a few other options that contain frequently used commands. As before, clicking an item causes the program to respond accordingly.
![]()
![]()
![]() This tip (12669) applies to Windows 7, 8, and 10.
This tip (12669) applies to Windows 7, 8, and 10.
There may come a time when your system is no longer operating properly. This could be the result of Registry changes, a ...
Discover MoreWindows provides a special menu that allows you to easily access many common tools in the operating system. Here's the ...
Discover MoreWindows currently comes in two flavors: 32-bit and 64-bit. While there are typically some performance advantages ...
Discover More2020-04-05 13:52:18
Ron S MVP
Funny thing, I saw the same jumplist question yesterday in another forum. The answer is to make sure you have 2 new registry entries
Increase the Number of Jump List Items in Windows 10 2019 09 23 Walter Glenn
https://www.howtogeek.com/267705/how-to-increase-the-number-of-jump-list-items-in-windows-10/
https://www.groovypost.com/howto/increase-the-number-of-jump-list-items-on-windows-10/
By default, Windows 10 shows around 12 recent items in the jump list. To increase that number, you just need to make an adjustment to one setting in the Windows Registry.
https://www.tenforums.com/tutorials/45535-change-maximum-number-items-jump-lists-windows-10-a-4.html
On page 4 of the comments, in 2020 a user identified a second key that had to be added, EnableXamlJumpView
textfile: Jumplist_Settings.reg
---
Windows Registry Editor Version 5.00
[HKEY_CURRENT_USER\Software\Microsoft\Windows\CurrentVersion\Explorer\Advanced]
"JumpListItems_Maximum"=dword:00000016
"Start_JumpListItems"=dword:00000016
"EnableXamlJumpView"=dword:00000001
2020-04-04 12:12:09
Michael Minor
Office 365: How to increase the number of recent files displayed in the task bar?
Back before I upgraded to Office 365, I used a well-known regedit hack (the one you showed that worked with Office 2016) to increase the number of recent files on the task bar to 30 (I have large monitors). Once I installed Office 365, it changed back to 10.
I have looked everywhere to find out how to increase this for Office 365, but can’t find one. All my other applications (Corel, AutoCAD, Adobe) still work fine and show up to 30 recent files.
Can you please tell me how to increase the number in Office 365?
Note, I have already increased that number in Office applications, and yes, I can see them once the application is opened, but I want them on the task bar with a simple right click like they should be able to do...
Thanks
2019-08-06 08:24:06
Ron S
Thanks MW:
.
I used Fences years ago, when it was first released in beta form. I agree, it is a great tool.
.
I have used folders with shortcuts, but they are not as convenient as jump lists.
MRU's, Most Recently Used lists, are useless to me. The random display of the lists is contrary to the way I work.
2019-08-05 16:09:00
MW
I still find that creating and using shortcuts to my frequently used folders is more efficient. I organize all of those shortcut icons on my desktop using an inexpensive program called Fences: https://www.stardock.com/products/fences/
However, I also use a little known feature built right into Windows 10 called Recent Files.
It is a folder where Windows automatically stores shortcuts to ALL of your recently opened files and folders by their name and in chronological order. You just click on the shortcut and that folder or file immediately opens, right where you left it.
Navigate to the Recent folder on your C: drive:
C:\Users\<user name>\AppData\Roaming\Microsoft\Windows\Recent
Create a shortcut to that folder on your desktop, click away in bliss and relieve your own memory banks of trying to remember where that file was.
2019-08-05 06:30:10
Ron S
I found a registry hack to increase the number of entries in the list:
https://www.groovypost.com/howto/increase-the-number-of-jump-list-items-on-windows-10/
It works, kinda. After I made the change, Word 2010 increased the number of entries displayed. But at the very same time Word 2016 dis not display any more entries. <sigh>
Any suggestions?
I had already previously used the Word (2010, 2016) File menu > Options command > Advanced option to increase the number of entries in the recent display list to the max, 50 (not enough for me).
Copyright © 2026 Sharon Parq Associates, Inc.
Comments