Turn Off/On Window Snap

Written by Eric Wyatt (last updated October 19, 2020)

Windows 8 introduced users to Snap, or Snap behavior. Snap allows for your windows to be organized on your screen, via either mouse, keyboard, or the Snap Assist feature, and have them "snap" to certain areas of your screen. This can be and was designed to be a help to users who want to display the content of their screen in a certain way.

While Snap can be helpful, at times it can be a bit annoying, such as when you specifically do not want the window to "snap" to a predefined size or position. This is the case with a Windows user who wrote that they were trying to position some windows and it would automatically snap to full screen because they had moved a window too close to the top edge. (This caused Windows, in an attempt to help, to assume that they wanted to snap the window to that size.) To turn Windows Snap behavior off, follow these steps:

  1. Press the Windows key and type (without quotes) "multitasking settings", then press Enter. This opens the Multitasking section of the Settings dialog box.
  2. Click on the switch under the "Snap Windows" heading. This turns off the Snap feature. (See Figure 1.)
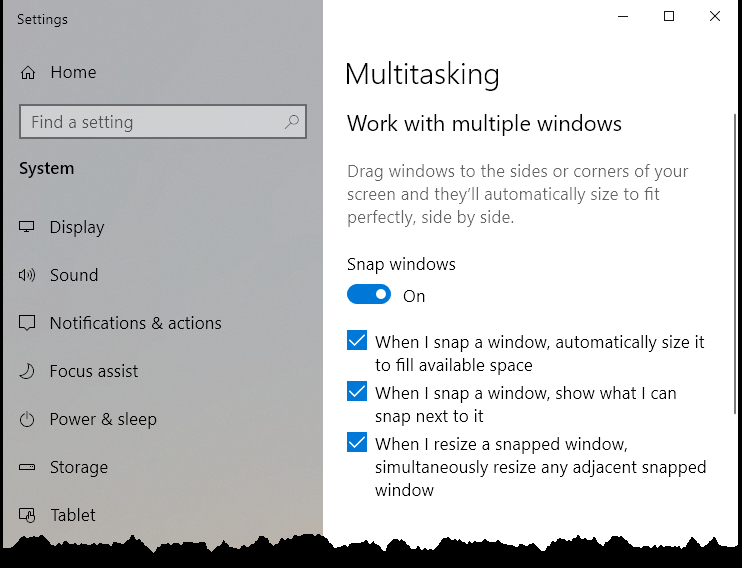
  3. Figure 1. The Multitasking section of system settings.

  4. Close the Settings dialog box. Your change takes place immediately; no need to restart or anything.

Those simple steps allow you to turn the Snap windows setting on or off. You may find times that you do prefer to have the Snap setting turned on. If you repeat the steps above, in step 2 simply turn the setting back on.

 This tip (13791) applies to Windows 10.

Author Bio

Eric Wyatt

Eric Wyatt is a swell guy (or so his friends tell him). He is a formally trained designer and branding expert, bringing a wide range of skills to his Tips.Net articles. ...

MORE FROM ERIC

Clearing the Address Resolution Protocol Cache

Corrupt or unwanted Address Resolution Protocol (ARP) cache entries can cause connectivity errors. Here is how to flush ...

Discover More

Setting Time Limits for Windows 10 Users

If your computer is set up in crowded environment, it may be helpful to establish times that an account can be used. You ...

Discover More

Win+E Shortcut Result

Configuring your computer is the best way to get your computer to behave the way you want. Here's how you can change what ...

Discover More
More WindowsTips

Limiting Bandwidth for Updates

Use a new advanced feature in Settings to limit upload bandwidth usage. By setting the absolute bandwidth an update can ...

Discover More

Typing Insights

Gaining insights into how you type can improve your typing skills and allow you to see how you're doing. The Windows 10 ...

Discover More

Changing Your Screen Saver

Screen savers can be works of art to bring some aesthetics to your computer monitor. This tip tells you how to change ...

Discover More
Comments

If you would like to add an image to your comment (not an avatar, but an image to help in making the point of your comment), include the characters [{fig}] (all 7 characters, in the sequence shown) in your comment text. You’ll be prompted to upload your image when you submit the comment. Maximum image size is 6Mpixels. Images larger than 600px wide or 1000px tall will be reduced. Up to three images may be included in a comment. All images are subject to review. Commenting privileges may be curtailed if inappropriate images are posted.

What is one more than 3?

There are currently no comments for this tip. (Be the first to leave your comment—just use the simple form above!)


Newest Tips