Profiles in Edge Chromium
Written by Eric Wyatt (last updated February 10, 2020)
When you use a computer that is shared by multiple people, such as the members of a family, it can be problematic when it comes to keeping web information separate from other users. To help keep sensitive information private—info such as passwords, history, payment information and more—Edge Chromium has enabled what it calls "Profiles." Profiles allow for accounts to be set up within the browser that keep all of the sensitive information safe without needing to set up new Windows user accounts.
When you first launch Edge Chromium, a default profile is automatically set up for you. Using the browser's settings, you can create the additional profiles. When you create a profile, you have two types of profiles to choose from: online (such as with a Microsoft or work/school account which syncs your data) or local (which keeps your data on the local machine).
To set up a local profile, follow these steps:
- Press the Windows key and type (without quotes) "Edge", then press Enter. This launches the Microsoft Edge Chromium browser. If you have the app pinned you could also click on the pin.
- Click on the People icon in the toolbar at the top of the browser. A drop-down window will appear showing the default profile and some options. (See Figure 1.)
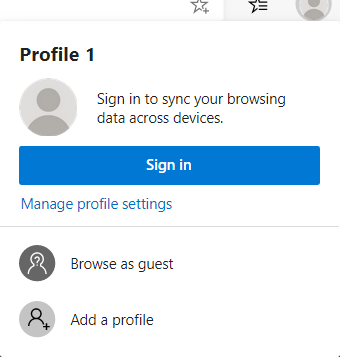
Figure 1. Microsoft Edge Chromium People icon drop-down.
- Click on the Add a Profile option. The drop-down changes to show the Add Profile drop-down, with two options: Add or Cancel.
- Click the Add option. This opens a browser window with a prompt allowing you to either sign in or confirm.
- Click Confirm. Your new profile is created. You can see this by clicking on the People icon again (as you did in step 2) and you will see that you are using Edge Chromium using the new profile.
To set up an online profile, follow these steps:
- Repeat steps 1 through 4, above.
- Click on "Sign in to Sync Data." This opens a Sign In dialog box with two sign-in options: Sign in with a "Microsoft account" or "Work or School Account." In this example, we will click on the Microsoft Account option which will open the sign-in box.
- Enter your Microsoft Account email, phone, or Skype information (or Create one) and click Next. You are then asked for your password.
- Enter your Microsoft Account password and click Next. Windows notifies you that information will be synced between all devices that use the same Microsoft login.
- Click Next. Microsoft starts syncing the information. (This may take a while to complete, depending on the speed of your Internet connection.) You will then see a screen asking if you wish to sync information across devices.
- Choose either Yes or No (using the toggle) and then click Next. You are then asked if you wish to share your browsing history with Windows.
- Choose either Yes or No (using the toggle) and then click Confirm. The screen will close, and you will see that you are signed in to your account by seeing your account photo in the People icon in the toolbar.
It is important to remember that you can switch between these profiles at will. A user will not be asked for a password. If you really want to keep things confidential between users, you will need to use separate Windows user accounts. One great reason for using Profiles is for keeping your work browsing information separate from your personal browsing information.
 This tip (13737) applies to Windows 10.
Author Bio
Eric Wyatt
Eric Wyatt is a swell guy (or so his friends tell him). He is a formally trained designer and branding expert, bringing a wide range of skills to his Tips.Net articles. Learn more about Eric...
Disabling USB Storage Devices
USB storage devices can be extremely helpful. They can also allow people to copy and access your information through the ...
Discover More
Quick Event Creation
Windows 10 November 2019 update provides a quick method to add a calendar event. This new method allows you to create an ...
Discover More
Connecting a Bluetooth Keyboard
Bluetooth allows electronic devices to connect wirelessly. Discover how easy it is to connect a Bluetooth keyboard to ...
Discover More
Comments