A physical hard drive (such as the one in your computer system) can be segmented into logical units referred to as partitions. By default, there is a good chance that your hard drive already has multiple partitions on it. If you decide to add a second hard drive to your system, you can always choose to set up the hard drive using multiple partitions. Each partition is treated by Windows as a separate hard drive, even when those partitions are on the same physical hard drive.
If you have multiple partitions on your hard drive, you might want to resize those partitions. For instance, your hard drive might have a single partition, recognized by Windows as drive E:. If drive E: occupies 900 GB, you might want to shrink it to 500 GB so you can create a new partition (to be named drive F:) with the remaining 400 GB.
To resize existing partitions, use the Disk Management utility. Click the Start button, type "diskmgmt.msc" (without the quote marks) and press Enter. Windows displays the Disk Management dialog box. (See Figure 1.)
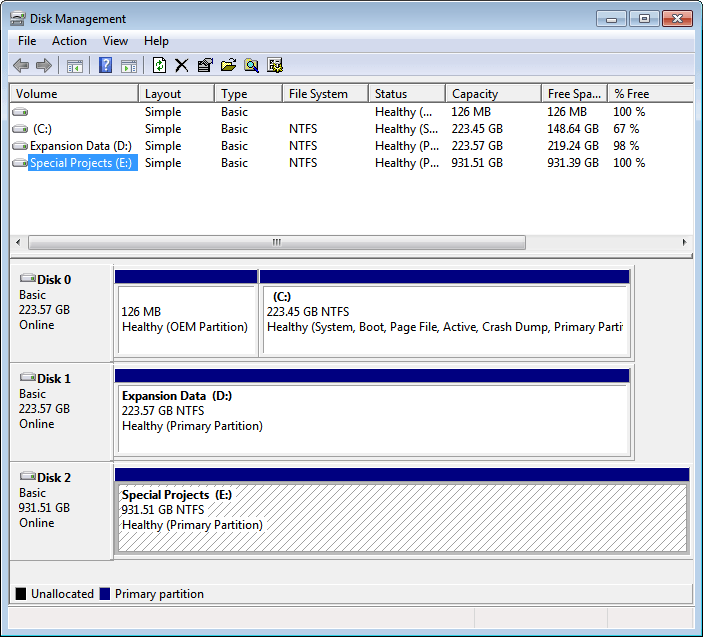
Figure 1. The Disk Management dialog box.
Right-click on the partition of the hard drive you want to resize; Windows displays a Context menu. Choose the Shrink Volume option. You'll then be presented with the Shrink E: dialog box. (See Figure 2.) (The "E:" would reflect whatever driver letter is assigned to the partition you are resizing.)
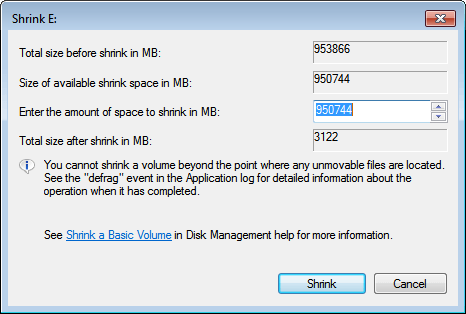
Figure 2. The Shrink E: dialog box.
You need to use the only active control in the dialog box (Enter the Amount of Space to Shrink in MB) to specify how much you want to have removed from the partition. This, to me, seems a bit backward; it would be better to be able to specify how large you want the resized partition to be, but that is not what is being asked. Instead, you need to put in how much space you want to take away from the partition. In my case, I entered a value of 400,000, which is an approximate size just under 400 GB.
To start the resize, I think clicked the Shrink button. The dialog box disappeared, the partition was resized, and the updated information displayed in the Disk Management dialog box. (See Figure 3.)
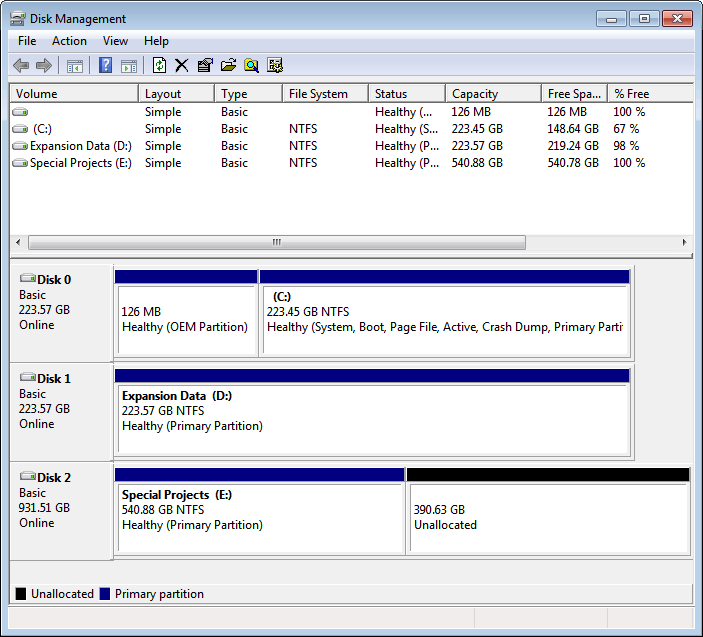
Figure 3. The Disk Management dialog box, showing resized partitions.
At this point I could proceed to partition the 390 GB unallocated space so that I could use it for a new F: drive.
![]()
![]()
![]() This tip (13130) applies to Windows 7, 8, and 10.
This tip (13130) applies to Windows 7, 8, and 10.
Files (and folders) can be marked hidden so that you don't see them in Windows Explorer. This tip tells you how to ...
Discover MoreBeing on a network is great because it allows you to share resources among the networked systems. Being able to access a ...
Discover MoreDisk drives, in Windows, can have names. You can easily use Windows Explorer to change the name of a disk drive on your ...
Discover MoreThere are currently no comments for this tip. (Be the first to leave your comment—just use the simple form above!)
Copyright © 2026 Sharon Parq Associates, Inc.
Comments