Video files tend to be large—very large. It is not unusual to have video files that are multiple gigabytes in size. Because of this, you may want to move your entire video library to an external hard drive, such as a fast SSD drive. (SSD drives don't rely on mechanical parts; they are memory-based, so they can transfer data very, very quickly.)
Since the Videos library is a folder, you can move files into it, like .mp4, .wmv, etc., and create sub-folders in it. As a system folder, though, if you want to relocate it to another drive, you need to do it a little differently. As an example of how you can move the Videos library, let's assume that you want to move it from its default location to D:\Videos. (You can only move to an existing folder, so you need to make sure that D:\Videoes actually exists.) Follow these steps:
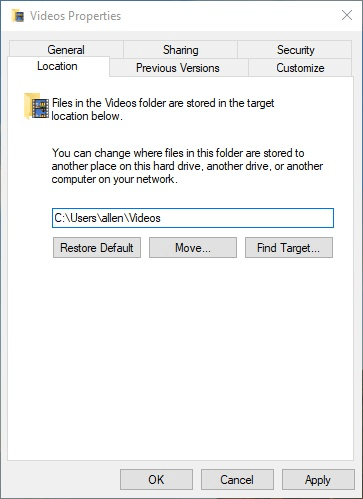
Figure 1. Changing the location of the Videos folder.
That's it; the Videos library is now moved. Note that if you ever want to move things back to their default location, you can go through the same procedure, but click the Restore Default button on the Location tab of the dialog box and everything will be moved back.
![]()
![]()
![]() This tip (12861) applies to Windows 7, 8, and 10.
This tip (12861) applies to Windows 7, 8, and 10.
Windows Libraries are a great extension to the functionality of Windows Explorer. Libraries are similar to folders in ...
Discover MoreThe Pictures folder is one of several system libraries created in Windows by default. This library is specifically ...
Discover MoreCreating a library can be done with just a couple of clicks. Although it appears that libraries have some issues, you can ...
Discover MoreThere are currently no comments for this tip. (Be the first to leave your comment—just use the simple form above!)
Copyright © 2026 Sharon Parq Associates, Inc.

Comments