At some point in time you may want to move your page file to a different location. Perhaps you've gotten a new disk whose size and/or speed is more appropriate to hold the page file. Whatever the case, you can move your page file to a different location by following these steps:
- Press Win+R. Windows displays the Run dialog box.
- At the command line type "sysdm.cpl" (without the quote marks) and then press Enter. Windows displays the System Properties dialog box.
- Make sure the Advanced tab is displayed. (See Figure 1.)

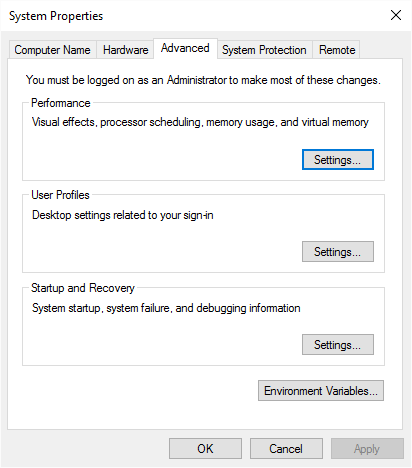
Figure 1. The System Properties dialog box.
- In the Performance group, near the top of the dialog box, click the Settings button. Windows displays the Performance Options dialog box.
- Make sure the Advanced tab is displayed. (See Figure 2.)

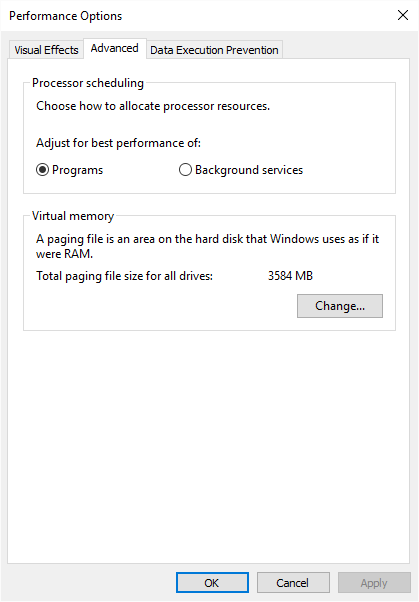
Figure 2. The Performance Options dialog box.
- Click the Change button. Windows displays the Virtual Memory dialog box. (See Figure 3.)

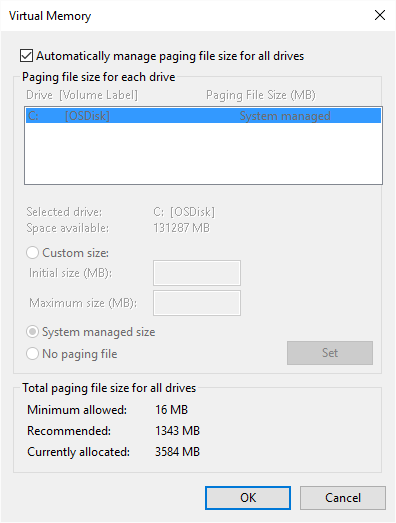
Figure 3. The Virtual Memory dialog box.
- Uncheck the top checkbox, Automatically Manage Paging File Size for All Drives.
- In the list of disk drives, select the drive on which you want your page file to reside.
- Change the parameters for the page file (e.g., initial size, maximum size) as desired or, more simply, click the System Managed Size radio button.
- Click the Set button.
- Click OK.
- Restart your system, as prompted.
You may now decide to remove the old page file from the previous drive. To do this, go through the same steps, but in step 9 select the old disk where the page file used to be and click the No Paging File radio button.
If you are using Windows 7, the steps to move the page file are almost identical; the biggest difference is in getting to the System Properties dialog box. You can follow these steps to display the dialog box:
- Click the Start menu button and then click Control Panel.
- Click the System link.
- Click the Advanced System Settings link at the left of the screen. Windows displays the System Properties dialog box.
Once at the dialog box you can continue with the earlier steps, starting with step 3.
Author Bio
Barry Dysert
Barry has been a computer professional for over 35 years, working in different positions such as technical team leader, project manager, and software developer. He is currently a software engineer with an emphasis on developing custom applications under Microsoft Windows. When not working with Windows or writing Tips, Barry is an amateur writer. His first non-fiction book is titled "A Chronological Commentary of Revelation." Learn more about Barry...
Getting Rid of a Built-in Windows Library
Most people like the Library feature of Windows, but for those who don't, this tip explains how to get rid of a built-in ...
Discover More
AutoRuns
Would you like to have one place to go in order to see what all programs are starting when your system starts or when you ...
Discover More
Closing an Open Port
On a routine security check, you may discover that a particular port is open that shouldn't be. This tip tells you how to ...
Discover More
Understanding the NTFS File System
The NTFS file system is at the core of the Windows operating system. This tip explains a bit about it.
Discover More
Disabling System Restore
Restore points are good to have in case a problem occurs while trying to make changes to your system. If for some reason ...
Discover More
Understanding File System Formats
When you format a disk drive, you have the option to specify what file system should be used on that drive. There are ...
Discover More
Comments