Storage spaces are created in Windows when you combine the storage capacity of multiple drives so that it can be treated as a single "space." Storage spaces is a new feature first introduced in Windows 8.
To create a storage space, make sure you add a couple of hard drives to your system. These drives can be internal or external; it doesn't matter. (Perhaps you have external drives connected through a USB port. That's great; Windows doesn't care.)
Display the Control Panel and then click System and Security. Windows displays some additional options; you should click Storage Spaces. Windows displays the Storage Spaces dialog box. At the left side of the dialog box click the Create a New Pool and Storage Space link. After a short time Windows displays the Create a Storage Pool dialog box.
Here you specify which drives you want added to the storage space. Windows shows all the drives it could locate; you just have to select the drives you want included. There is a checkbox to the left of each drive; select the checkbox for each drive you want included in the storage space. Make sure that you only add drives that you don't mind losing the data on—Windows erases the drives as it creates the storage space.
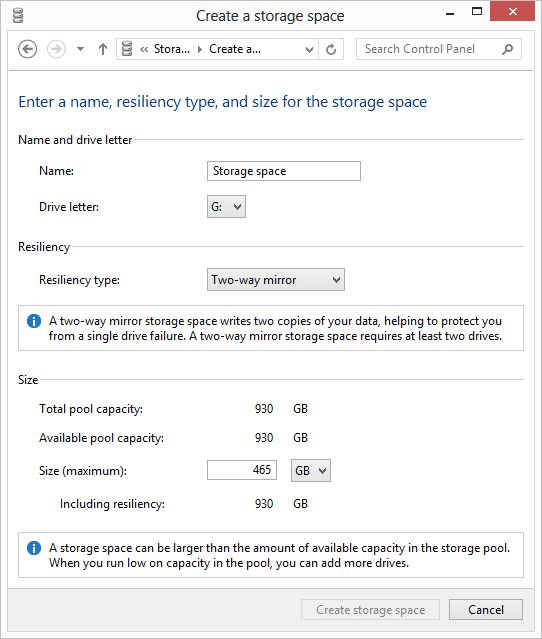
When satisfied with the drives you've selected, click the Create Pool button. Windows creates the storage pool, prepares the drives, and then displays the Create a Storage Space dialog box. (See Figure 1.)

Figure 1. The Create a Storage Space dialog box.
Here you should specify the technical information about the storage space you are creating. Give it a name and pick a drive letter you want used for the space. (The drive letter is because the storage space will be treated by Windows as if it were a single disk drive, even though it may consist of multiple physical drives.)
You'll want to pay attention to the options available using the Resiliency Type drop-down list. These options should sound familiar to those who may have used RAID technology in the past. They control how the data is actually written to the drives in your storage space. There are four possible options:
Perhaps the most interesting setting on the dialog box is the one where you can specify a logical size for your storage space. The default value depends on the size of the physical drives in your storage space and the resiliency type you selected. However, you can make your logical size as big as you want. For instance, let's say that Windows suggests a size of 30 MB. You could, if you wanted, specify a logical size of 500 MB (or more) for your storage space. As the data you store in the storage space gets close to the 30 MB that Windows knows is available, it prompts you (through the Action Center) to add more drives to the storage space—pretty cool!
After you've set the specifications for your storage space, click the Create Storage Space button. Windows creates the storage space and you can start to use it right away, the same as you would any other drive on your system.
![]()
![]() This tip (12683) applies to Windows 8 and 10.
This tip (12683) applies to Windows 8 and 10.
Windows allows you to customize many aspects of its user interface. One thing you can modify is how a folder's icon ...
Discover MoreRemoving a file type program association is a task for third-party utilities. You can, however, change the association ...
Discover MoreIf you have an important file that you want to be sure doesn't get accidentally edited, you can set it to read-only. This ...
Discover MoreThere are currently no comments for this tip. (Be the first to leave your comment—just use the simple form above!)
Copyright © 2026 Sharon Parq Associates, Inc.
Comments