File Explorer is a very popular utility in Windows. It allows you to easily navigate among your files and folders. Not surprisingly, you can customize it in a variety of ways to better suit your needs.
When you launch File Explorer, you'll see that there are three main elements to the window. (See Figure 1.)
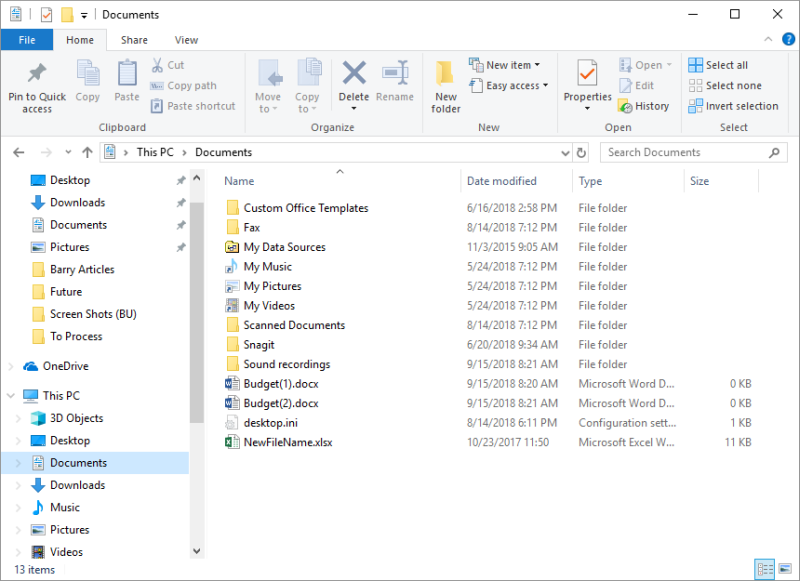
Figure 1. The Home tab of File Explorer.
The three main elements comprising this window include:
You can indicate which of these main elements you'd like displayed by displaying the View tab of File Explorer. (See Figure 2.)
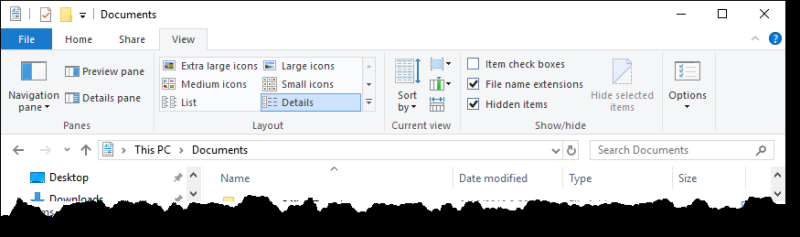
Figure 2. The View tab of File Explorer.
You can modify the navigation pane by clicking the drop-down arrow next to the Navigation pane tool in the Panes group. The Panes group also allows you to modify the details pane to show either the preview or details of a selected file/folder by clicking the Preview pane or Details pane, respectively.
The details pane can be presented in one of several views as listed in the Layout group: Extra large icons, Large icons, Medium icons, Small icons, List, and Details.
Another way to customize the Explorer window is by grouping items together. This is done by right-clicking an empty area of the details pane and, from the resulting Context menu, selecting the Group By option. Grouping by different attributes of the files (Date, Type, Size, etc.) can make things easier to find.
You can also select which columns are to be displayed in the details pane. Right-click a column header, and you are presented with a list of what columns are available for display. You can even indicate the left-to-right ordering of the columns by moving particular columns up and down via the More button on the Context menu.
When you've decided what columns should be displayed you can sort the information in the details pane in ascending or descending order by clicking a column's header. A small arrow will appear in the column header to indicate which column is being used to sort, and whether the sort is ascending or descending. (See Figure 3.)

Figure 3. Arrow indicating that the pane is displayed in ascending order by name.
When you launch Windows Explorer, you'll see that there are four main elements to the window. (See Figure 4.)
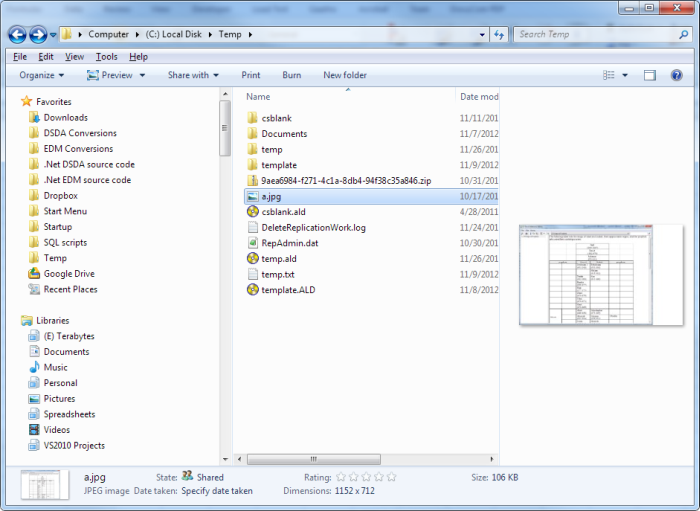
Figure 4. The Windows Explorer.
The four main elements comprising this window include:
You can indicate which of these main elements you'd like displayed by pulling down the Organize | Layout menu and either checking or clearing the corresponding menu item. Most people tend to turn off the preview pane since a thumbnail preview is shown in the status area.
The details pane can be presented in one of several views. By pulling down the View menu you can see that the available views include: Icons, List, Details, Tiles, and Content.
Another way to customize the Explorer window is by grouping items together. This is done by right-clicking an empty area of the details pane and, from the resulting Context menu, selecting the Group By option. Grouping by different attributes of the files (Date, Type, Size, etc.) can make things easier to find.
You can also select which columns are to be displayed in the details pane. Right-click a column header, and you are presented with a list of what columns are available for display. You can even indicate the left-to-right ordering of the columns by moving particular columns up and down via the More button on the Context menu.
When you've decided what columns should be displayed you can sort the information in the details pane in ascending or descending order by clicking a column's header. A small arrow will appear in the column header to indicate which column is being used to sort, and whether the sort is ascending or descending.
![]()
![]() This tip (12367) applies to Windows 7 and 10.
This tip (12367) applies to Windows 7 and 10.
Do a search for files on your computer and you may need to see more information about the results than what Windows first ...
Discover MoreThe DiskPart utility is a low-level command-line program that lets you manage disks, virtual disks, partitions, and ...
Discover MoreWindows Explorer has a good search utility built into it. As you use it, you may wish to save your commonly typed ...
Discover More2019-04-15 17:50:51
MW
Regarding the left-side navigation pane: As I recall, staring with Win10 Microsoft significantly changed the behavior of the File Manager/Explorer.
Are there any settings to stop the navigation pane display from jumping up or down when you are selecting folders or files in the 'middle' detail pane?
It is very frustrating to navigate to a file or folder in the middle pane, click on it and them see the left hand navigation pane quickly scroll away from the folder you are working in.
Or, if you select a file and try to move/copy it into another folder that was once in view on the navigation pane, it is a race to do so before that pane scrolls automatically away from your intended target.
I must constantly re-navigate back to where I am working.
Can you explain in a Windows Tip item Microsoft's thinking and intent in building in this behavior?
I assume (but it being MS, maybe not) there were valid reasons to program File Explorer this way. Unfortunately in my use those benefits escape me and I would appreciate somebody pointing them out so I can take advantage of them.
Copyright © 2026 Sharon Parq Associates, Inc.

Comments