Bob started to notice that, as of late, his system has gotten a bit sluggish. He mentioned it to a friend, and she said that he should check into defragmenting his hard drive. While she explained a little bit about what this means, they ran out of time before she could tell him how to actually defragment. Bob is wondering how to go about defragmenting his hard drive.
Defragmenting a disk can be an effective way to improve your system's performance—at least for mechanical drives. Windows does not defragment solid-state drives, as doing so can accelerate them wearing out.
Through the normal course of use, the performance of mechanical disks can degrade from having lots of contiguous space to having that space split into pieces that the operating system must keep track of every time it needs to access a file. Defragmenting a disk essentially groups files and pieces of files into contiguous space again so that disk access is improved.
By default, automatic disk defragmentation is turned on in Windows so that you usually don't have to concern yourself with it. It is possible in Bob's case that automatic defragmentation is turned off, or he wouldn't have noticed a progressive sluggishness to his system. If you wish to change the defragmentation schedule, want to perform a manual defragmentation, or otherwise are just curious about the condition of your disks, you can launch the defragmenter and investigate.
There are several different ways you can start the disk defragmenter tool that is provided with Windows. Here are a couple of ways you can use if you are using Windows 7:
Not all of these ways will work if you are using Windows 8 and Windows 10, though. In those versions, it is best to start the Control Panel, then click System and Security. Scroll down, and under the Administrative Tools category you'll see a link to Defragment and Optimize Your Drives. (You can use the Control Panel approach in Windows 7 if you prefer, as well.)
If you are using Windows 7, then at this point you'll see the Disk Defragmenter window. (See Figure 1.) If you are using Windows 8 or Windows 10 you'll see the Optimize Drives window. (See Figure 2.)
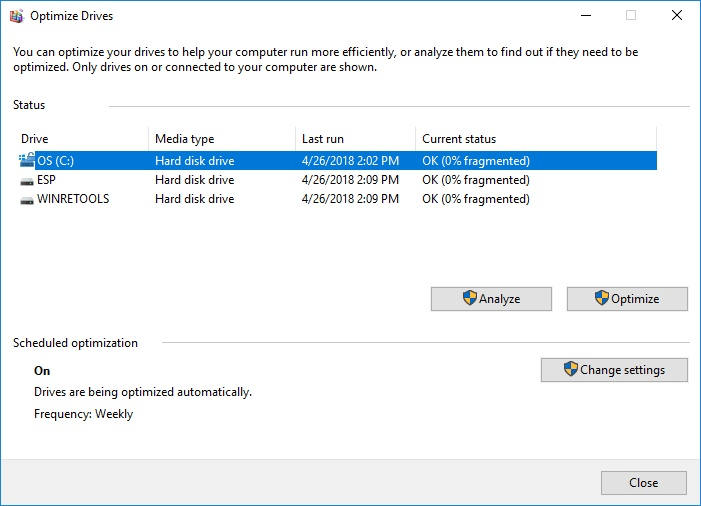
Figure 2. The Optimize Drives window (Windows 8 and Windows 10).
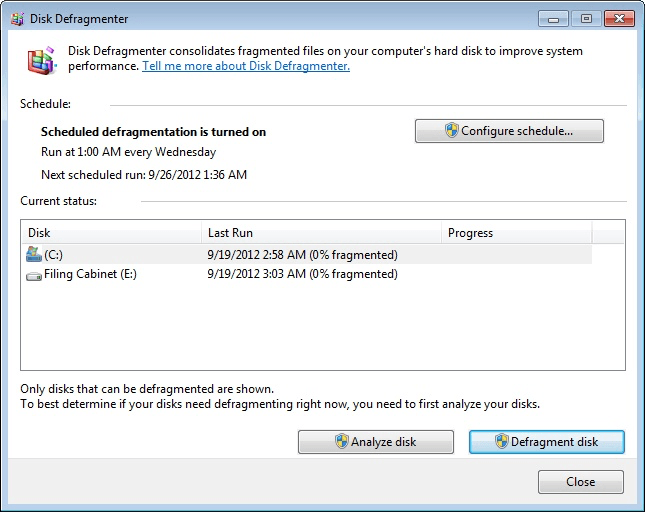
Figure 1. The Disk Defragmenter window (Windows 7).
The information displayed in the Disk Defragmenter or Optimize Drives window on your system will necessarily be different than what you see in these examples. You can tell a few things from this information:
If you want to change the defragmenting schedule, click the Configure Schedule button in Windows 7 or the Change Settings button in Windows 8 or Windows 10. Windows 7 displays the Modify Schedule dialog box (See Figure 3.) , and in Windows 8 and Windows 10 you'll see the Optimize Schedule area of the Optimize Drives dialog box. (See Figure 4.)
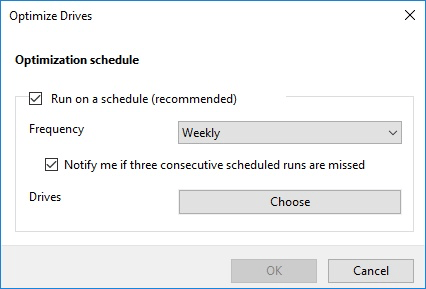
Figure 4. The Optimization Schedule area of the Optimize Drives dialog box (Windows 8 and Windows 10).
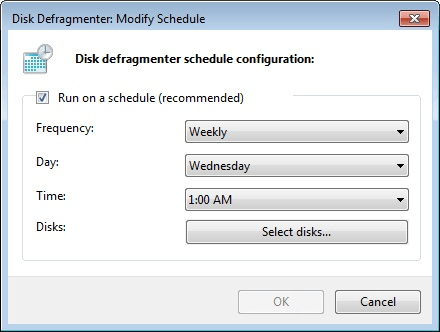
Figure 3. The Disk Defragmenter Modify Schedule dialog box (Windows 7).
The dialog boxes allow you to turn off automatic defragmentation (which is not recommended), change the frequency of when it is run, specify the day of the week and time of when it is run (only in Windows 7), and what disks it runs on. In Windows 8 and 10 you can also have Windows notify you if three consecutive scheduled runs are missed.
If you change any of the settings, click OK to return to the previous window.
In the Disk Defragmenter dialog box (Windows 7) or Optimize Drives dialog box (Windows 8 and Windows 10) you can analyze the current state of each of your disk drives by selecting the disk to be analyzed and clicking the Analyze Disk button (Windows 7) or the Analyze button (Windows 8 and Windows 10). When you do, the information in the dialog box is updated to show that an analysis is underway. After a few minutes, the analysis completes and you may see a change in the "% fragmented" value for that disk. Assuming you're doing defragmentation regularly, the change probably won't be big, but you nevertheless have the opportunity to manually do a defragmentation pass on it immediately. This is done by clicking the Defragment Disk button (Windows 7) or the Optimize button (Windows 8 and Windows 10).
Manually performing a defragmentation causes a re-analysis of the disk, and then the actual defragmentation process begins. You are continually updated on the progress of the process, and after a while (depending upon how much work there was to do) the process will end, and your disk will once again be defragmented.
Incidentally, if at any time (whether you're doing an analysis or an actual defragmentation) you want to stop the process, you can safely click the Stop Operation button without fear of data corruption.
Finally, you should note that there is no need to defragment solid-state drives (SSDs). In fact, doing so may adversely affect the performance of the drives.
![]()
![]()
![]() This tip (12144) applies to Windows 7, 8, and 10.
This tip (12144) applies to Windows 7, 8, and 10.
A hidden file that the system uses to speed performance of your viewing folders containing pictures is called Thumbs.db. ...
Discover MoreIt's possible to rename multiple files at the same time, but the new names of the files may leave a bit to be desired. ...
Discover MoreYou can have virtually unlimited disk space if you're willing to swap discs once in a while. By copying files to a CD or ...
Discover More2018-04-30 11:22:18
David Gardner
If you are in the habit of shutting your computer off at the end of the day or after you are done for the day, then your drive will not be defragmented if the scheduled time for it is during the time your computer is shut down.
Copyright © 2026 Sharon Parq Associates, Inc.

Comments