Grabbing a Screen Shot

Written by Allen Wyatt (last updated April 27, 2020)

There are several specialized utilities on the market that you can use to capture what you see on your screen. You may not need such a utility, however, as Windows allows you to easily capture a screen.

Here are the steps to capture your screen; they are different from the procedure in earlier versions of Windows:

  1. Set up your screen so that it reflects what you want to capture. (For instance, start whatever applications or open whatever windows you want visible.)
  2. Hold down the Win key (that's the one on your keyboard with the Windows logo on it) and press the PrtScn key. (On some keyboards it may be labeled "Print Screen.") Windows grabs the screen shot and stores it on your hard drive.
  3. Press Win+E. Windows displays an Explorer window.
  4. Using the tree at the left side of the window, open Libraries | Pictures | Pictures.
  5. Click on the Screenshots folder. (This folder is created automatically, if necessary, after you perform step 2.) (See Figure 1.)
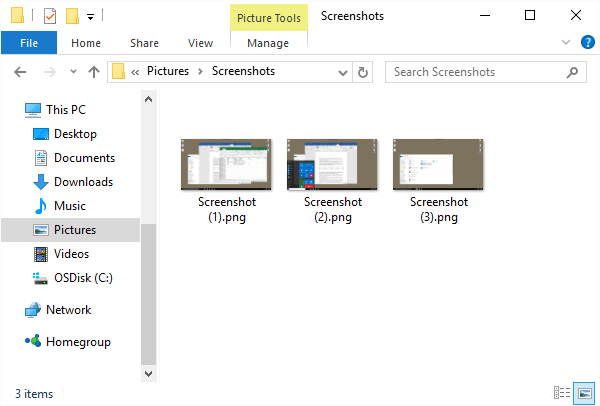
  6. Figure 1. The Screenshots folder.

The Screenshots folder contains all the screen shots you've captured, in chronological order. The files are saved in PNG format and the filenames are always "Screenshot" followed by an incremented number within parentheses. Thus, the files will be Screenshot (1), Screenshot (2), Screenshot (3), etc.

If you don't want the screen capture saved to a disk file immediately, you can use the PrtScn key without the Win key. Doing so copies the capture to the Clipboard, where you can paste it into a different program. For instance, you could paste it into a graphics program, modify the image in some way, and then save it to a disk file from within the program.

 This tip (11884) applies to Windows 8 and 10.

Author Bio

Allen Wyatt

With more than 50 non-fiction books and numerous magazine articles to his credit, Allen Wyatt is an internationally recognized author. He is president of Sharon Parq Associates, a computer and publishing services company. ...

MORE FROM ALLEN

Creating a Master Document Using Existing Subdocuments

If you decide to create a master document, it is easy to do by just adding one or more subdocuments to an existing ...

Discover More

Changing the Outline Color of the Selected Cell

It can be a bit difficult, at times, to locate the selected cell on the screen. If you have difficulties in this area, ...

Discover More

Date Last Edited

When adding headers or footers to your worksheets, you may want to include the date that the workbook was last edited. ...

Discover More
More WindowsTips

Using Windows DVD Maker

You can use the built-in DVD Maker to create slide shows and views of your own photographs and videos. This tip tells you ...

Discover More

Transferring Pictures from a Camera

Transferring pictures from a camera to your computer may be simpler than you think. This tip describes the process.

Discover More

Understanding Types of CDs

There are several types of Compact Discs on the market. This short little tip explains the various types and how you ...

Discover More
Comments

If you would like to add an image to your comment (not an avatar, but an image to help in making the point of your comment), include the characters [{fig}] (all 7 characters, in the sequence shown) in your comment text. You’ll be prompted to upload your image when you submit the comment. Maximum image size is 6Mpixels. Images larger than 600px wide or 1000px tall will be reduced. Up to three images may be included in a comment. All images are subject to review. Commenting privileges may be curtailed if inappropriate images are posted.

What is 8 - 5?

There are currently no comments for this tip. (Be the first to leave your comment—just use the simple form above!)


Newest Tips