Changing the Default Desktop Icons
Windows, by default, displays only the Recycle Bin icon on your desktop. You can, if you desire, instruct Windows to display a number of other icons as well. Follow these steps if you are using a Windows 10 system:
- Click the Start button (the Windows icon) and then select Settings icon (looks like a small gear). Windows displays the Windows Settings screen.
- Choose Personalize. Windows displays the Personalization window.
- Click the Themes link from the list on the left side of the window. Windows displays the Themes window.
- Scroll down to the Related Settings group and click on the Desktop Icon Settings link. Windows displays the Desktop Icon Settings dialog box. (See Figure 1.)
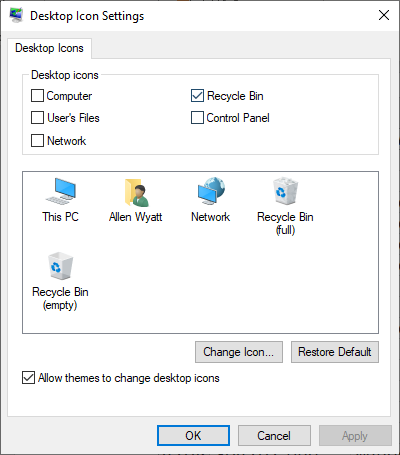
Figure 1. The Desktop Icon Settings dialog box.
- At the top of the dialog box, make sure a check mark appears beside each icon you want displayed on your desktop.
- Click OK.
If you are using a Windows 7 or Windows 8 system, follow these steps:
- Right-click at some empty point on your desktop. Windows displays a Context menu.
- Choose Personalize from the Context menu. Windows displays the Personalize dialog box.
- Click the Change Desktop Icons link, near the upper-left of the dialog box. Windows displays the Desktop Icon Settings dialog box.
- At the top of the dialog box, make sure a check mark appears beside each icon you want displayed on your desktop.
- Click OK.
The icons you selected should now be visible on the screen, along with all the others you have.
Author Bio
Allen Wyatt
With more than 50 non-fiction books and numerous magazine articles to his credit, Allen Wyatt is an internationally recognized author. He is president of Sharon Parq Associates, a computer and publishing services company. Learn more about Allen...
Moving to the Start or End of the Real Document
The main body of your text is only one part of what makes up the entire document. Documents can consist of other ...
Discover More
Working with Record Numbers
Want to keep track of various rows in a data table through the use of record numbers? Here are some options and ...
Discover More
Creating Categories for Your Table of Authorities
A table of authorities is normally divided into separate sections based on categories you define. Here's how to create ...
Discover More
Restoring Your System from a Restore Point
Restore Points let you go "back in time" to a point before you made system changes that could prove harmful to your ...
Discover More
Evaluating System Performance Using the Task Manager
One of the many functions of the Windows Task Manager is to allow you to see how your system is performing. If necessary, ...
Discover More
Setting a Restore Point
Restore Points let you go "back in time" to a point before you made system changes that could prove harmful to your ...
Discover More
Comments