Specifying the Default Printer

Written by Allen Wyatt (last updated July 9, 2018)

Windows allows you to have any number of printers connected to your system. You can even have printer drivers installed for printers that aren't always available for your system. (This is particularly helpful with laptop or portable computers, as they may use different printers based on where they are being used.)

One and only one of your printers can be defined as the default printer. This printer is the one to which Windows and any programs running under Windows will print, by default. Most programs allow you to pick a printer different than the default, but if you specify your most commonly used printer as the default, then you won't have to continually go through the steps to select that printer when you want to print.

To specify the default printer, follow these steps if you are using Windows 7:
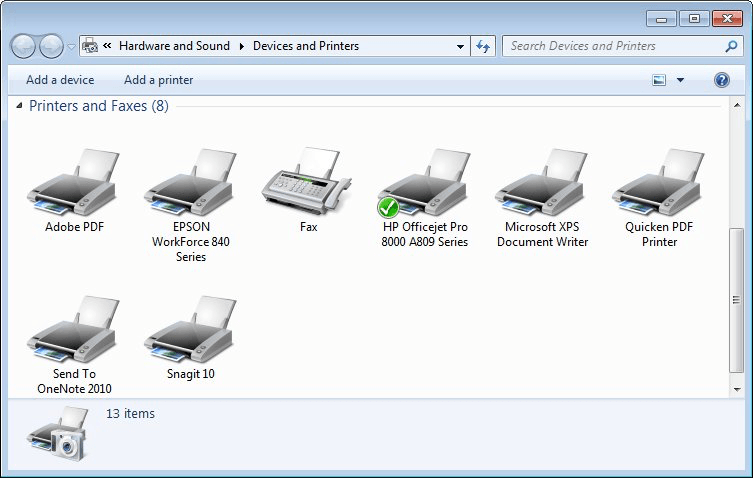
  1. Click Start and then click Devices and Printers. Windows displays the Devices and Printers screen. Note that the current default printer has a green circle next to it that contains a check mark. (See Figure 1.)
  2. Figure 1. The default printer is clearly indicated.

  3. Right-click on the printer you want to use as the default printer. Windows displays a Context menu.
  4. Choose Set as Default Printer from the Context menu. Windows moves the green circle to the printer you specified.

If you are using Windows 8 or 10, the beginning steps are a bit different:

  1. Display the Control Panel.
  2. Click the Hardware and Sound category link.
  3. Click the Devices and Printers category link. Windows displays the Devices and Printers screen. As in Windows 7, the current default printer has a green circle next to it that contains a check mark.
  4. Right-click on the printer you want to use as the default printer. Windows displays a Context menu.
  5. Choose Set as Default Printer from the Context menu. Windows moves the green circle to the printer you specified.

If you are using Windows 10 and you do not see a green circle on a printer, it is because Windows 10 is set to automatically manage your default printer. If Windows 10 is set to manage your default printer, it will be set to the printer you most recently used. If you right-click and then choose Set as Default Printer on a printer (step 5, above) Windows displays a prompt letting you know that if you choose OK then Windows will stop managing your default printer. If you want to re-enable having Windows manage your default printer follow these steps:

  1. Click on the Start button in the bottom left corner. Windows displays the Start screen.
  2. Click on the Settings button (it looks like a small gear). Windows displays the Settings dialog box.
  3. Click the Devices link. Windows displays the Devices options of the Settings dialog box.
  4. Click on Printers & Scanners in the list to the left. This shows the Printers & Scanners options in the right.
  5. Scroll down and check the box next to Let Windows Manage My Default Printer.
  6. Close the Settings dialog box. Your settings take effect immediately.

That's it; now any programs you start should recognize the newly specified default printer.

 This tip (10721) applies to Windows 7, 8, and 10.

Author Bio

Allen Wyatt

With more than 50 non-fiction books and numerous magazine articles to his credit, Allen Wyatt is an internationally recognized author. He is president of Sharon Parq Associates, a computer and publishing services company. ...

MORE FROM ALLEN

Conditionally Playing an Audio File

You can add audio files to an Excel worksheet, but what if you want a particular audio file to play only when a value in ...

Discover More

Using AutoFiltering

Excel's AutoFilter tool is a great way to make a long list of items much more manageable. This tip explains how to set up ...

Discover More

Copying Subtotals

If you have added subtotals to your worksheet data, you might want to copy those subtotals somewhere else. This is easy ...

Discover More
More WindowsTips

Deleting a Printer

When you get rid of an old printer and install a new one, you'll want to get rid of the old printer definition maintained ...

Discover More

Stopping or Deleting a Print Job

Knowing how to stop or delete a print job can save lots of paper and also lots of embarrassment if you happen to ...

Discover More

Quick Photo Printing

Windows 10 allows for quick and easy printing of your photos at standard photo sizes. You can start printing your photos ...

Discover More
Comments

If you would like to add an image to your comment (not an avatar, but an image to help in making the point of your comment), include the characters [{fig}] (all 7 characters, in the sequence shown) in your comment text. You’ll be prompted to upload your image when you submit the comment. Maximum image size is 6Mpixels. Images larger than 600px wide or 1000px tall will be reduced. Up to three images may be included in a comment. All images are subject to review. Commenting privileges may be curtailed if inappropriate images are posted.

What is eight minus 7?

There are currently no comments for this tip. (Be the first to leave your comment—just use the simple form above!)


Newest Tips