Windows includes a ton of built-in features designed to be used by a wide variety of people. Of course, there is a good chance that you may not need all the features provided by Windows, or there may be some features that are disabled by default and you want to enable.
To enable or disable features, follow these steps:
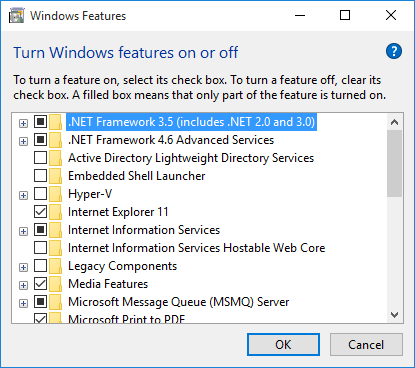
Figure 1. The Windows Features dialog box.
Note that you may see some checkboxes in the features list that aren't clear and, conversely, they don't contain a check mark. Instead, they are filled with a gray color. These aren't individual features but, instead, are categories of features. Click the plus sign next to such items and they expand to show you individual features in that category that can be enabled or disabled.
It's a good idea to only disable those Windows features that you know you really don't need. If you are in doubt about a particular feature, study up on it to make sure it is one you really want to disable.
![]()
![]()
![]() This tip (10133) applies to Windows 7, 8, and 10.
This tip (10133) applies to Windows 7, 8, and 10.
It may not always be a good thing to have Windows automatically restart your computer after an update. This tip tells you ...
Discover MoreWindows 10, by default, displays alerts or notifications for five seconds. If that's not enough time, you can increase ...
Discover MoreWindows allows for a system window to "snap" to certain areas of your screen. You can easily turn this feature on or off.
Discover MoreThere are currently no comments for this tip. (Be the first to leave your comment—just use the simple form above!)
Copyright © 2026 Sharon Parq Associates, Inc.
Comments