Reverse the Wheel

Written by Eric Wyatt (last updated June 24, 2019)

1

Ever since I got my first smartphone several years ago, I have discovered that, while I have been using a mouse for years, I got accustomed to what is referred to as "reverse scrolling." If you're unfamiliar with this term, it means that instead of rolling your mouse wheel down to scroll a web page or document upwards, you roll your mouse wheel up—the movement of the wheel matches the movement of the page or document. This motion causes the page to scroll as though you are moving or pushing the page up. For some reason, I find this scroll motion easier and a more consistent experience across my devices.

To change how your scroll wheel functions, you will find there is not a simple setting change. You need to make the change using the Device Manager and Registry. You need to use the Device Manger to identify your mouse information to make finding it in the Registry easier.

Obtaining Your Mouse Information

As stated, to obtain the mouse information we need to use the Device Manager. To do this, follow these steps:
  1. Press Windows key and type (without quotes) "Device Manager" and press Enter. This opens the Device Manager window.
  2. In the list of devices, navigate to and click on the arrow to the left of the Mice and Other Pointing Devices group. Device Manager will then expand all the items listed under that group.
  3. 3. Right-click on the mouse device you want to change and choose Properties. This opens the Mouse Properties window.
  4. Display the Details tab.
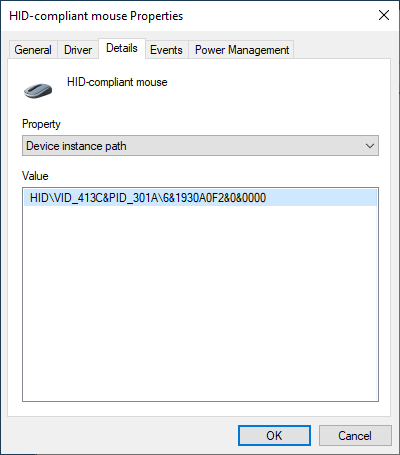
  5. In the Property drop-down list, choose Device Instance Path. This displays, in the Value box, the VID ID for your mouse. (See Figure 1.)
  6. Figure 1. Mouse Properties window.

Note the VID ID number for your mouse; you need to jot it down somewhere. In my case it is HID\VID_413C&PID_301A\6&1930A0F2&0&0000. Once you have this number you can close the Mouse Properties window and the Device Manager window.

Modifying the Registry

The next step is to go into the Registry Editor to enable reverse scrolling. To do this, simply follow these steps:
  1. Press Windows+R. Windows opens the Run window.
  2. Type "regedit" (without quotes) and press Enter. Windows opens the Registry Editor.
  3. In the left-side panel, navigate to HKEY_LOCAL_MACHINE\SYSTEM\CurrentControlSet\Enum\HID.
  4. Click the plus sign beside the key to expand the items it contains.
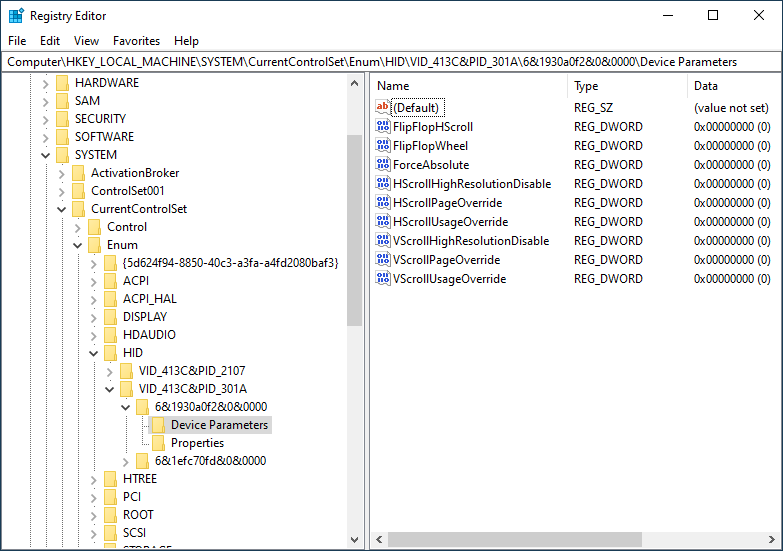
  5. Open the corresponding key that matches your mouse VID ID. This shows you the key(s) for your mouse. In my example, when I open the VID_413C&PID_301A key, I have two keys available. I find the key that corresponds, again, to my mouse's VID ID and click to open it. Note that the number of keys shown might vary on your computer. (See Figure 2.)
  6. Figure 2. Registry Editor showing Mouse VID ID.
  7. Click on Device Parameters. Once you do, you will see several options in the right-side panel.
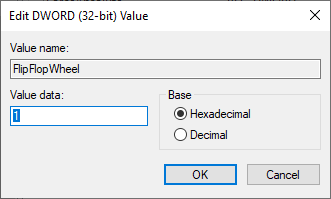
  8. Select the item named FlipFlopWheel and double-click it. This brings up the Edit DWORD (32-bit) Value dialog box. (See Figure 3.)
  9. Figure 3. Edit DWORD (32-bit) Value dialog box for the FlipFlopWheel value.

  1. In the Value data field change the "0" to a "1" (without quotes).
  2. Click on OK to close the dialog box.
  3. Close the Registry Editor.
  4. Restart your computer for the setting to take effect.

Once you restart your computer the reverse scrolling should be enabled. If you desire to change the setting back, repeat the steps above, and at step 7 change the "1" back to a "0" and again restart your computer.

With reverse scrolling enabled you may find a more consistent scrolling experience across your devices.

 This tip (13647) applies to Windows 10.

Author Bio

Eric Wyatt

Eric Wyatt is a swell guy (or so his friends tell him). He is a formally trained designer and branding expert, bringing a wide range of skills to his Tips.Net articles. ...

MORE FROM ERIC

Configuring Windows' Secret Start Menu

You can quickly access either Command Prompt or PowerShell by using the Win+X shortcut key command. But which one is ...

Discover More

Get Text Suggestions and Autocorrection

As mobile devices became more prevalent in our lives we become more reliant on text suggestions and autocorrect. With ...

Discover More

Change your Computer's Name with PowerShell

Your computer has a name that is separate from your account name. You can use PowerShell to change the name of your computer.

Discover More
More WindowsTips

Opening HEVC and HEIF Files

HEVC and HEIF are two new popular graphics file formats that are gaining support. Getting your Windows 10 computer setup ...

Discover More

Customizing the SendTo Menu

The SendTo menu can be used to perform some handy tasks with files. By following the steps in this tip you'll be able to ...

Discover More

Disable the "Get even more out of Windows" Message

Concerned or bothered by the "Get even more out of Windows" or "Welcome to Windows" full-screen notifications? With a ...

Discover More
Comments

If you would like to add an image to your comment (not an avatar, but an image to help in making the point of your comment), include the characters [{fig}] (all 7 characters, in the sequence shown) in your comment text. You’ll be prompted to upload your image when you submit the comment. Maximum image size is 6Mpixels. Images larger than 600px wide or 1000px tall will be reduced. Up to three images may be included in a comment. All images are subject to review. Commenting privileges may be curtailed if inappropriate images are posted.

What is 2 + 2?

2019-06-24 22:46:36

Don Mattocks

Thank you Eric. I often use my Win 10 laptop on my desk with my iMac to transfer things back and forth. As you know the iMac scrolls one way and the Win 10 laptop the opposite way. Now they are the same. Many kudos and Thank-you's.


Newest Tips