Disabling System Restore

Written by Barry Dysert (last updated February 5, 2018)

2

The system restore capability of Windows is a good self-defense mechanism if things go wrong when you're trying to make changes to your system. (Restore points are covered under other tips.) They do consume some disk space, though, so you may decide to disable this capability. Note that I don't recommend disabling the system restore capability, but if you really want to for some reason, read on.

To disable the system restore capability if you are using Windows 10, follow these steps:

  1. Use the search capabilities of Windows to look for "system protection" and then press Enter. Windows displays the System Protection tab of the System Properties dialog box. (See Figure 1.)
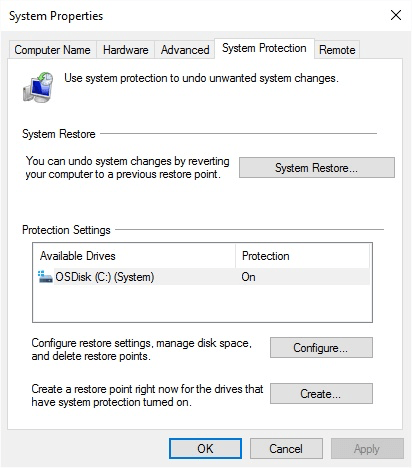
  2. Figure 1. The System Protection tab of the System Properties dialog box.

  3. Click the Configure button. Windows displays the System Protection dialog box. (See Figure 2.)
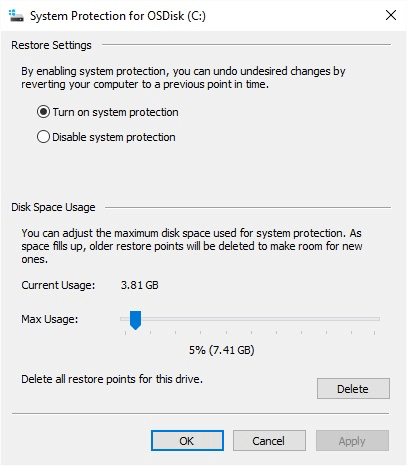
  4. Figure 2. The System Protection dialog box.

  5. Click the Disable System Protection radio button.
  6. Click OK to close the dialog box.

Here are the steps to follow if you are using Windows 8:

  1. Display the Charms bar at the right side of your screen. (Do this by swiping right-to-left or moving the mouse to the very upper-right or lower-right corners of the screen. You can also accomplish this step by pressing Win+C.)
  2. Click Settings. Windows displays the Settings bar at the right side of the screen.
  3. Click PC Info. Windows displays the System dialog box.
  4. At the left side of the screen click the System Protection link. Windows displays the System Protection tab of the System Properties dialog box.
  5. Click the Configure button. Windows displays the System Protection dialog box.
  6. Click the Disable System Protection radio button.
  7. Click OK as many times as necessary to close all the open dialog boxes.

If you are using Windows 7 the steps are necessarily different:

  1. Click on the Start button, then right-click Computer. Windows displays a Context menu.
  2. Choose the Properties option from the Context menu. Windows displays a window containing information about your system.
  3. At the left side of the screen click the System Protection link. Windows displays the System Protection tab of the System Properties dialog box.
  4. Click the Configure button. Windows displays the System Protection dialog box.
  5. Click the Disable System Protection radio button.
  6. Click OK as many times as necessary to close all the open dialog boxes.

 This tip (13255) applies to Windows 7, 8, and 10.

Author Bio

Barry Dysert

Barry has been a computer professional for over 35 years, working in different positions such as technical team leader, project manager, and software developer. He is currently a software engineer with an emphasis on developing custom applications under Microsoft Windows. When not working with Windows or writing Tips, Barry is an amateur writer. His first non-fiction book is titled "A Chronological Commentary of Revelation." ...

MORE FROM BARRY

Changing the Size of Icons Used by Windows

Microsoft Windows can be highly personalized to suit your needs. This personalization includes the ability to change the ...

Discover More

Using Reliability Monitor

Reliability Monitor provides some measure of how stable your system is. It does this by noting, over time, various types ...

Discover More

Understanding the Command Line For Loop

A niche command that sometimes comes in handy is the FOR loop. It has several forms and therefore can serve several ...

Discover More
More WindowsTips

Moving Your Page File

It's quite possible to move your system's page file to a different disk. This tip provides the steps you should follow to ...

Discover More

Understanding File System Formats

When you format a disk drive, you have the option to specify what file system should be used on that drive. There are ...

Discover More

How to Encrypt a File or Folder via NTFS

Windows 10 provides two ways to password protect files and folders. One way is to use the Zip utility, as discussed in a ...

Discover More
Comments

If you would like to add an image to your comment (not an avatar, but an image to help in making the point of your comment), include the characters [{fig}] (all 7 characters, in the sequence shown) in your comment text. You’ll be prompted to upload your image when you submit the comment. Maximum image size is 6Mpixels. Images larger than 600px wide or 1000px tall will be reduced. Up to three images may be included in a comment. All images are subject to review. Commenting privileges may be curtailed if inappropriate images are posted.

What is 6 + 5?

2021-01-11 06:22:30

Alan Fitzsimmons

Hi, I am having problems with setting system restore points! and keep getting an error message (see Figure 1 below) , I have run sfc /scannow as admin in cmd, but it reports no problems found - I am tearing my hair out (not much left!) over this, and suspect it may have happened after the win 2004 update? Any help you can give me would be appreciated ( I have tried EVERY suggestion online) and keep getting the same error message??!!
In desparation....Alan

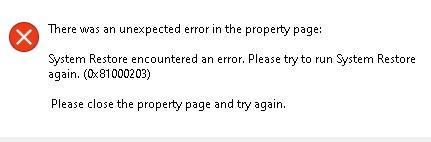
Figure 1. error message


2018-02-05 09:57:40

Henry Noble

Watch out for some odd behavior in Windows 10. When a system upgrade is installed that would make existing restore points invalid, Windows does not merely remove the old restore points, it also likes to turn off System Restore. If you want System Restore turned off, per Barry's tip, no problem. However, if you rely on System Restore, then check frequently to ensure it remains enabled.


Newest Tips