Changing the Hidden Attribute for a File
When you create a file in Windows, that file has certain attributes that are associated with it. Sometimes these attributes seem obvious—things like file size and file name come to mind. Other times the attributes are less obvious and more esoteric. Once such attribute controls whether the file is displayed, by default, in Explorer windows. It is called, appropriately enough, the Hidden attribute.
To change the hidden attribute, follow these steps:
- Display an Explorer window. (The easiest way is to press Win+E.)
- Navigate until you see the file you want to affect.
- Right-click on the file and choose Properties from the resulting Context menu. Windows displays the Properties dialog box; the General tab should be visible. (See Figure 1.)
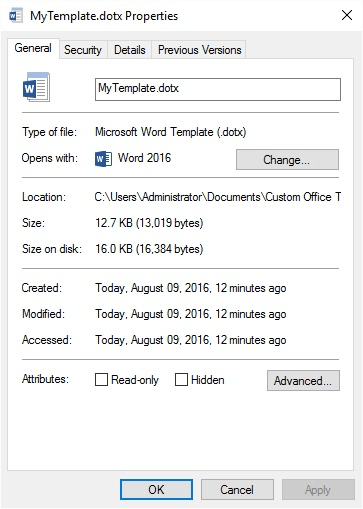
Figure 1. The Properties dialog box for a file.
- Use the Hidden checkbox (at the bottom of the dialog box) to specify whether the file should be hidden or not.
- Click OK.
When a file is hidden, it is not normally visible in the Explorer window. If you want to have hidden files included in what you see, follow these steps if you are using Windows 7 or Windows 10:
- Display the Control Panel by typing "Control Panel" (without the quotes) in the search box to the left of the task bar and press Enter if you are using Windows 10. If you are using Windows 7 click the Start menu and then click Control Panel.
- Click the Appearance and Personalization link.
- Click the Show Hidden Files and Folders link (under the File Explorer section). Windows displays the File Explorer Options dialog box. (See Figure 2.)
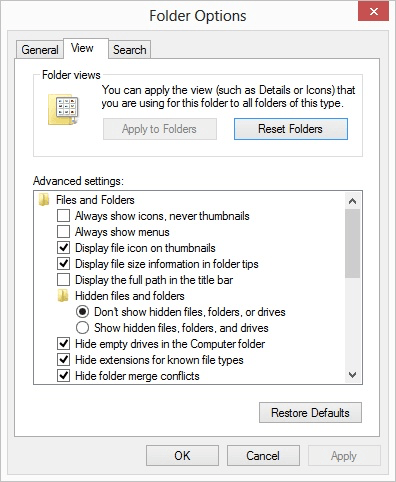
Figure 2. The File Explorer Options dialog box.
- Select the Show Hidden Files, Folders, and Drives radio button.
- Click OK.
With this setting made, all hidden files are displayed in all Explorer windows. If you are using Windows 10 you can also follow these steps:
- Press Win+E to display an Explorer window.
- At the top of the window, click the View tab.
- In the Show/Hide group (near the right side of the ribbon), make sure the Hidden Items check box is selected.

 This tip (13078) applies to Windows 7 and 10.
Author Bio
Allen Wyatt
With more than 50 non-fiction books and numerous magazine articles to his credit, Allen Wyatt is an internationally recognized author. He is president of Sharon Parq Associates, a computer and publishing services company. Learn more about Allen...
Updating Automatic Links
Normally, Word updates links within your document when you first open the document. If you don't want Word to do this, ...
Discover More
Spell-Checking in a Protected Worksheet
When you protect a worksheet, you can't use some tools, including the spell-checker. If you want to use it, you must ...
Discover More
Jumping Around Folders
When you open a workbook in Excel, the Open dialog box always starts within the folder in which you were last working. ...
Discover More
Pin Items to File Explorer's Quick Access View
You can improve your efficiency at navigating the file system by using the Quick Access view. This tip shows you how to ...
Discover More
Ways to Combine Two (or More) Text Files
There have probably been times when you've wanted to combine two or more text files into one. Windows provides a few ...
Discover More
Making a File Read-Only
If you have an important file that you want to be sure doesn't get accidentally edited, you can set it to read-only. This ...
Discover More
Comments