Hiding the Taskbar when It is Not in Use
The Taskbar is an important part of the Windows interface. It appears at the bottom of the screen and includes the Start menu button, links to frequently used programs, Taskbar buttons for currently running programs, and a Notification area that includes lots of configuration icons.
Even though the Taskbar is important, you may want to hide it so that it doesn't detract from whatever you are working on at the time. Hiding it also allows you to "reclaim" more of the screen for the use of your programs. The way you control whether the Taskbar is displayed or not varies depending on your version of windows.
If you are using Windows 7, follow these steps:
- Right click somewhere within a blank area of the Taskbar. (Don't right-click one of the icons on the Taskbar; right-click an area that contains no icons.) Windows displays a Context menu.
- Choose Properties from the Context menu. Windows displays the Taskbar tab of the Taskbar and Start Menu Properties dialog box. (See Figure 1.)
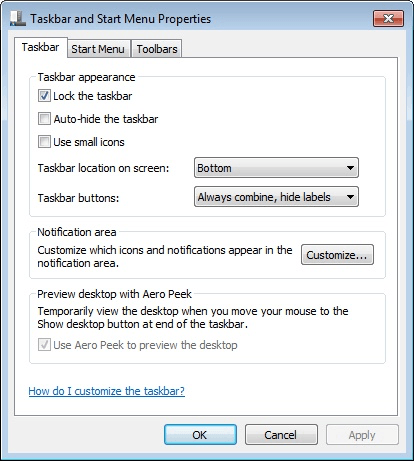
Figure 1. The Taskbar tab of the Taskbar and Start Menu Properties dialog box.
- Select the Auto-Hide the Taskbar check box.
- Click on OK.
Windows 10 users should, instead, follow these steps:
- Right click somewhere within a blank area of the Taskbar. (Don't right-click one of the icons on the Taskbar; right-click an area that contains no icons.) Windows displays a Context menu.
- Choose Taskbar Settings from the Context menu. Windows displays the Taskbar section of the Settings dialog box. (See Figure 2.)
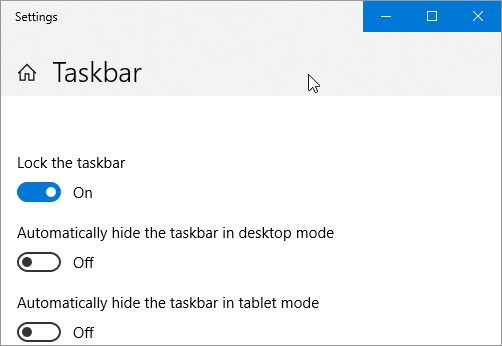
Figure 2. The Taskbar section of the Settings dialog box.
- If you are using Windows 10 on a desktop computer, select the Automatically Hide the Taskbar in Desktop Mode option. If you are using Windows 10 on a tablet, select the Automatically Hide the Taskbar in Tablet Mode option.
- Close the Settings dialog box.
The Taskbar should now be hidden. If you want to display it again, simply move the mouse pointer to the bottom of the screen where it would normally appear, and it should pop into view.

 This tip (10801) applies to Windows 7 and 10.
Author Bio
Allen Wyatt
With more than 50 non-fiction books and numerous magazine articles to his credit, Allen Wyatt is an internationally recognized author. He is president of Sharon Parq Associates, a computer and publishing services company. Learn more about Allen...
Creating a Drawing Object
Word documents can contain more than just words. They can also contain drawing objects such as lines and simple shapes. ...
Discover More
Creating New Windows
If you need to look at different parts of the same worksheet at the same time, the answer is to create windows for your ...
Discover More
Changing Lots of Title Properties
Word maintains a collection of descriptive properties for each document you create. One of these properties is the Title ...
Discover More
Creating a Flip 3D Taskbar Shortcut
It is easy to invoke Flip 3D using the keyboard. If you are person who likes to use the mouse, you might want to create a ...
Discover More
Adding the Day of the Week to the Taskbar Clock
Sometimes it is helpful to know the day of the week. How do you get the taskbar clock to show the day of the week?
Discover More
Displaying the Volume Icon in the Taskbar
Having access to the volume slider in the Taskbar is handy. Learn how to display or hide the volume icon in the Taskbar.
Discover More
Comments