Creating Additional Clocks
Written by Allen Wyatt (last updated September 11, 2017)
Your computer keeps track of the current time and uses that time for a lot of different purposes. For instance, it uses the time to mark when files are updated or when different events occur on the computer. Windows makes this time available to you as a clock, visible at the right side of the Taskbar (if you are viewing the desktop).
Interestingly enough, you can define additional clocks in Windows. Why would you want to do this? In case you need to keep track of what time it is somewhere else in the world. The time displayed in this additional clock doesn't affect anything that Windows does, it is simply for your edification and convenience.
You can create an additional clock by following these steps if you are using Windows 7 or Windows 8:
- Click once on the date and time at the right side of the Taskbar. Windows displays a calendar and clock.
- Click the Change Date and Time Settings link. Windows displays the Date and Time dialog box.
- Make sure the Additional Clocks tab is displayed. (See Figure 1.)
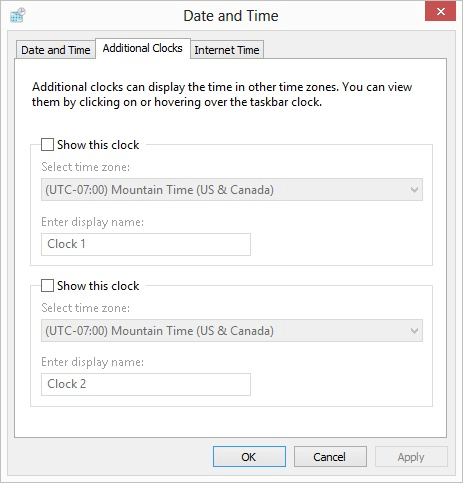
Figure 1. The Additional Clocks tab of the Date and Time dialog box.
- Click either Show this Clock check box (there are two available) to activate the settings area under the corresponding check box.
- Use the Select Time Zone drop-down list to choose which time zone is appropriate for the new clock.
- Change the display name for the new clock, as desired.
- Click OK to close the Date and Time Settings dialog box.
If you are using Windows 10, the steps are a bit different:
- Right-click on the date and time at the right side of the Taskbar. Windows displays a Context menu.
- Choose the Adjust Date/Time option. Windows displays the settings for your clock.
- Scroll down to the bottom of the settings and click the Add Clocks for Different Time Zones option. Windows displays the Additional Clocks tab of the Date and Time dialog box.
- Click either Show this Clock check box (there are two available) to activate the settings area under the corresponding check box.
- Use the Select Time Zone drop-down list to choose which time zone is appropriate for the new clock.
- Change the display name for the new clock, as desired.
- Click OK to close the Date and Time Settings dialog box.
At this point it may appear that nothing has happened in Windows—the current date and time still appear in the normal place on the Taskbar. However, if you click once on the date and time on the Taskbar, you'll notice that your additional clock is displayed to the right of your primary system clock.
Author Bio
Allen Wyatt
With more than 50 non-fiction books and numerous magazine articles to his credit, Allen Wyatt is an internationally recognized author. He is president of Sharon Parq Associates, a computer and publishing services company. Learn more about Allen...
Automatically Saving Changes to Defaults
Have you ever started a new document only to find that the settings in Word seem to be different than what you expected? ...
Discover More
Deriving a Secant and Cosecant
Two rather common trigonometric functions are secants and cosecants. Excel doesn't provide functions to calculate these, ...
Discover More
Turning Off Automatic Capitalization
Type some information into a worksheet, and you may notice that Excel automatically capitalizes some of your information. ...
Discover More
Deleting Additional Clocks
Windows can display up to three separate clocks so you can keep track of what time it is in various time zones. If you ...
Discover More
Specifying a Time Server for Windows to Use
Windows can utilize resources on the Internet to make sure that your computer's internal clock is working at the right ...
Discover More
Hiding the System Date and Time
Windows normally displays the current date and time at the rightmost side of the Taskbar. You can hide the date and time, ...
Discover More
Comments