Deleting a Power Management Plan

Written by Allen Wyatt (last updated February 18, 2019)

1

Most modern computers allow Windows to control both the computer itself (including the hard drive) and the display monitor. These components can be set to automatically "turn off" after varying amounts of inactivity. Windows even allows you to create your own custom power management plans. At some point, however, you may want to get rid of a custom plan that you no longer need. Follow these steps:
  1. Display the Control Panel.
  2. At the left side of the screen click the Hardware and Sound heading. Windows displays the Hardware and Sound screen.
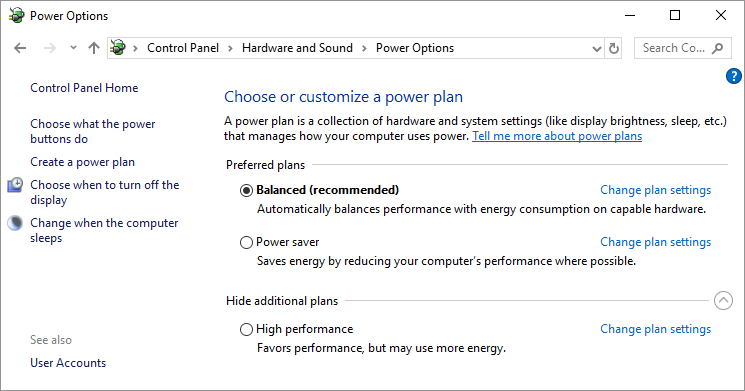
  3. Under the category of Power Options, click the Change Power-Saving Settings option. Windows displays the Power Options screen. (See Figure 1.)
  4. Figure 1. The Power Options screen.

  5. Make sure that the power management plan you want to delete is not selected; pick a different power management plan, if necessary.
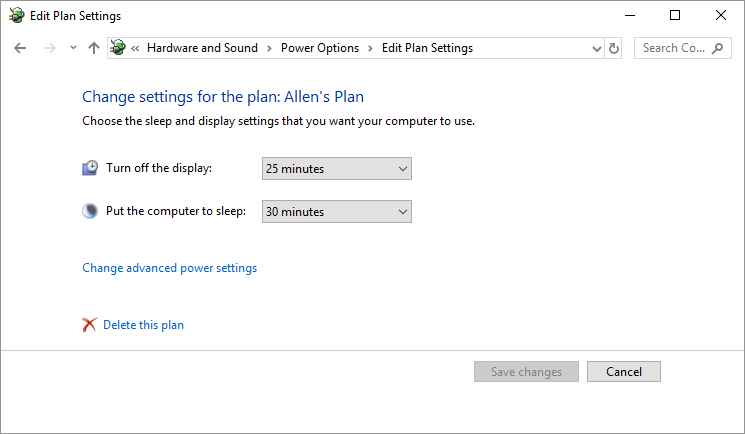
  6. At the right of the name of the power management plan you want to delete, click Change Plan Settings. Windows displays the Edit Plan Settings screen. (See Figure 2.)
  7. Figure 2. The Edit Plan Settings screen.

  8. Click Delete This Plan. (This option is only visible if you completed step 4.) Windows asks if you are sure you want to delete the plan.
  9. Click OK. Windows again displays the Power Options screen you saw in step 3. The power management plan you deleted is no longer listed in the screen.

Remember that you can only delete custom power management plans—those you've added to Windows. You cannot delete the built-in power management plans (Balanced, High Performance, Power Saver, or any created by your computer manufacturer).

 This tip (10718) applies to Windows 7, 8, and 10.

Author Bio

Allen Wyatt

With more than 50 non-fiction books and numerous magazine articles to his credit, Allen Wyatt is an internationally recognized author. He is president of Sharon Parq Associates, a computer and publishing services company. ...

MORE FROM ALLEN

Adding a ScreenTip

Need to add a ScreenTip to your document? It's easy to do, provided you are adding a hyperlink.

Discover More

E-mailing from a Mail Merge

Word has a great mail merge capability. Inherent in this capability is the option to send your merged documents via ...

Discover More

Blank Page Printing after Table at End of Document

When you print, do you get an extra blank page printed at the end of the document? It could be because of the final ...

Discover More
More WindowsTips

Disabling a Laptop's Touchpad

If you never use your laptop's touchpad, you may want to disable it so that you don't accidentally effect unintentional ...

Discover More

Estimating Battery Life

The battery in your laptop provides the power you need to even use the system. As you use your laptop, you may notice ...

Discover More

Changing the MAC Address for a Network Adapter

MAC addresses are used to uniquely identify devices on your network, such as a network adapter. Here's how you can modify ...

Discover More
Comments

If you would like to add an image to your comment (not an avatar, but an image to help in making the point of your comment), include the characters [{fig}] (all 7 characters, in the sequence shown) in your comment text. You’ll be prompted to upload your image when you submit the comment. Maximum image size is 6Mpixels. Images larger than 600px wide or 1000px tall will be reduced. Up to three images may be included in a comment. All images are subject to review. Commenting privileges may be curtailed if inappropriate images are posted.

What is 6 - 6?

2019-02-18 22:45:21

John Simkins

Allen:
Your details for the topic "Deleting a Power Management Plan" (10718) are too different from what I am seeing here on my PC, running Win7 Home Premium SP1 64Kb, to follow the steps. Does this particular topic not apply to my Win7? Thanks.


Newest Tips