Every device that has the ability to connect to an Ethernet network comes preconfigured with what is called a MAC address. (MAC is an acronym for Media Access Control.) This address is unique (no two devices should have the same MAC address) and is used to identify and differentiate one device from another on the network.
While it is unlikely that two devices on the same network will ever have the same MAC address, you may have a need to modify the MAC address used by a device. For instance, you may have a secure router at your company that requires MAC addresses for connected devices to be within a specific range of addresses.
Most devices allow you to change the MAC address, but some do not. You can find out if a network adapter allows you to change the address (and actually make changes) by using the Device Manager. To display the Device Manager in a Windows 7 system, follow these steps:
In Windows 8 you can display the Device Manager much simpler: Press Win+X to display a menu at the bottom-left corner of the screen, then choose Device Manager from that menu. (See Figure 1.)
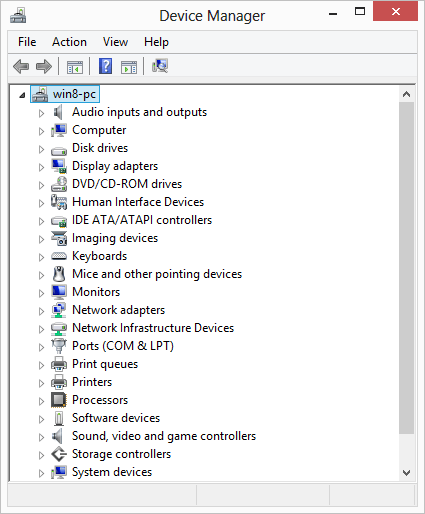
Figure 1. The Device Manager.
At the left side of the Device Manager you can see the categories of devices and drivers that make up your system. You need to expand the Network Adapters category. (Click the small triangle that appears to the left of the category name.) The category should show all the network adapters you have installed. You may very well have more than one network adapter in your system. For instance, you might have both a WiFi card and a "cabled" Ethernet card, both of which may have drivers.
Right-click the name of the network adapter whose MAC address you want to change. In the resulting Context menu, choose Properties. Windows displays the Properties dialog box for the adapter. You want to do your work on the Advanced tab of the dialog box. (See Figure 2.)
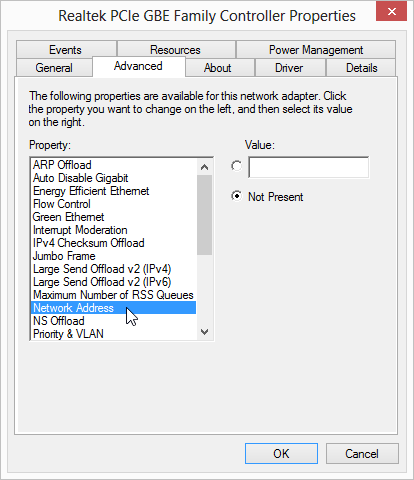
Figure 2. The Advanced tab of the Properties dialog box for a network adapter.
In the list of properties, choose Network Address. If that option is not visible, you may need to scroll down to see it. (The properties should be listed in alphabetic order) If you still cannot locate it, then it is probable that the network adapter doesn't allow you to modify the MAC address.
Once you click the Network Address option, you'll notice that a Value box appears to the right of the list of properties. You can enter a desired MAC address in this Value box. (Make sure you enter just the MAC address digits; you don't need to enter any dashes, periods, colons, spaces, or separator characters.) When done, click OK and then close the adapter's Properties dialog box and the Device Manager. Depending on the characteristics of the adapter, you may be prompted to restart your system or informed that your change won't take effect until you restart your system.
![]()
![]()
![]() This tip (13163) applies to Windows 7, 8, and 10.
This tip (13163) applies to Windows 7, 8, and 10.
Although it's rare for RAM to go bad, it does happen. This tip tells you how to check for faulty RAM by using the Windows ...
Discover MoreYou can easily change which power scheme is active by using the SetActive switch. This tip shows you how.
Discover MoreWindows 11 has different processor requirements than Windows 10. How do you know if your processor will work with Windows 11?
Discover MoreThere are currently no comments for this tip. (Be the first to leave your comment—just use the simple form above!)
Copyright © 2026 Sharon Parq Associates, Inc.
Comments