Understanding the Guest Account

Written by Allen Wyatt (last updated December 31, 2018)

Windows comes with the ability to establish a Guest user account. This account is designed to be used by temporary users who may have a need to use the computer. Normally, the Guest account is used on computers that are placed in publically accessible areas, such as computer labs or conference rooms.

In general, if your computer is not in a public area, you should make sure that the Guest account is disabled so that it cannot be used for log-in. The reason is simple—the Guest account can present a "doorway" that hackers can use to access your system. If you disable the Guest account, then you close that particular door and increase the security of your computer.

You can find out if the Guest account is enabled on your system by following these steps if you are using Windows 10:

  1. Display the Control Panel.
  2. At the right side of the screen, click the User Accounts heading.
  3. Click the User Accounts heading.
  4. Click the Manage Another Account link. Windows displays the Manage Accounts screen. (See Figure 1.)
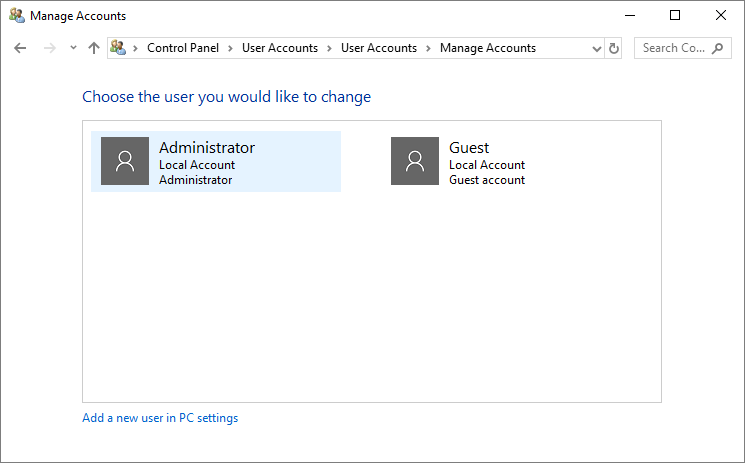
  5. Figure 1. The Manage Accounts screen.

  6. Look through the accounts in the screen until you see the Guest account.

Note that the Guest account will only show on the screen if it is enabled. If you don't see the Guest account in the Manage Accounts screen, then the account has been disabled. You cannot delete the Guest account; all you can do is disable it.

To enable the Guest account on your Windows 10 system, follow these steps:

  1. Type "lusrmgr.msc" (without the quotes) in the Search box and press Enter. Windows opens Local Users and Groups. (You may have to click on the lusrmgr link in the taskbar to open up the screen).
  2. On the left side under Local Users and Groups (Local), click Users. (See Figure 2.)
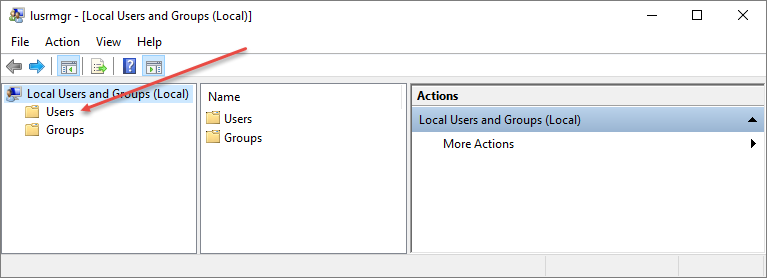
  3. Figure 2. The Local Users and Groups (Local) screen.

  4. Windows displays all the user accounts on your Windows 10 system in the middle pane. (Note that after clicking on Users in the left pane in Step 2, you may see Users and Groups in the middle pane. If that is the case, double-click on Users in the middle pane to display all the user accounts.) (See Figure 3.)
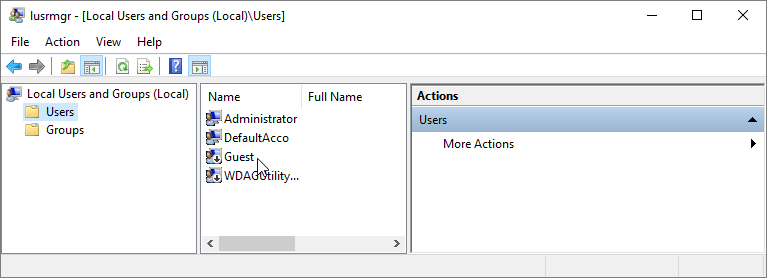
  5. Figure 3. The Local Users and Groups (Local\Users) screen.

  6. Right-click the Guest account and then click Properties from the Context menu or double-click on Guest to open its properties.
  7. To enable the Guest account, uncheck the Account is Disabled option found under the General tab. (See Figure 4.)
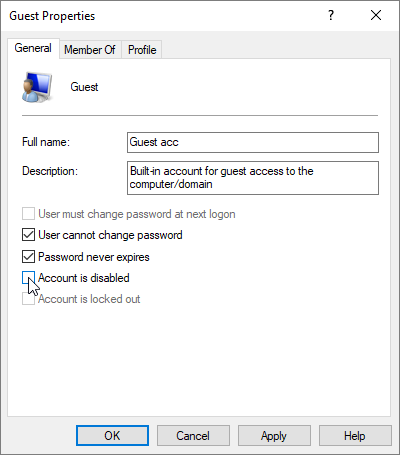
  8. Figure 4. The Guest Properties dialog box.

  9. Click the Apply button to enable the Guest account.
  10. Click OK to close the dialog box.

If you are using Windows 8, follow these steps instead to find out if the Guest account is enabled on your system:

  1. Display the Control Panel.
  2. At the right side of the screen, click the User Accounts and Family Safety heading.
  3. Click the User Accounts heading.
  4. Click the Manage Another Account link. Windows displays the Manage Accounts screen.
  5. Look through the accounts in the screen until you see the Guest account.

If you are using Windows 7, follow these steps instead to find out if the Guest account is enabled on your system:

  1. Click Start and then click Control Panel. Windows 7 displays the Control Panel.
  2. At the right side of the screen, under the main heading of User Accounts and Family Safety, click Add or Remove User Accounts. Windows 7 displays the Manage Accounts screen.
  3. Look through the accounts in the screen until you see the Guest account.

Note that the Guest account, as shown in the Manage Accounts screen, indicates whether the account is turned on or off. You cannot delete the Guest account; all you can do is make sure it is turned off. When you click the Guest account, you are given the option to turn it on or off; you should simply make sure it is off unless you have a compelling reason to have it turned on.

 This tip (10715) applies to Windows 7, 8, and 10.

Author Bio

Allen Wyatt

With more than 50 non-fiction books and numerous magazine articles to his credit, Allen Wyatt is an internationally recognized author. He is president of Sharon Parq Associates, a computer and publishing services company. ...

MORE FROM ALLEN

Understanding Hard and Soft Returns

Did you know that there are different types of returns in Word? Here's the inside scoop.

Discover More

Inserting the Total Number of Characters in Your Document

One of the things that Word keeps track of regarding your document is the number of characters it contains. Using the ...

Discover More

Limiting the Scope of the Undo Command

As you make edits in Excel, the program remembers your actions so that you can later undo them. If you have multiple ...

Discover More
More WindowsTips

Using the Sign Out Feature

To switch users without going through the lengthy reboot process, just sign out. It's not too obvious how to do this, but ...

Discover More

Changing an Account's Picture

You may want to customize your account so that it uses a picture of your own choosing. This tip tells you how to change ...

Discover More

Getting Rid of Your Windows 7 Password

When you get rid of your Windows login password, you accomplish two things. First, you make it easier to log onto your ...

Discover More
Comments

If you would like to add an image to your comment (not an avatar, but an image to help in making the point of your comment), include the characters [{fig}] (all 7 characters, in the sequence shown) in your comment text. You’ll be prompted to upload your image when you submit the comment. Maximum image size is 6Mpixels. Images larger than 600px wide or 1000px tall will be reduced. Up to three images may be included in a comment. All images are subject to review. Commenting privileges may be curtailed if inappropriate images are posted.

What is one less than 9?

There are currently no comments for this tip. (Be the first to leave your comment—just use the simple form above!)


Newest Tips